My baby recently turned 20! Kind of scary and yet also awesome at the same time to realize that I am no longer the parent of teenage children. I have made the exact same Chocolate Cake for him for the past 19 years. To say that he is a child that does not handle change well is putting it mildly. For the first 3 years of his life he cried every year on his birthday when we sang happy birthday to him. The more he cried, the louder his older brother and sister would sing. Whether it was to drown out his crying or antagonize him even further, I am not quite sure, but I have my suspicions!
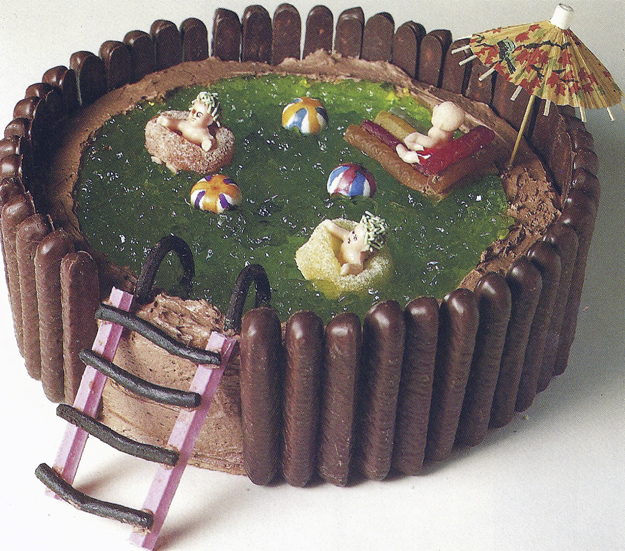
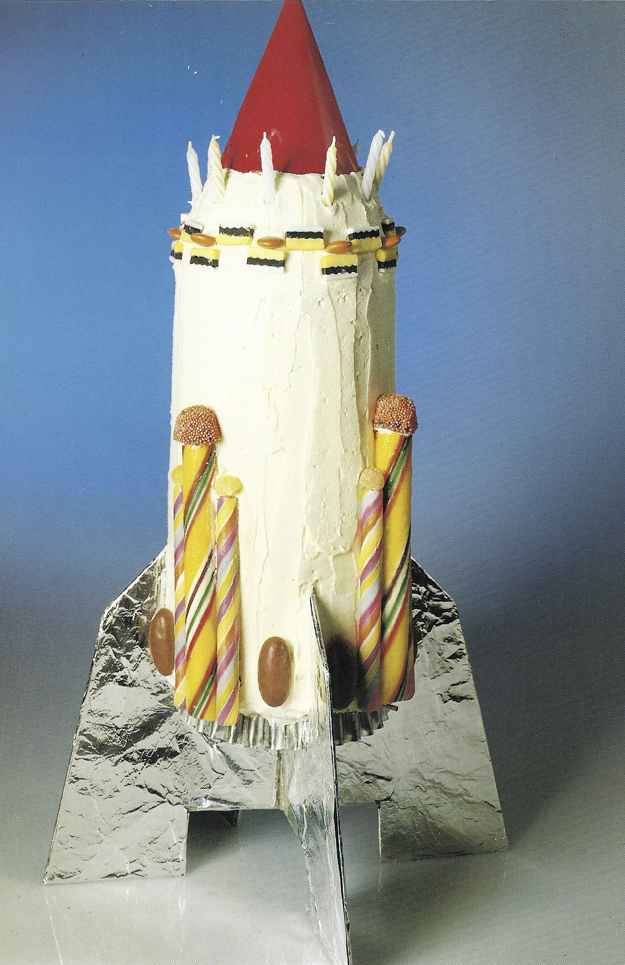
Thankfully, for the next several years, the crying stopped but he would still get sad on his birthday. We just learned to keep things low key. Finally, on his 9th birthday he said he wanted to have a party with friends, balloons and streamers. I was thrilled and we went all out with the decorations. I even suggested that perhaps we make a special cake, maybe a train cake, or a swimming pool cake or even a rocket ship cake, like I had made for his brother and sister in past years.
Those suggestions were met with a stony stare and then he informed me that he would like his regular chocolate cake with chocolate icing please. Hey, at least he said please! So as the saying goes, “If it ain’t broke, don’t fix it.” So, I continued to make his favourite cake every year. However, as a food blogger, I have found this to be quite frustrating. I needed new material to blog about!
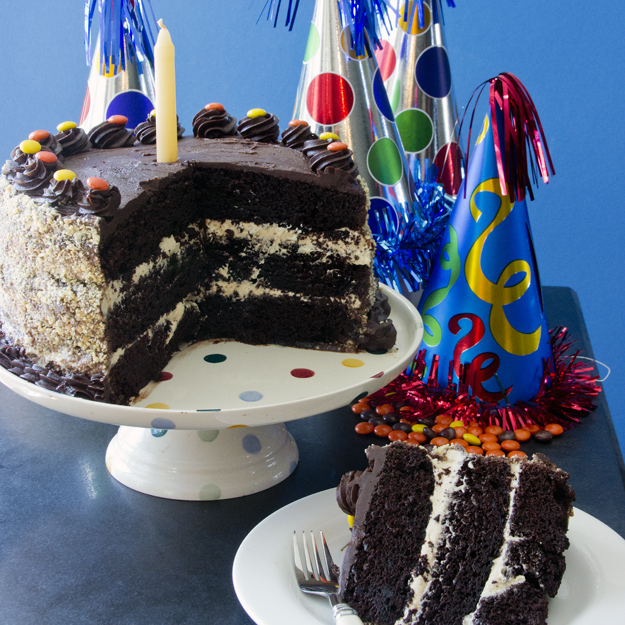
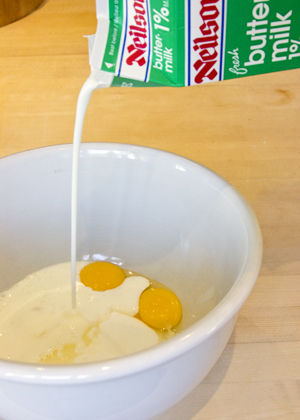
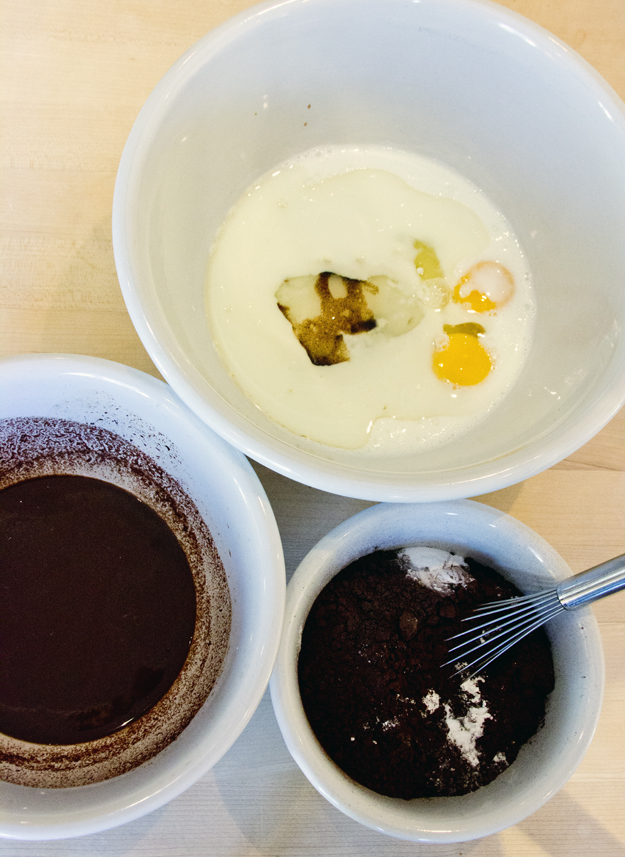
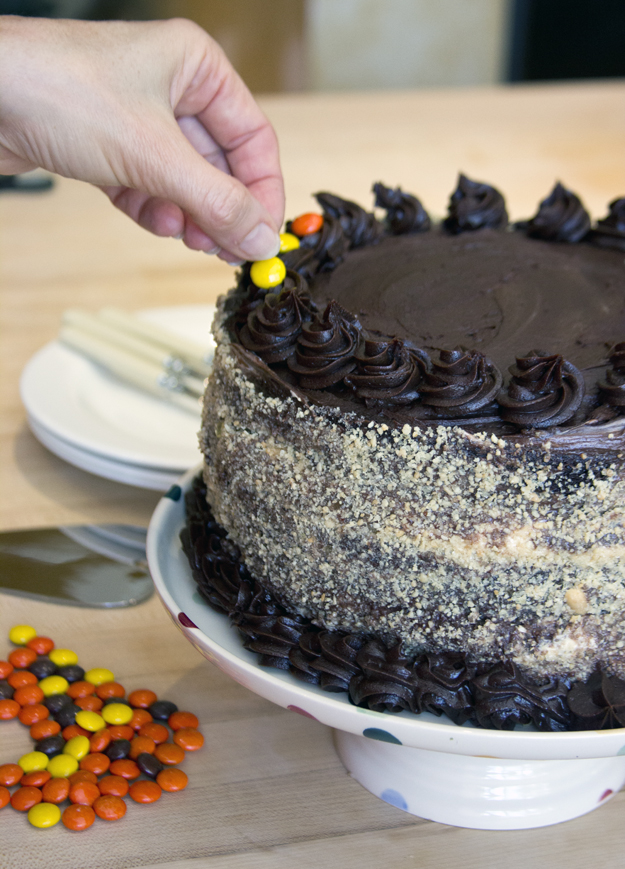
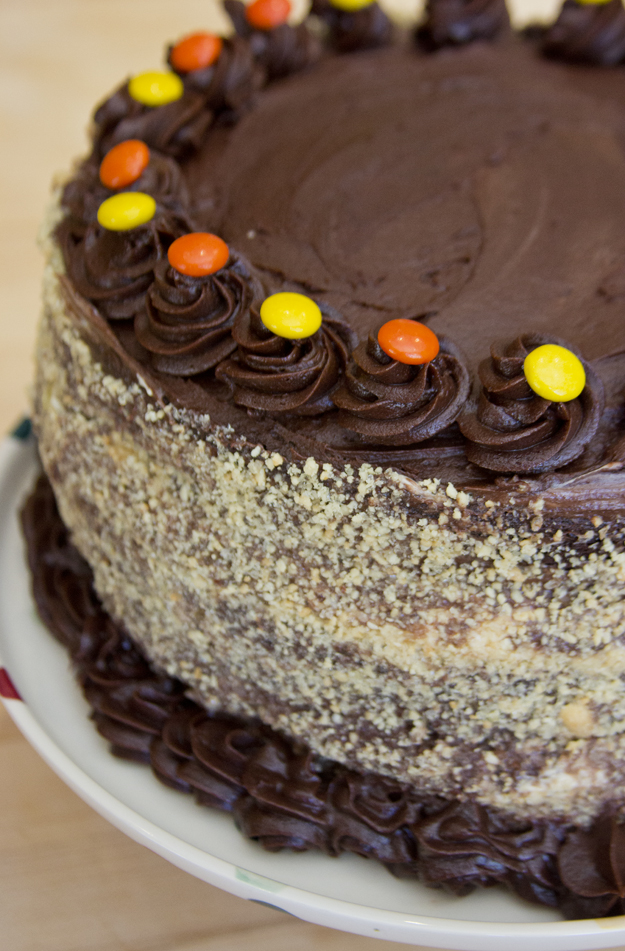
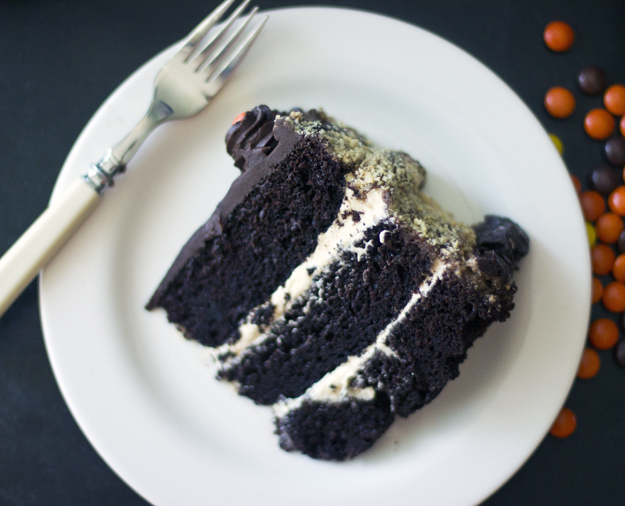
When I saw this photo of Chocolate Cake with Peanut Butter Mousse Filling on Serious Eats, I became transfixed. I could not stop thinking about it and began having serious cravings. This looked like the consummate birthday cake for my son. He loves the combo of chocolate and peanut butter. I showed him a picture of the cake and asked if this could be his birthday cake this year. He shocked me by saying, sure!I adapted the original recipe in several ways. The first thing I did was double the cake recipe. This chocolate cake recipe uses both bittersweet chocolate and unsweetened cocoa powder. Buttermilk and coffee round out the flavours to produce a fantastic moist, rich and fudgy cake. I wanted more cake in relation to the peanut butter mousse filling.The peanut butter mousse filling gets a bit of tang from cream cheese and then the whole thing is lightened with some whipped cream.
The original recipe called for a ganache frosting, but I swapped in my favourite Chocolate Coffee Buttercream instead. The slight bitterness of the coffee was a great counterpoint for the sweet cake. The final change I made was adding a dusting of peanut praline to the outside of the cake. I liked the textural crunch it added to the final bite. Without the praline I found it was just too many smooth textures in your mouth from the mousse and the buttercream.
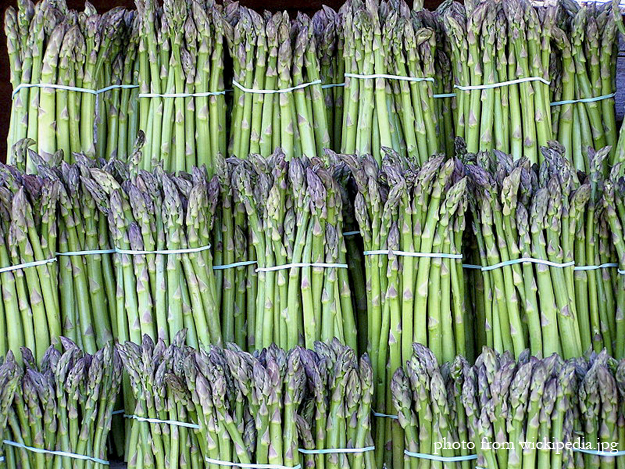
It’s entirely possible that I may be jumping the gun a bit by writing about asparagus during the end of April. Here in Ottawa we will not be seeing any local crops until mid-May at the earliest. However, given the winter that we recently crawled out of, I hope I can be forgiven for buying California asparagus at Costco last week. I could not wait any longer.
Perhaps like you, I have a love hate relationship with asparagus. I love it when I eat it, but not so much about 15 minutes later when I pee. Up until recently it was believed that everybodys urine has that pungent aroma after eating asparagus, but not everyone can smell it.
It should be noted that the effect of asparagus on urine odour has been around for several hundred years. Apparently one British men’s club is said to have put up a sign reading, “During the asparagus season, members are requested not to relieve themselves in the hat stand.” I would have hoped that men would always have the good sense to never relieve themselves in the hat stand, but perhaps that’s just asking too much of that gender.
More recent scientific studies on what I like to call “The Great Asparagus Pee Mystery” (yes folks, there are some freaky scientists out there actually studying it) have now theorized that there are really two factors at play here; the ability to produce the aroma and the ability to detect the aroma. Both are determined by genetics.
Let’s deal first with the ability to produce the aroma. Asparagus contains a sulphurous compound called mercaptan. Enzymes in your digestive system break down the mercaptan and certain by-products are released that cause the offensive odour. But, here’s where it gets interesting. Not everyone has the gene for that enzyme. If you are part of the 54% of the population whose DNA lacks the gene for this enzyme, then you will not produce smelly urine after eating asparagus.
Now, what about the ability to detect the aroma? It has been theorized that depending on your DNA, you may or may not have the olfactory receptors to detect the scent. Some of us are “super-smellers” and others are just “smell-blind” when it comes to asparagus pee.
To simplify things I have created a chart!
If you are one of those with a malfunctioning olfactory sense, I envy you. Although looking on the bright side, when I am old and my memory is failing, I will always be able to remember that I had asparagus for dinner!
A word to the wise should you happen to find yourself at the Spargelfest (Asparagus festival) in Beelitzer Germany or any of these other Asparagus Festivals, this spring. If you are a super smeller, you may want to hold your breath when you enter the bathroom stalls!
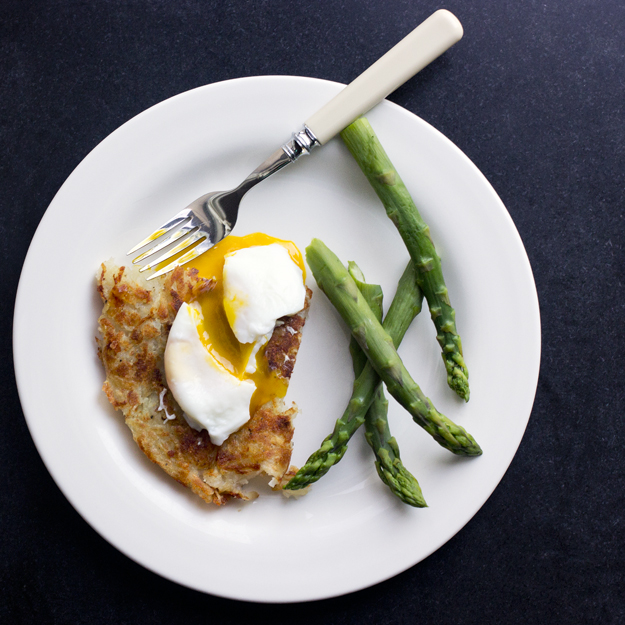
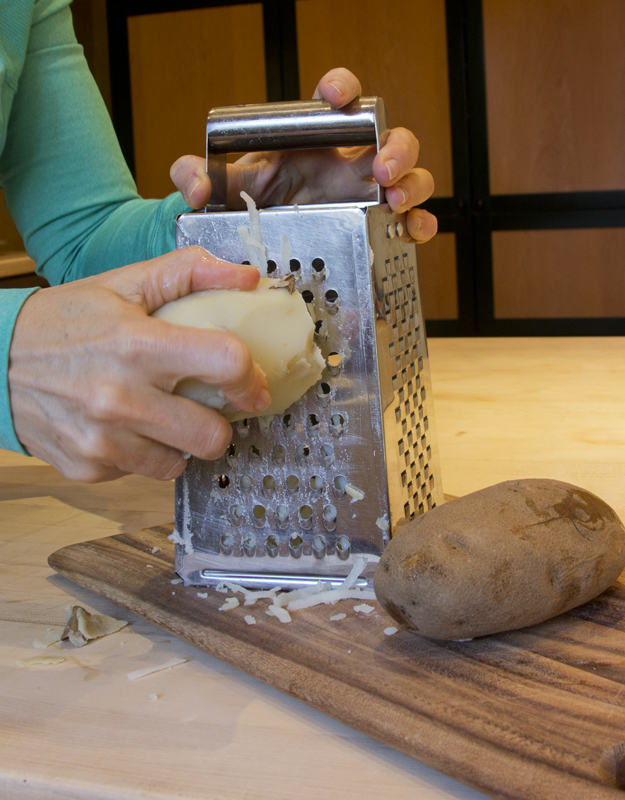
The fact that I am a stinker and a smeller does not hold me back from eating asparagus when it is in season. One of my favourite ways to enjoy it is to simply steam it and serve it with poached eggs. I love to dip the spears into the runny golden egg yolk. Last week, I served the poached eggs on top of Rösti potatoes, with the asparagus dippers on the side. A perfect spring dinner!Rösti potatoes, also known as shredded potato cake, is not the same thing as latkes. Latkes are made with shredded raw potatoes, whereas Rösti are made with shredded par-boiled potatoes. Yukon Gold or Idaho potatoes are perfect for this dish.
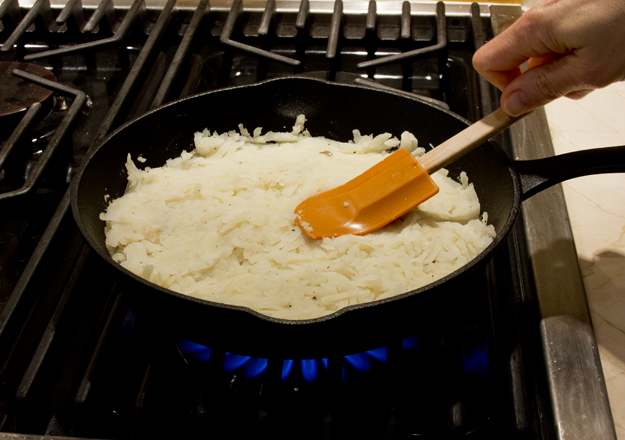
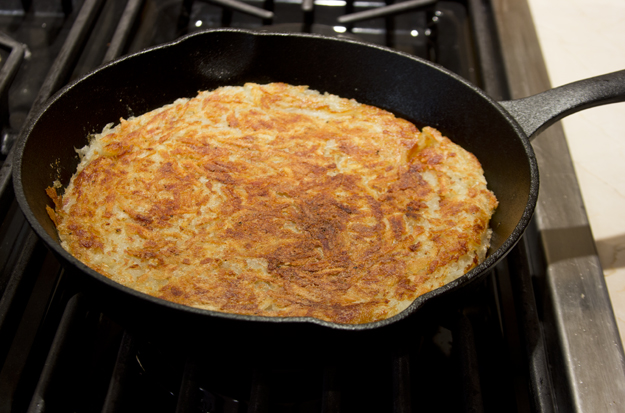
Once the potatoes are parboiled, they should be allowed to chill in the fridge for several hours, or even up to a day, before they are peeled and shredded. This is the secret to getting the a crispy golden crust on the outside of the potato cake and having a fluffy and tender inside.The shredded potato is mixed with some salt and pepper and gets pressed into a hot cast iron skillet, with a little bit of both butter and vegetable oil.Patience is required here. Turn the heat down to medium low and let it get brown. This will take at least 15 minutes. When the underside is brown, flip the cake out into a large plate, browned side up. Add more oil and butter to the pan and slide the cake back into the pan, pale side down. Brown the second side.
While the Rösti potato cake is cooking, steam or boil asparagus and poach eggs. If you are at all intimidated about making poached eggs, please know that you are not alone, and there is help. Serious Eats posted a fool-proof method for poaching eggs, that is really quite genius, and actually works! Click on the link above to view the video if you are planning top poach eggs.
I had a friend in seventh grade whose long straight shiny hair I envied. It reached down to her lower back and was a beautiful shade of butterscotch. I had short, wiry, curly black hair and would have given anything for hair like hers. She seemed so exotic to me. As I spent more time at her house I came to appreciate how different our families were. She only had one sibling and her mom was quite involved in all aspects of her life. I had 5 siblings and my mom was busy just trying to keep all our names straight.
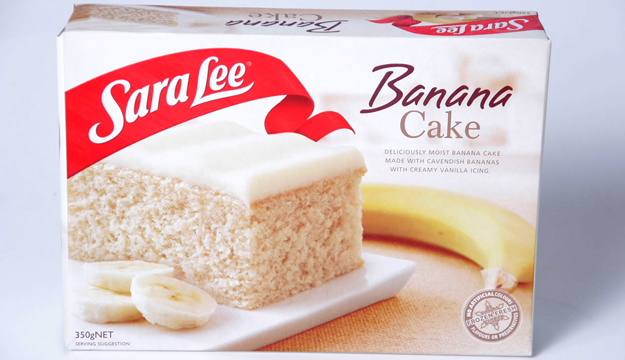
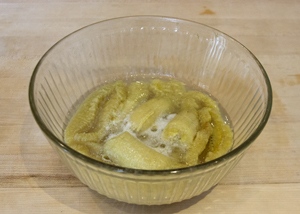
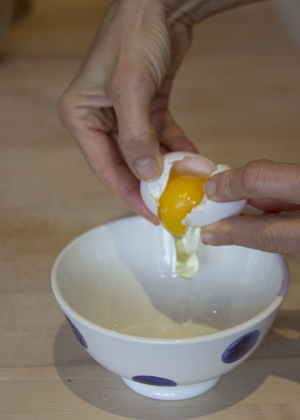
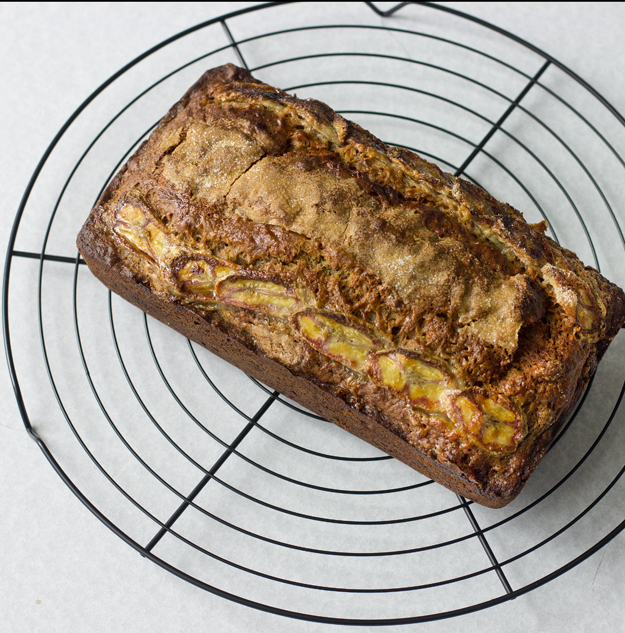
One of the strangest things about my friend’s mom was that every week she would buy a huge bunch of bananas and leave them in a pretty bowl on the kitchen table. By the end of the week, they would be ripe and almost black and she would throw the bunch away and buy a fresh one to replace it. No one in their family liked the taste of bananas, yet her mom just loved how they looked, so she continued to buy them.At the time it never occurred to me that you could make banana bread with ripe bananas. In our house, banana cake came from Sara Lee. Oh how I loved the icing on those frozen cakes!I only came to discover the joy of homemade banana bread many years later, during my University years, when I worked part-time as a Cuisinart demonstrator. I was given Noreen Gilletz’s book “The Pleasures of your Food Processor” as a gift. And there on page 208 was a banana bread recipe so perfect that it became my gold standard by which I judged all other banana breads for the next 30 years.
My mom was a student of the “more is more” school, and she revised Noreen’s recipe by using 5 or 6 bananas, instead of the 3 called for in the recipe. We dubbed her version, “Banana Brick.” It was wet and heavy.
Little did my mom know that with her addition of more bananas, she was onto something big here. She wanted to intensify the banana flavour but she just lacked the correct technique to do it without ending up with a sodden heavy mess.
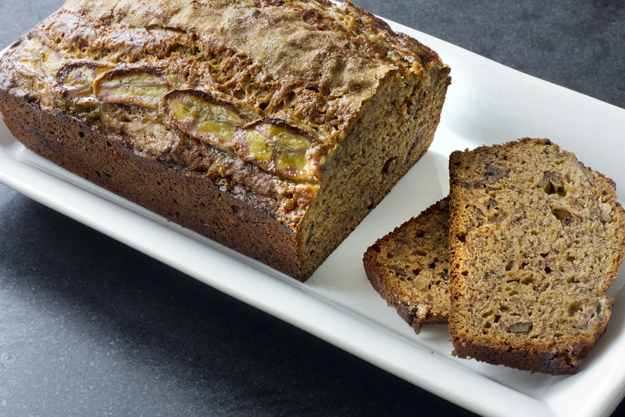
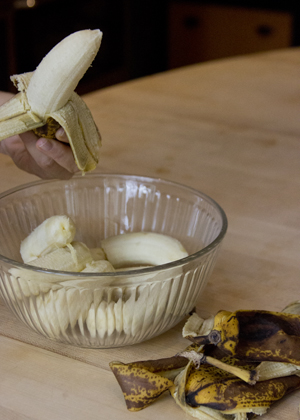
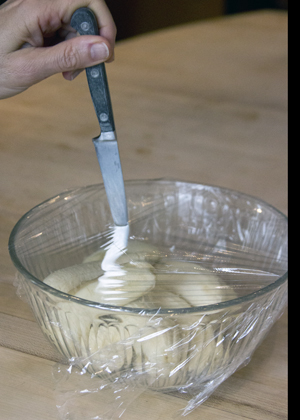
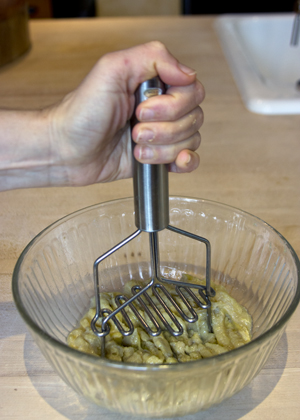
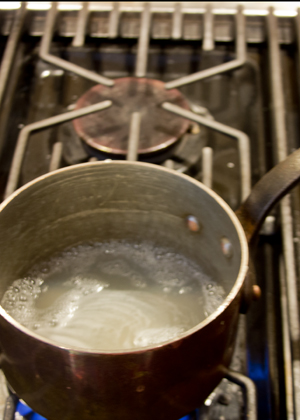
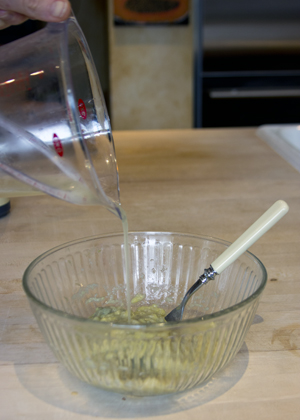
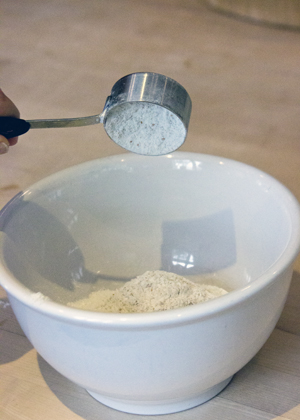
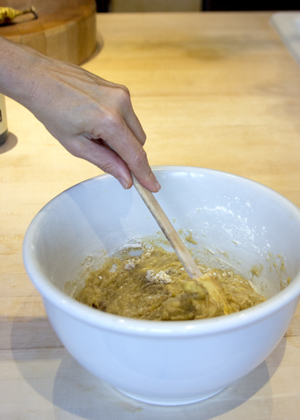
Cook’s Illustrated Magazine figured out a way to ramp up the banana flavour without introducing too much additional moisture. They started with five very ripe bananas (versus the usual three in most typical recipes) and proceeded to microwave them to release their juices. The next step was to drain all the juices that had accumulated during microwaving and simmer that liquid in a saucepan until it reduced.
This reduced liquid is then added to the batter, a sort of intensified banana essence.
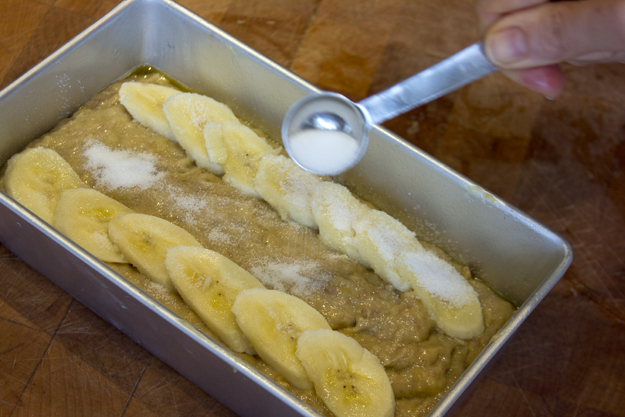
Cooks Illustrated decided to further boost the banana flavour by adding a sixth banana, sliced thin and caramelized on top of the loaf gave this banana bread an enticingly crisp, crunchy top.
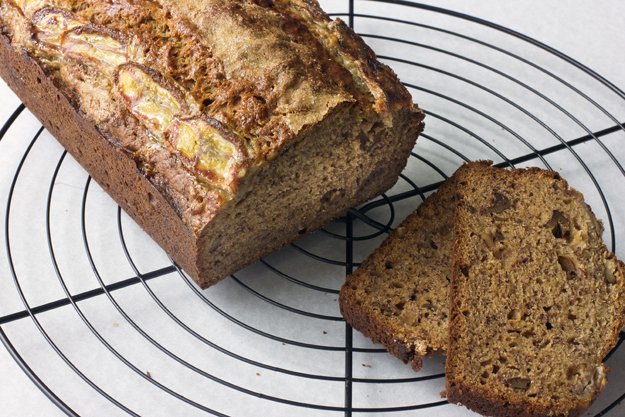
I tasted the bread warm from the oven and to be honest, I wasn’t sure I liked it better than my classic recipe from Noreen. But I went back for a second taste after it had cooled for about 6 hours and I was astounded at how different it tasted. All the buttery goodness was now front and center. It was moist, but not wet. The slices, heavy for their size, had the perfect density.
There were several layers of sweetness to this banana bread. It tasted of bananas but the sweetness was not overpowering. The addition of brown sugar to this version added a molasses undertone that helped balance the sweetness. Cook’s Illustrated called for walnuts in their recipe and not being a walnut lover, I hesitated over this addition. In the end, I added them and their slight bitterness provided just the right contrast with the sweet bananas.
The sliced bananas and granulated sugar on top of the bread caramelized and they added a crunch to the top that was such a nice surprise and contrast to the moist interior. This banana bread continued to improve over the next 3 days, much like a fruitcake. Sometimes it does pay to mess with the classics! I think even Noreen Gilletz would approve.
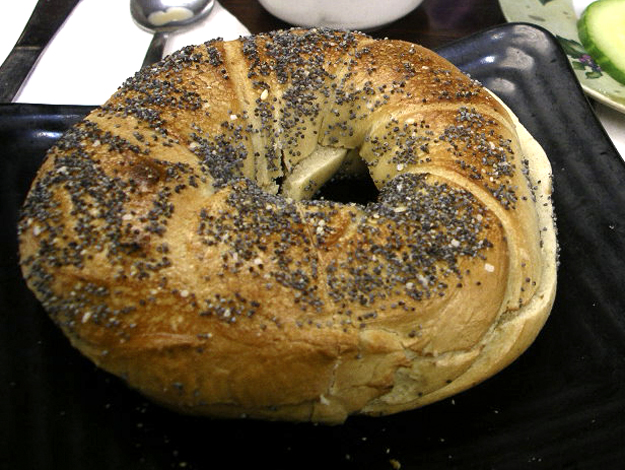
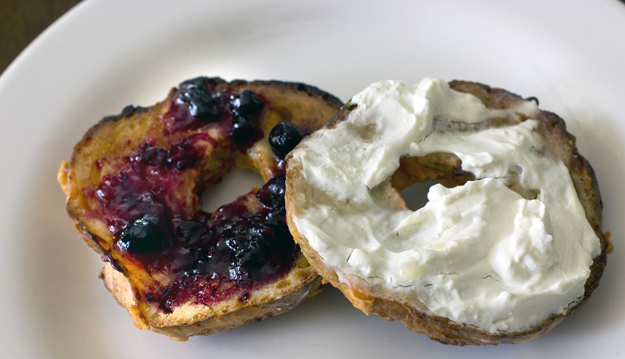
I consider myself to be something of a bagel aficionado. Partly because I have eaten my fair share (and perhaps several others fair shares as well) over my life span, and partly because I have baked hundreds of bagels myself, after learning the craft when I participated in the Bread Baker’s Apprentice Challenge.
I will not delve into the hotly contested debate of New York vs. Montreal style bagels, because really, that argument is laden with trash talking and never ends well. For those not familiar with the difference between the two styles, a little bagel primer here.
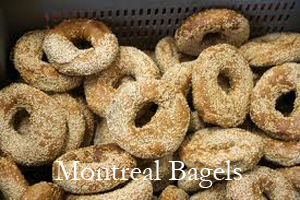
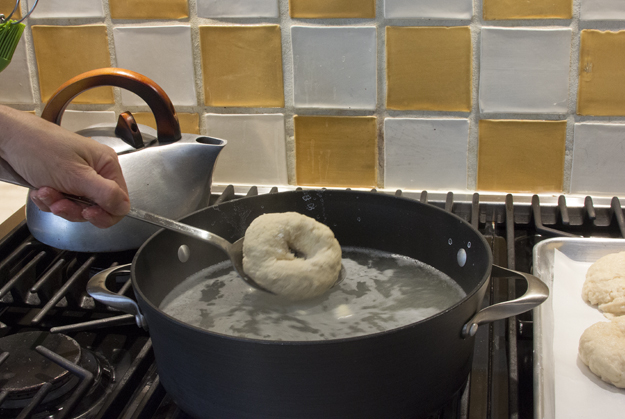
Montreal bagels are thin, a little sweet and quite chewy. They are boiled and then baked in a wood fired oven. They are really only good within the first few hours of being baked. After that, they get quite tough and leathery. New York bagels are bigger, doughier and fluffier than Montreal style bagels. They are also boiled first and then baked, but not usually in a wood fired oven.
One’s bagel preference is imprinted on them early in childhood and it’s extremely tough to shake it. Personally, I do not care for either Montreal or New York bagels. I grew up in Toronto, and for me, bagel bliss is a Bagel World Twister. Weighing in at 8 ounces, these behemoths are chewy in the center and heavily seeded with poppy to create an extreme crunch on the outside. Twisters are spiralled by hand; the dough is literally twisted before the loop is closed to form the bagel. The result is that the baked bagels tear apart in beautiful little sections. All the better to slather on salted butter.Bagel World realized that it is a hazard to your health to eat twisters on a regular basis, so they created Twister flagels (flat bagels). I do not care for them quite as much as a regular twister since the chewy middle part has all but been eliminated. Sadly, I no longer live in Toronto and here in Ottawa bagels are made in the Montreal style. Blech!
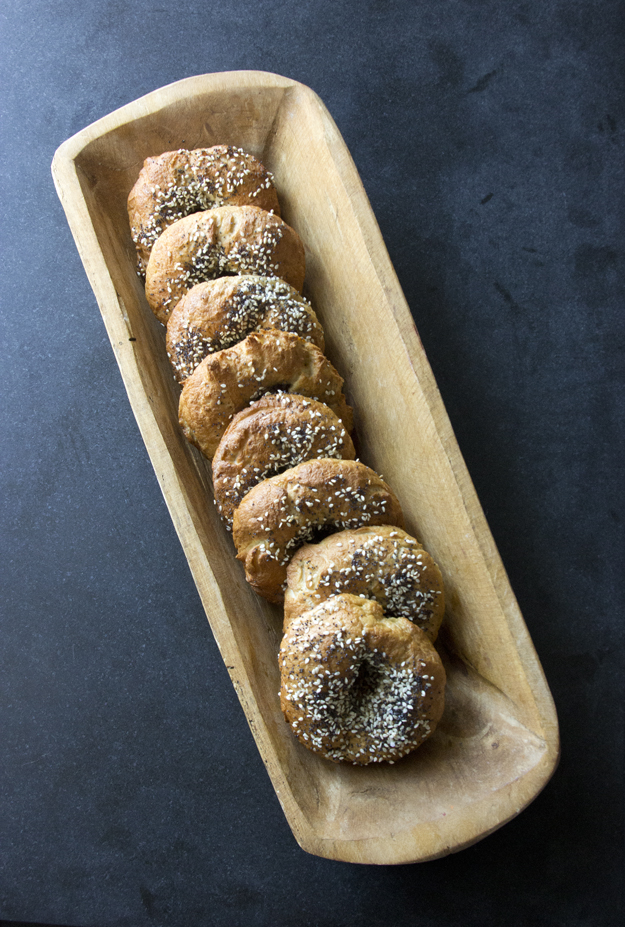
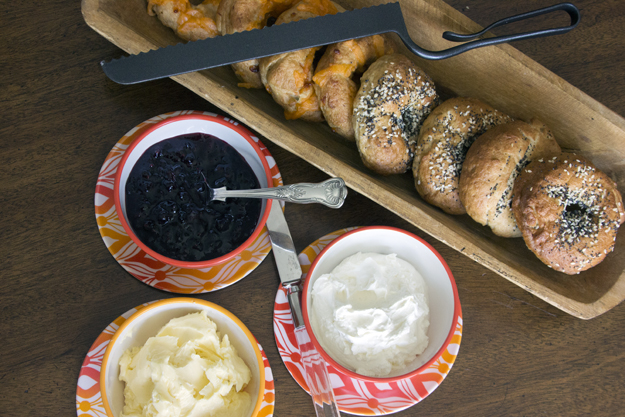
I’ll be so bold as to bring a different species of bagel into this discussion: The Gluten-Free Bagel. Are delicious gluten-free bagels possible, or is that an oxymoron? Up until about 5 years ago, I would have said that gluten-free bagels should not even be allowed in the same conversation as regular bagels. We put out youngest son on a gluten free diet about 12 years ago, and one of the hardest things for him to give up were bagels. I tried buying commercially made gluten-free bagels and truthfully, they were awful. The vast majority of them were made from a combination of rice flour and tapioca starch. The texture was quite gluey.
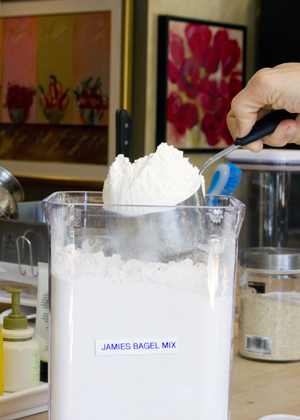
Then, a friend of mine, who suffers from Celiac disease, gave me a recipe for gluten-free bagels that he discovered in the magazine “Living Without.” I was sceptical, but when I read the list of ingredients, I was intrigued. These bagels incorporate 6 different types of flour (Garbanzo-fava bean flour, brown rice flour, arrowroot flour, potato starch, tapioca flour and amaranth flour) to create a multi-grain flour blend. In addition, the recipe also calls for flax meal (ground up flax seeds). All these ingredients combine together to create a bagel with some heft and chew. I will be honest and tell you that they are best toasted, but if you are unable to have gluten, these really are a delicious substitute.
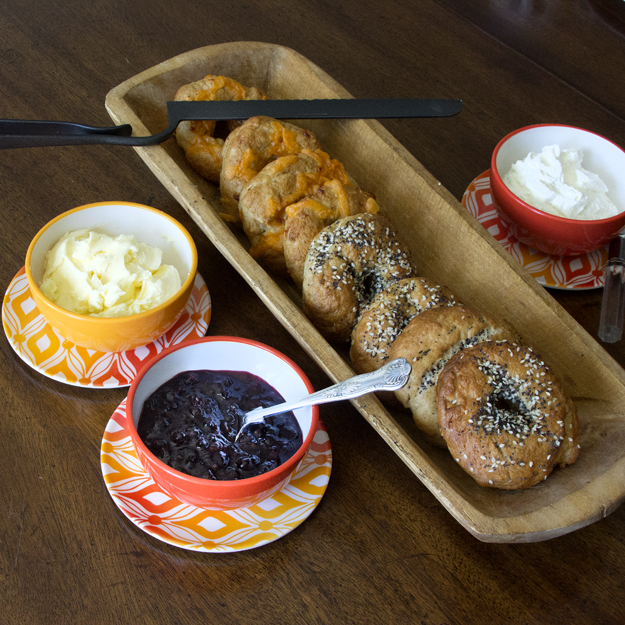
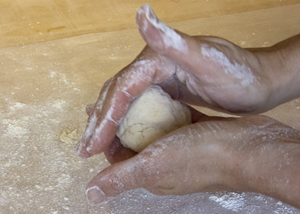
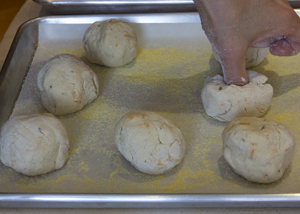
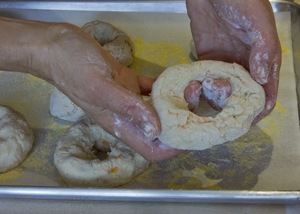
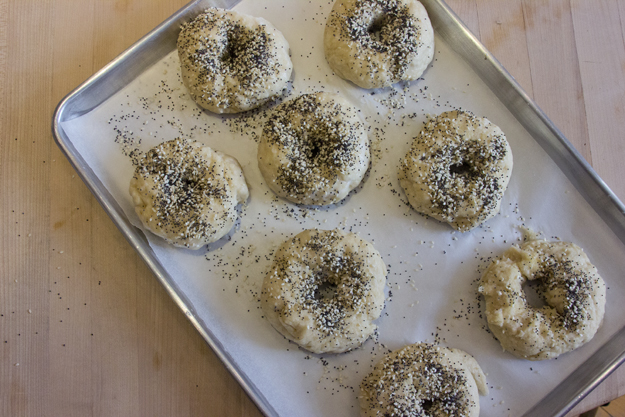
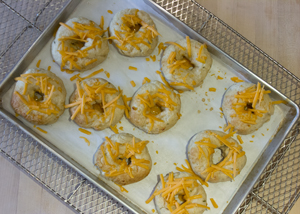
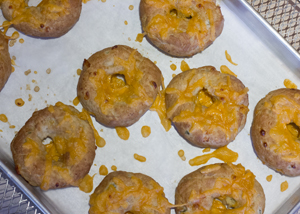
I make them regularly for my son and decided to blog about it, since gluten-free diets seem to be gaining in popularity. Today I made a batch of seeded (poppy and sesame) and a second batch of cheddar jalapeno gluten-free bagels. The dough for regular flour bagels needs to spend a night or even two in the fridge to allow the gluten and flavours to develop. Since these are gluten-free, they can be made quite quickly.
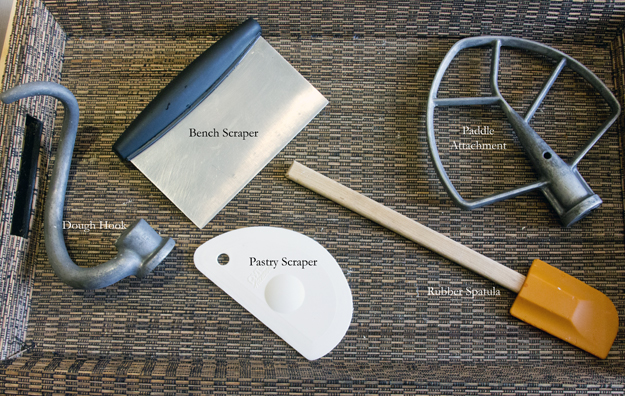
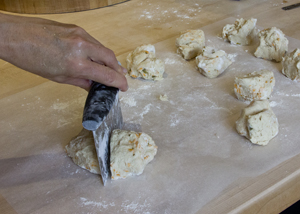
This is quite a sticky dough, so it is best made in a stand mixer. Start out with the paddle attachment and then switch to the dough hook after several minutes of mixing. A plastic pastry scraper will make it easier to get the dough out of the bowl and a metal bench scraper makes portioning the dough easier.
The seeds are sprinkled on after boiling and before baking.For the cheddar jalapeño bagels, I mixed in some shredded cheddar and finely diced pickled jalapeño peppers. After 10 minutes in the oven, they get topped with some additional cheddar, for the the last 10 minutes of baking.
One of the best things I ate during my trip to Barcelona was discovered purely by accident. We had just finished our Architectural walking tour of the city and based on a recommendation from our guide we stopped in at La Botiga at 27 Rambla Catalunya for lunch. This was only our second day in Barcelona so we were still learning the ways of the city. Our first mistake was showing up for lunch at 12:45. Talk about looking like tourists! We might as well have shown up wearing baseball caps, white Adidas running shoes and a Canadian Maple Leaf sewn onto our backpacks. They were not even open yet.
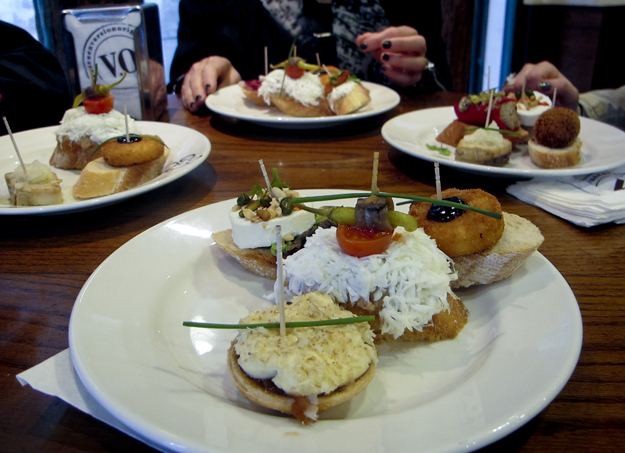
We quickly learned that the Spanish are on an entirely different meal schedule than North Americans. Breakfast is usually just a shot of espresso and a pastry or roll. Then around 11 am they may have a cafe con leche (espresso with milk) and a little bocadillo (sandwich). Lunch is typically served between 2:00 and 4:00 pm. Dinner is not usually served until 9:00 pm at the earliest. Sometimes they will eat their main meal at lunch and just have a light snack, (tapas) for dinner, or they may reverse it and have tapas for lunch and have their main meal at night.
We returned to La Botiga just as they were opening. We were starving by this point and quickly perused the menu and ordered a bunch of little tapas for sharing. Several minutes later, the waiter returned and told us that at least half of our choices were “already gone.” Huh? Already gone? How could that be? They just opened. We were the first customers there. Perhaps some savvy Barcelonians have caught onto the North American trend of eating lunch at noon, and snuck in to the restaurant before they were officially opened and ate all the best stuff. Just saying, it could have happened that way.
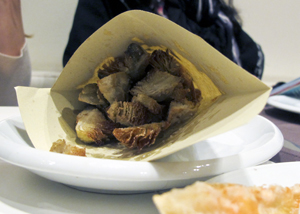
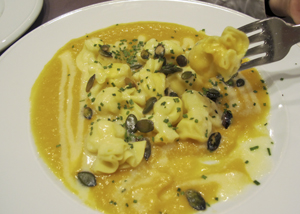
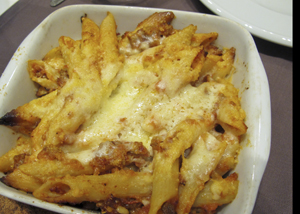
Since we were not eating meat, our choices were limited. We settled on fried artichokes, butternut squash tortellini with pepitas, mac and cheese (which we discovered they had snuck some ham into) and pan con tomate. Just some light carb loading.
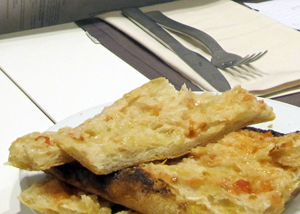
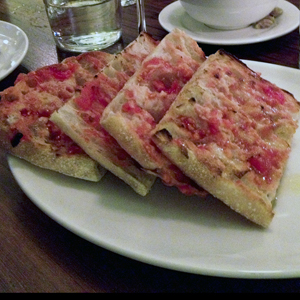
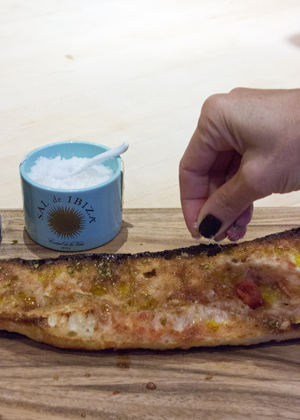
Most of the food was ok, nothing very special. But the pan con tomate, oh my! It was truly one of the best things we ate all week. Pan con tomate, translates into “bread with tomato.” Yawn. Not exactly the most exciting dish you may be thinking. But you would be wrong. Pan con tomate is a Spanish trick that turns simple bread, tomatoes, oil and salt into something insanely delicious.
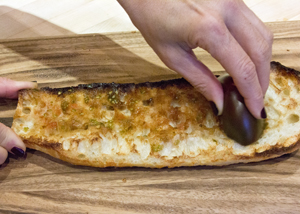
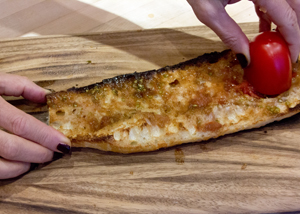
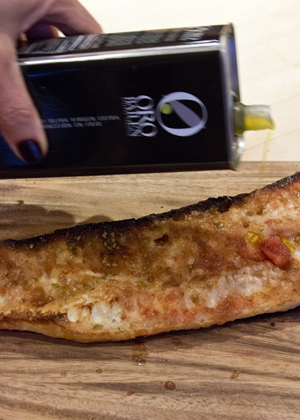
When it arrived at the table, we were expecting bread with diced tomatoes on top, like you get with bruschetta. This looked like it had barely any tomato at all. When we inquired about this, the waiter explained how this dish, a Catalan specialty, is made. First the bread is toasted or grilled. Then a ripe tomato is cut in half and roughly rubbed over the surface of the toasted bread until all you are left holding in your hand is the skin of the tomato. Then, some fruity spanish olive oil is drizzled over the top and it is finished with a few flakes of sea salt.
As I took my first bite, the crunch on the outside surface of the warm bread and the yeasty scent assaulted my senses. The center of the bread, so chewy, was filled with little nooks and crannies. These little air pockets were bursting with the sweet and fragrant tomato essence and the fruity nutty olive oil. The little crystals of sea salt on top just melted on my tongue. How could something so simple be so good?
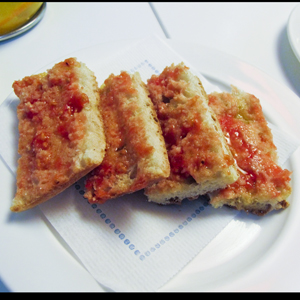
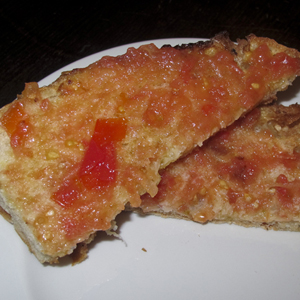
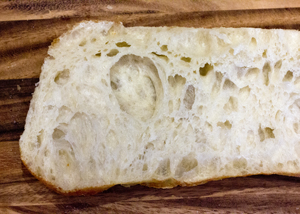
From this meal forward, our mission was to order pan con tomate every time it appeared on the menu. Little did we know that the pan con tomate at La Botiga would be the best one we tasted. I would go back for a big plate of that and a bottle of Cava and I would be transported to my happy place. Here is a sampling of some of the pan con tomate we sampled over our week in Barcelona. At the end of the week, we realized that the pan con tomate we devoured at La Botiga, had become our Gold Standard, by which all others were judged. It became apparent that the one variable that was more important than any of the others, was the bread. Without an open crumb structure (i.e.: lots of air pockets and nooks and crannies) on the interior of the bread, the tomato pulp and olive oil have nowhere to soak into. Armed with the knowledge from completing the Bread Bakers Apprentice Challenge, I knew there was one bread that had the ideal structure to create this. Ciabatta bread.
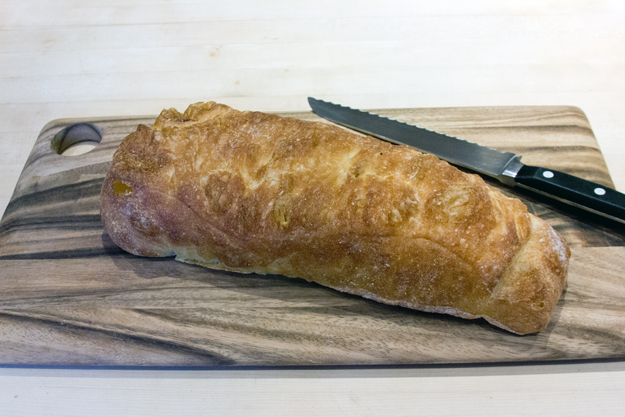
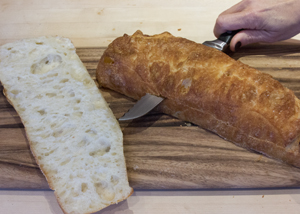
Still obsessing over pan con tomate once I arrived home, I needed to see if I could create it in my kitchen. I somehow doubted that it would taste as good here, as it did when I was on holiday in Barcelona. There is something about eating the food in a spectacular venue that elevates it to mythical status. I went to Art-Is-In Bakery here in Ottawa and bought a ciabatta loaf. I sliced the loaf horizontally into 3 layers. I toasted the bread in my toaster oven. I experimented with 2 different types of tomatoes, kumato and plum. I liked the sweeter, thinner skinned kumatos best.
I drizzled the bread with some olive oil and salt I brought home from my holiday.
The verdict: a perfect crunchy and chewy snack that transported me right back to Barcelona. I can only imagine how good this will taste this summer when I grill the bread and use local vine ripened sweet summer tomatoes.
Regular readers of this blog may know that my drink of choice is Prosecco. However, when in Barcelona, we switched our allegiance and guzzled quaffed Cava. Made in the Catalonia region of Spain, Cava is the generic term for Spanish sparkling wine. I should explain here that Cava and Prosecco are very different from Champagne.
While all Champagne is sparkling wine, not all sparkling wine is Champagne. To be labelled Champagne, the sparkling wine must come from the Champagne region in France. The main difference between Champagne and Prosecco/Cava lies in the method by which each is made.
Champagne is fermented into wine normally, then bottled with a little yeast and sugar, capped, and left to referment. This second fermentation produces carbon dioxide that is trapped in the bottle; the sparkling wine is left to steep with the yeast in it for an additional several years and then the sediment is removed and the Champagne is sold. With Prosecco and Cava, the second fermentation takes place in a specially reinforced tank. Once the second fermentation is complete, the sparkling wine is immediately drained from the yeast and bottled. So the aroma and flavour of the yeast is an integral quality of Champagne, but not of Prosecco or Cava, because the yeast is removed from the tank of Prosecco and Cava as soon as it has done its job.
What this means is that the lack of the yeasty aroma and flavor in Prosecco and Cava allows the varietal characteristics of the grapes to shine through. This is an important difference between Champagne and Prosecco/Cava. I have never really liked the yeasty quality of Champagne. I find it too heavy. I guess I’m just a cheap date, but I really prefer the light fresh quality of Prosecco and now, after my trip to Barcelona, Cava.
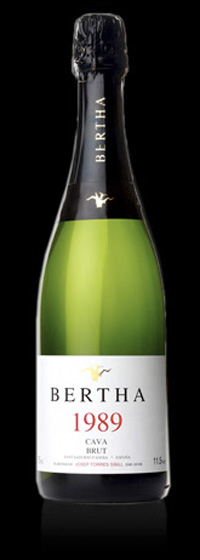
Since our knowledge of Cava was quite limited, each night we asked our waiters to recommend a brand. Purely by coincidence, we ended up sampling Cavas alphabetically! The first night we were brought a bottle of Aria, the second night Bertha and the third Colet. We stopped paying attention after that.
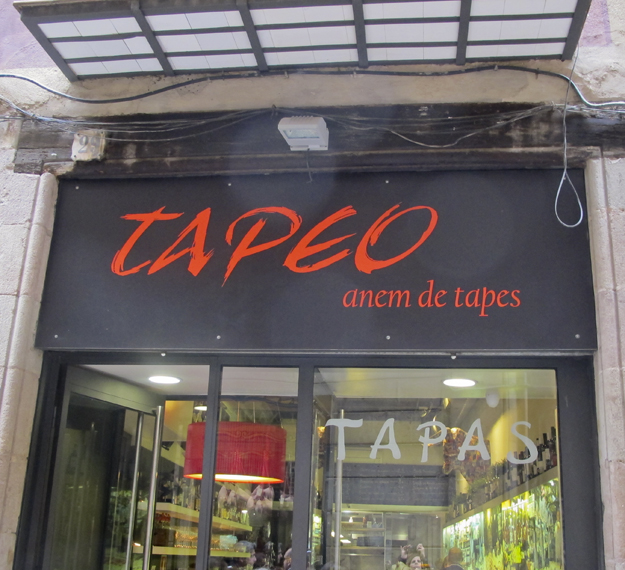
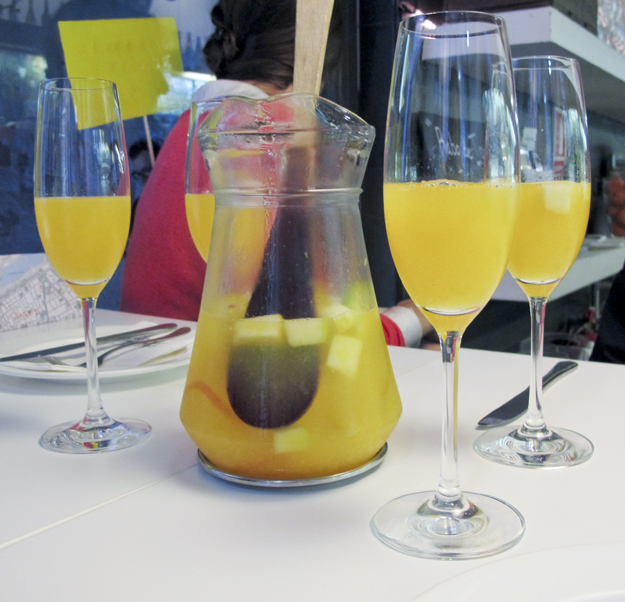
.One day we stopped into Tapeo for lunch and we spotted sangria made with cava on the menu. Things were never quite the same after that revelation.
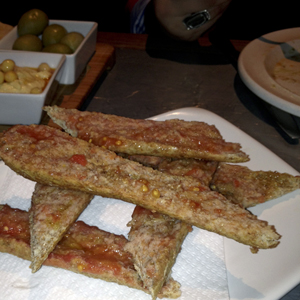
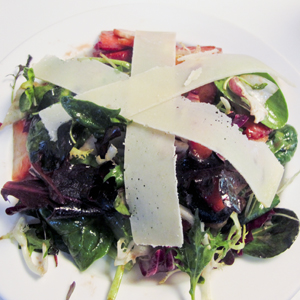
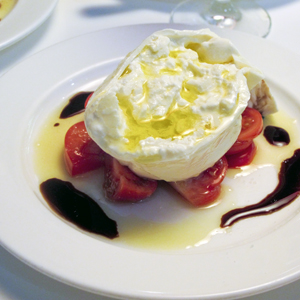
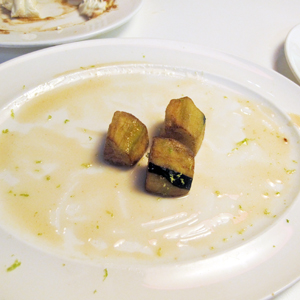
Our lunch at Tapeo was so delicious. We were all quite excited to see a green salad on the menu. After eating fried tapas for several days, we were ready for something fresh and green. The acid and sweet balance in the strawberry and manchego cheese salad was perfect. Although Italian and not Spanish in origin, I can never resist ordering Buratta cheese on a menu when I see it. The rendition at Tapeo, with tomatoes and olive oil was creamy, slightly tangy and perfectly rich and yummy. We also ordered the eggplant fried and dressed in lime and honey. Unfortunately there were only a few little pieces to photograph as we gobbled it up so quickly. We also ordered “pan con tomate”, which translates roughly to tomato bread. I will report more thoroughly on this dish in my next post. Suffice it to say, we all became obsessed with this national dish!
Organized walking tours are one of my favourite ways to explore a new city. I have tried following walking tours in guide books, but I am directionally challenged and always seem to get lost. Plus, I find that seeing the city through the eyes of a passionate local, eager to show off their city to be a wonderful way to really delve into the culture.
Sometimes you want to cover a bit more ground than walking will allow. Several years ago, while visiting Paris I took a Segway tour. We suggested doing a similar tour in Barcelona, but my god-daughter had a better idea! GoCars.GoCars are the latest trend in sightseeing. It’s a city tour, but with a difference. They offer a guided tour using GPS technology. Essentially, these are three-wheeled scooters. There are three different GPS tours to choose from. Your charming GPS guide (I nicknamed ours “Jill”) not only tells you where to go, but she tells you what you are seeing along the way. And the best part was that when I missed a turn, (which I did several times!), Jill did not say “recalculating” in a disappointed tone of voice, but “Oops, you missed a turn. No problem, we’ll get you back on course straight away”, in an ever so encouraging and loving manner. She sang songs to us, told us jokes and even gave us restaurant recommendations.
We arrived at the GoCar garage, just across from the Santa Caterina Market. We had to sign several standard waivers and one special one that said we would be responsible for the fine if we were stopped by the police for not having an international drivers license. Say what??? We didn’t have international licences. The woman told us not to worry. No one had ever been stopped by the police. The chances of that were quite remote.
She gave us our helmets, had us watch a short video and then sent us out into the traffic! I had never driven a scooter of motorcycle before, so the hand controls for accelerating and braking were foreign to me. I was a bit shaky for the first 10 minutes trying to use my feet to press on the non-existent gas and brake pedals. The staff at the store said that other motorists on the road were quite friendly and would honk and wave at us. I accidentally cut off a bus driver and he did indeed honk and give me a special one finger wave. He was not charmed or amused by us. The cars go up to 40 miles per hour and are just a blast to drive.
We chose the Olympic Barcelona tour, which took us through the Gothic Quarter, the Raval District and then up to Montjuic, home to the 1992 Olympic Games. You are able to stop and park your car at any time and get out for pictures or to walk around. After about half an hour I heard a police siren and saw, in my rear view mirror, that our daughters were being pulled over by the police. Apparently, the were driving in the oncoming traffic lane. The officers were quite sweet and patiently explained to them how Barcelona roads worked, and soon we were on our way again.
Check out this you tube video to get a closer look at how these cars operate.
I met one of my very best friends at summer camp when we were 13 years old. We first bonded over giggling about a certain boy we both had a crush on while washing our hair in the rain with Herbal Essence Shampoo. This was way before the days of acid rain, and our camp was in the Haliburton Highlands of Ontario, so the rainwater, while a little cold, was fairly clean. Our friendship, like the shampoo, has endured. Not sure what became of that boy!
In 1991 we both discovered we were pregnant and expecting within several months of each other. She with her fourth child (she already had three boys) and me with my second child (I already had one son). We joked that it would be so cute if we both had girls and they ended up becoming friends. Since I was living in Ottawa at the time and she was in Toronto, it seemed unlikely, but we wished for it anyways.
Fast forward 21 years and yes indeed we both had girls. Her daughter became my god-daughter and these girls of ours did indeed become friends. To celebrate this milestone birthday of our daughters, we decided to take a trip to mark the occasion. After much lobbying back and forth, Barcelona became the destination of choice. For the record, the moms lobbied hard for a beach holiday where we could just park ourselves under a big palm tree and read and drink Prosecco all day, but the girls lobbied harder for a cultural European city.
I decided to journal our adventure here in my blog, so that one day, when our daughters have daughters, they can look back on this holiday adventure and reminisce! Of course, the journalling will have a culinary bent. This is a food blog after all. Had we been thinking clearly, when planning this trip, perhaps Barcelona was not the best choice from a food perspective. My daughter is a vegetarian and my girlfriend and her daughter keep kosher. Barcelona is a haven for pork lovers!
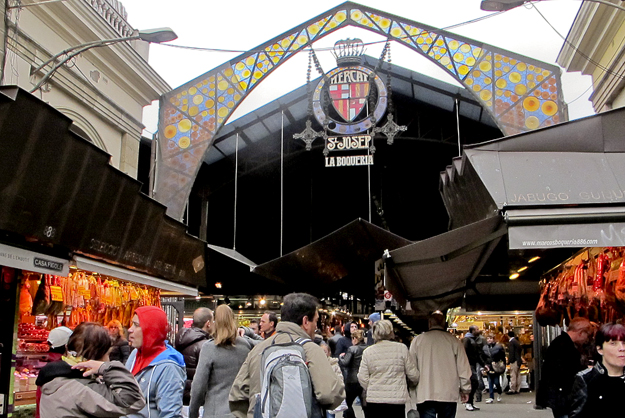
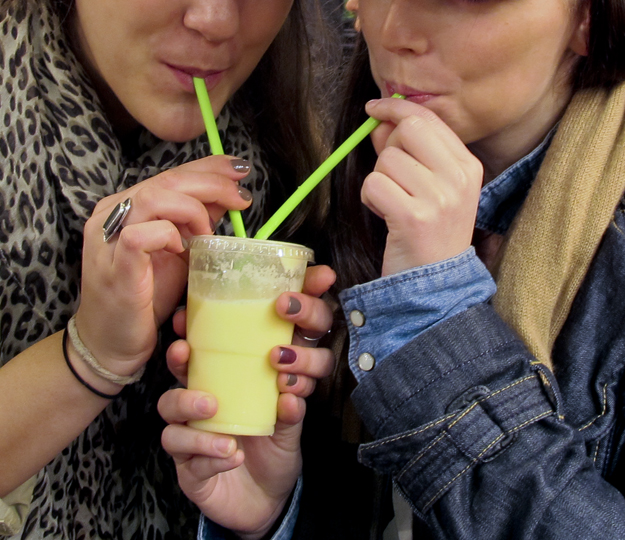
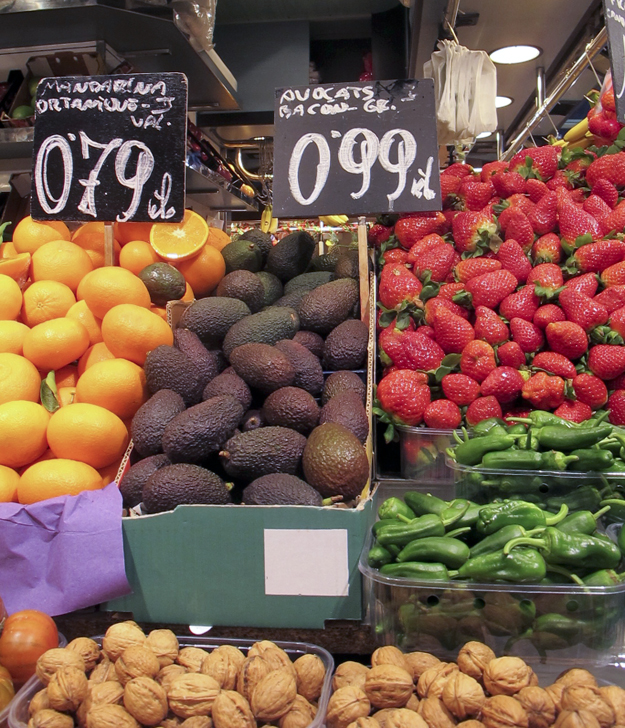
We arrived around noon, Barcelona time, which was 6:00 a.m. for us. While our comfy beds at The Grand Hotel Central, were calling to us, we thought it would be wiser to try to stay awake and get on Barcelona time as soon as possible. We went for lunch and had our first tapas meal. We were quite jet lagged so I can’t really remember where this was, but there was one little bocadillo (sandwich) that stood out from all the others. It featured breaded and deep-fried goat cheese that was topped with a blueberry compote. Crispy on the outside, creamy, tangy and salty inside, with the sweetness of the blueberry topping, this was a little bite of perfection. We spent the rest of the afternoon walking around and getting our bearings. It quickly became apparent that only one of us would ever be able to list map reading skills on our resumes. My god-daughter has a keen sense of direction, and she became our North Star. We took a walk down Las Ramblas, a 1.2 kilometer long tree lined pedestrian mall that is in the center of the city. We had heard that the city was rife with pickpockets so we kept our purses close to us, but we had no problems at all. Right in the center of the sidewalk we ran into a cat that charmed us all! El Gato del Raval, is a bronze sculpture by artist Fernando Botero. We stumbled upon La Boqueria, the enormous food market, featuring over 200 food stalls, shops and tapas bars. The lattice wrought iron entrance to the market is a beautiful example of Catalonian Art Nouveau. The market has been here since 1857!The sheer volume of stalls and selection at each stall was astounding. It was all quite overwhelming. It took us over 20 minutes to decide which fruit drink to order. I have purchased a car in less time than that! We blamed our indecision on the jet lag. Pineapple coconut was finally chosen.
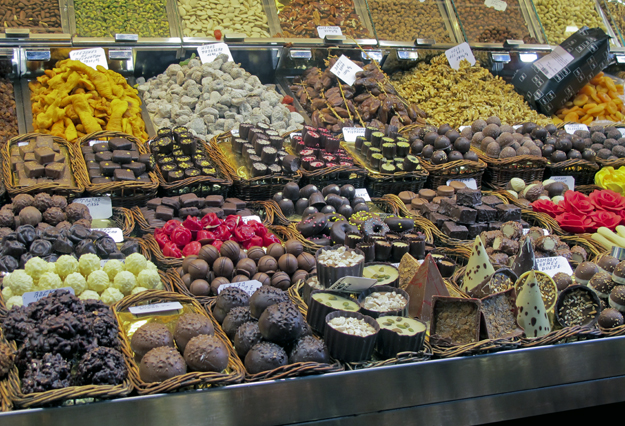
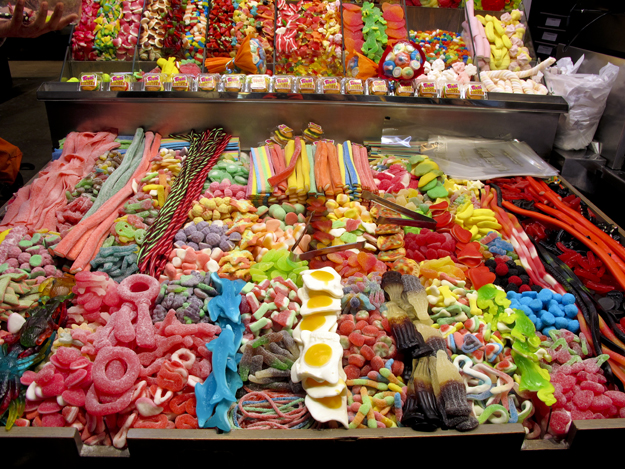
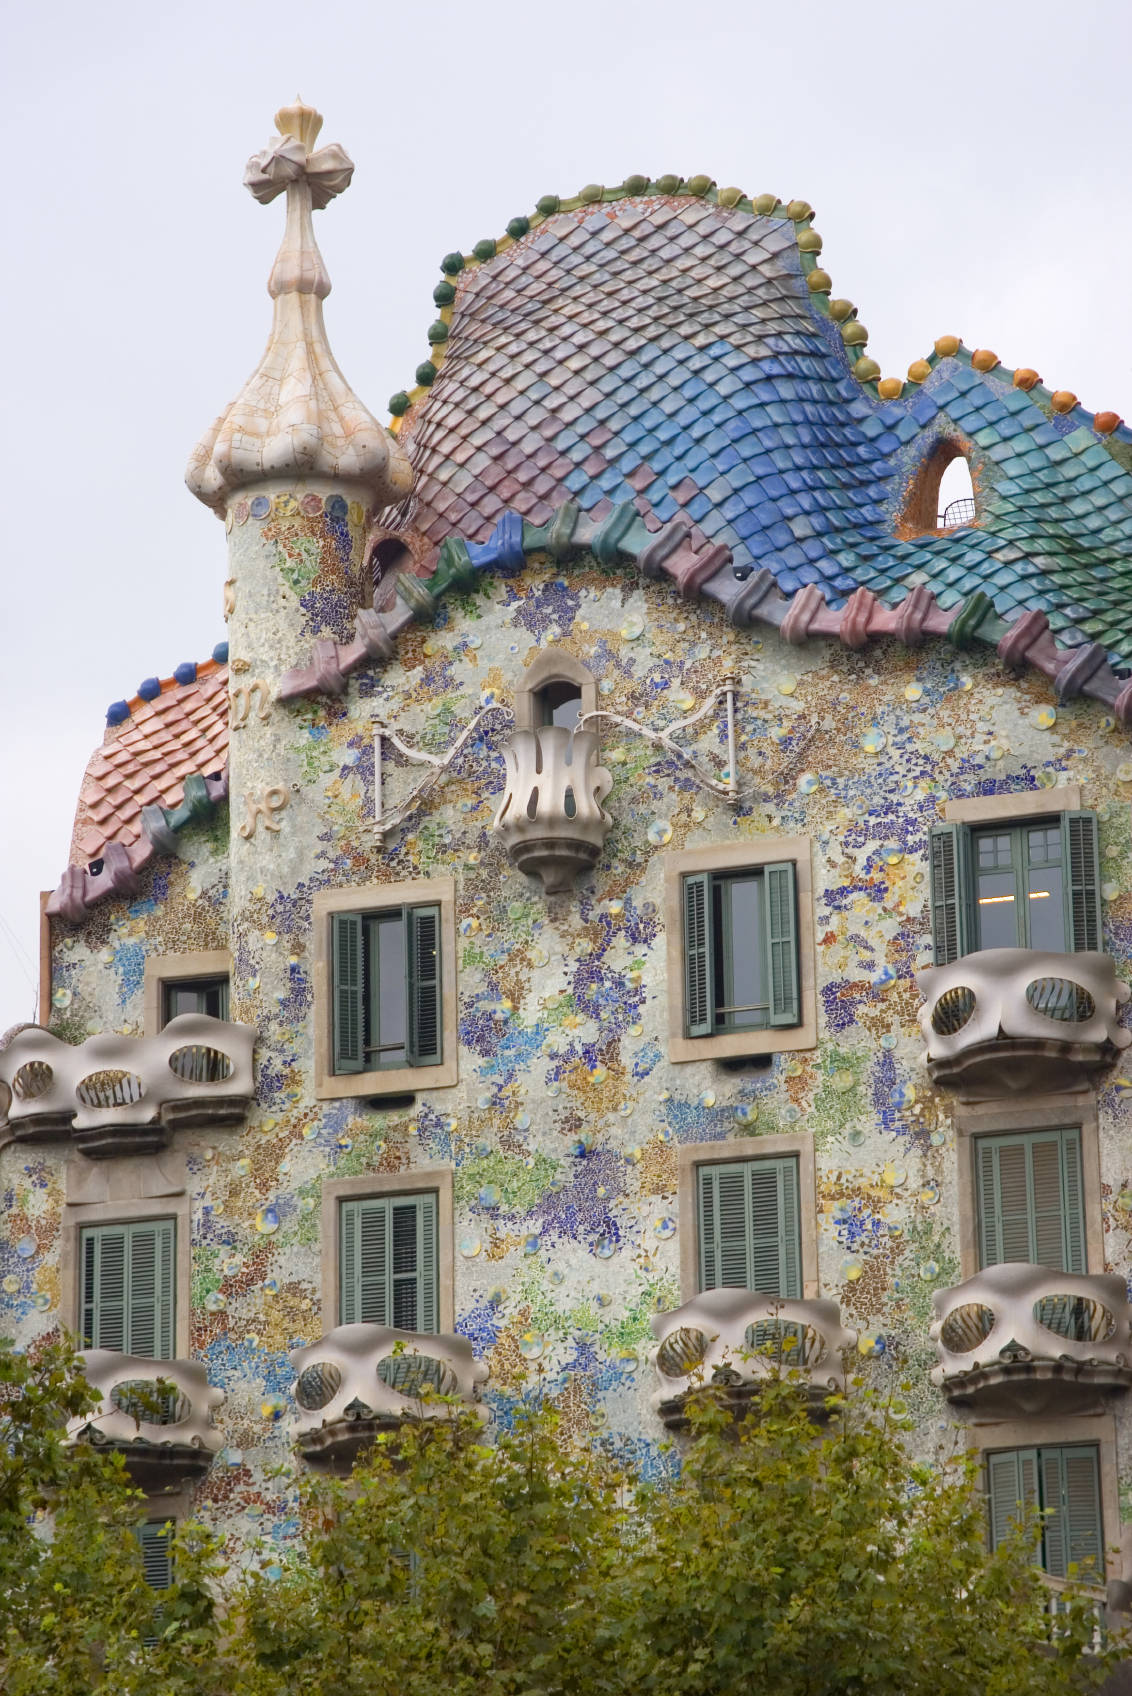
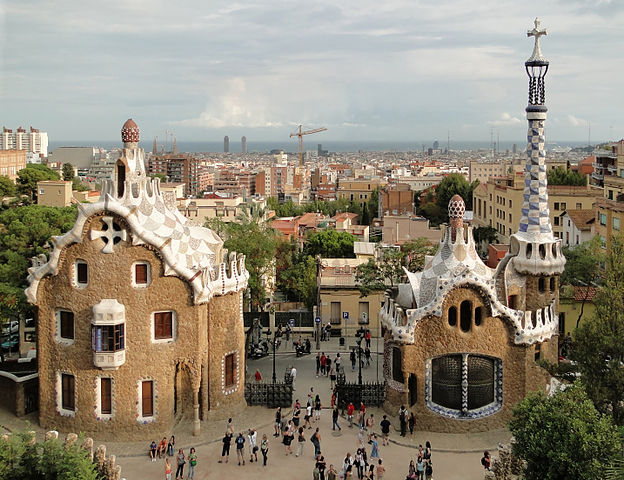
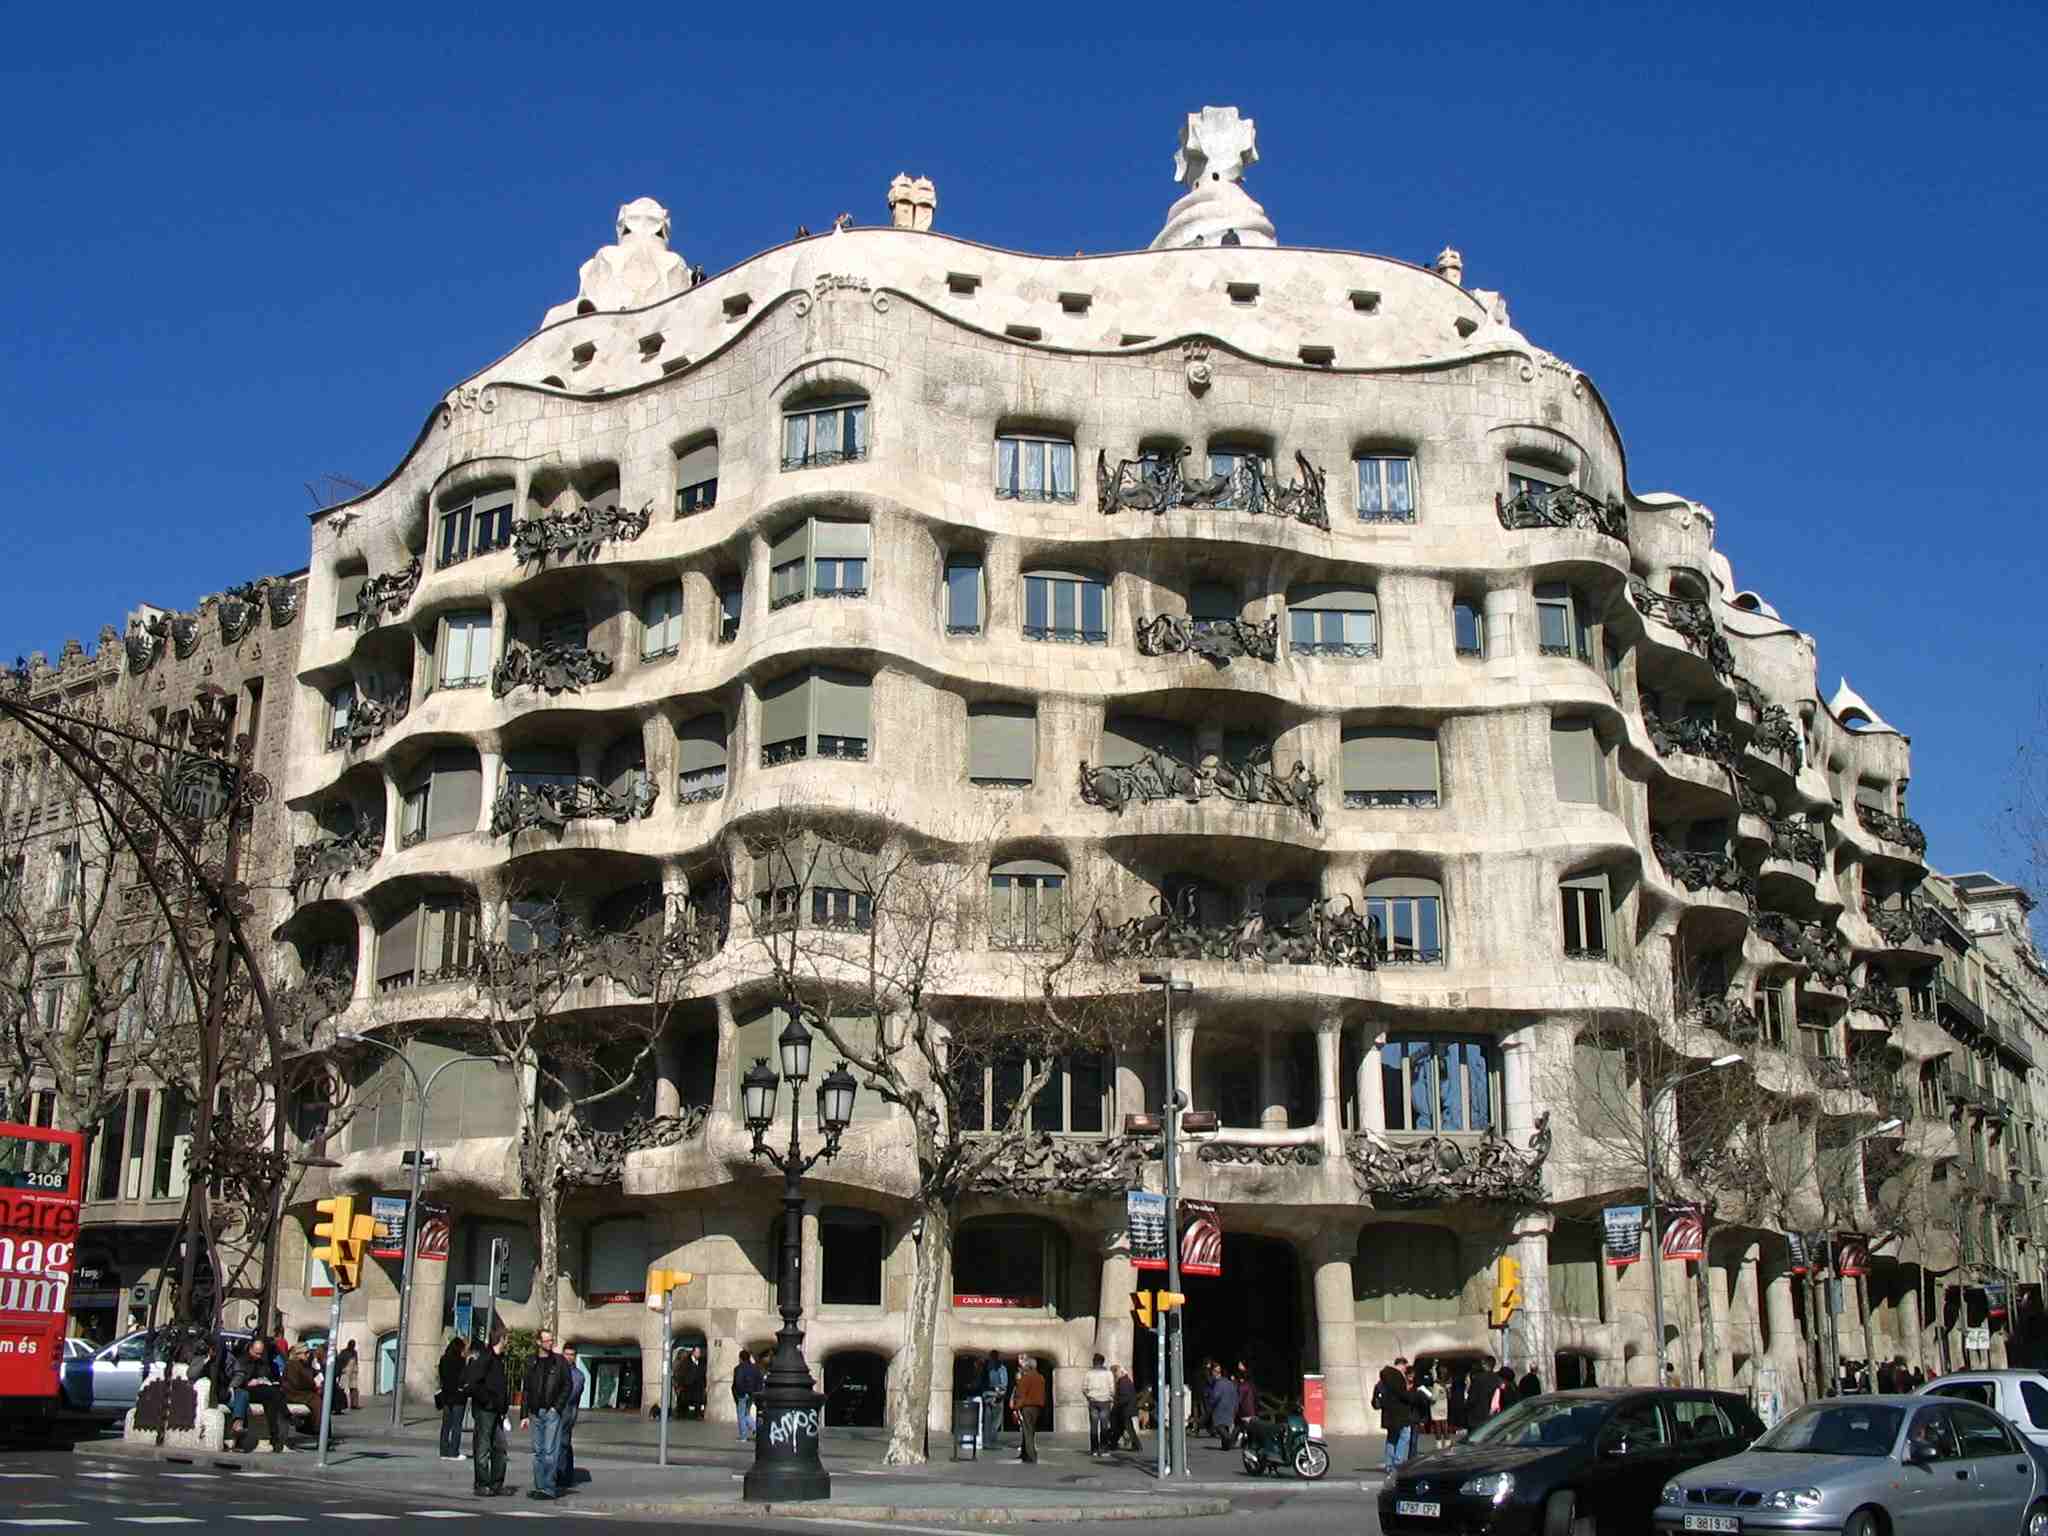
The displays were pure culinary art.The candy and dried fruit displays reminded me of the Shuk (Machane Yehuda) in Jerusalem.Baby avocados, just slightly larger than strawberries stopped me in my tracks.The next day dawned cold and rainy, but we came prepared. Dressed in raincoats, rubber boots and armed with umbrellas, we took an Architectural Walking Tour of the city. The walk, organized by Context Tours focuses on the fantastic architecture of Antoni Gaudí, Barcelona’s most important architect. Gaudi’s work can best be described as a cross between Willy Wonka and Dr. Seuss. He was at the forefront of the Modernista style of architecture so prevalent in the late 19th and early 20th Centuries. This style of architecture is perfectly described by author Francois Loyer in his book “Art Nouveau in Catalonia.”
Modernista architecture can be characterized by the use of the curve over the straight line, organic and botanical shapes and motifs, a great richness of ornamentation, bright colours, a disregard of symmetry and a wide use of symbolism….The overall effect is a style of architecture which is very dynamic, very human, very colourful and often absurdly over-the-top when it comes to details and adornment.
Our guide, the charming, enthusiastic and extremely knowledgable Celia (she is an associate professor at the Barcelona School of Architecture) explained that during this time period Barcelona expanded exponentially in size from the medieval Old Town and became a breeding ground for the modernist movement. While this over-the-top, whimsical style may not be everyone’s cup of tea, they certainly make for great photo ops.
After viewing many of his buildings, I was convinced that the term “gaudy” derived from Antoine Gaudi’s over the top style. Apparently not. According to The Online Etymology Dictionary, the word gaudy dates back to the 16th century, well before our Antoine Gaudi was born (1852). It described a joke, plaything or showy ornament.
Gaudi died tragically in 1926. He was run over by a tram. He had spent the last 16 years of his life devoted to the construction of a massive church, The Sagrada Familia Basilica. It remains under construction to this day. There are plans underway to complete the building by 2026, the centenary of his death. Gaudi was fond of saying, “My client his in no hurry.” He was, of course, referring to God! I suspect that not too many clients would be happy with this pace of development.Stay tuned for Part 2 of Friendship in Barcelona, in which we work our way through numerous brands of Spanish Cavas (in alphabetical order) and the girls get pulled over by the police while driving up to Olympic Park.
Yesterday was the first day of spring. Apparently, someone forgot to notify the Weather Gods of this fact because over 25 centimetres of snow fell on us here in Ottawa! My son, a go-with-the-flow kind of guy, just took it in his stride, embraced the white stuff and went snowshoeing!
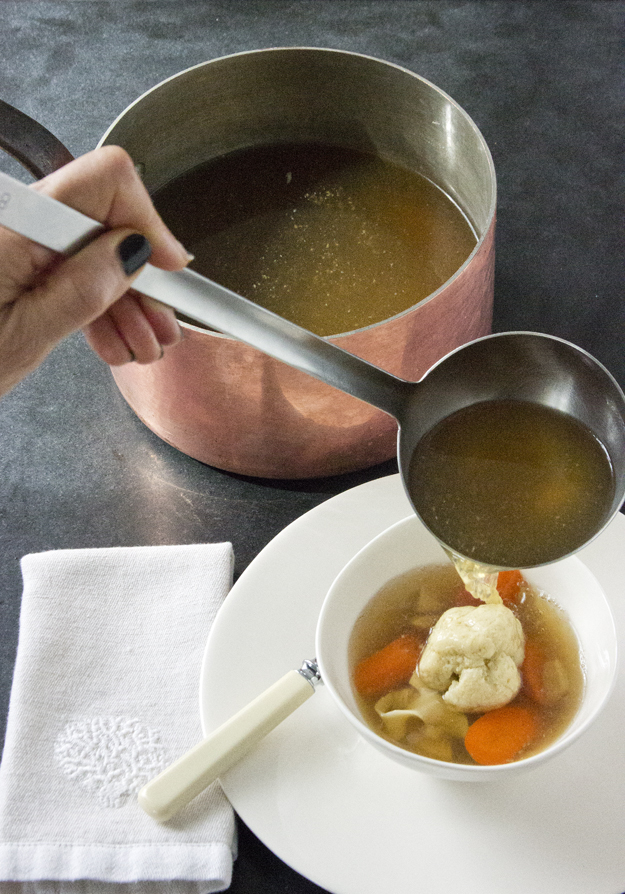
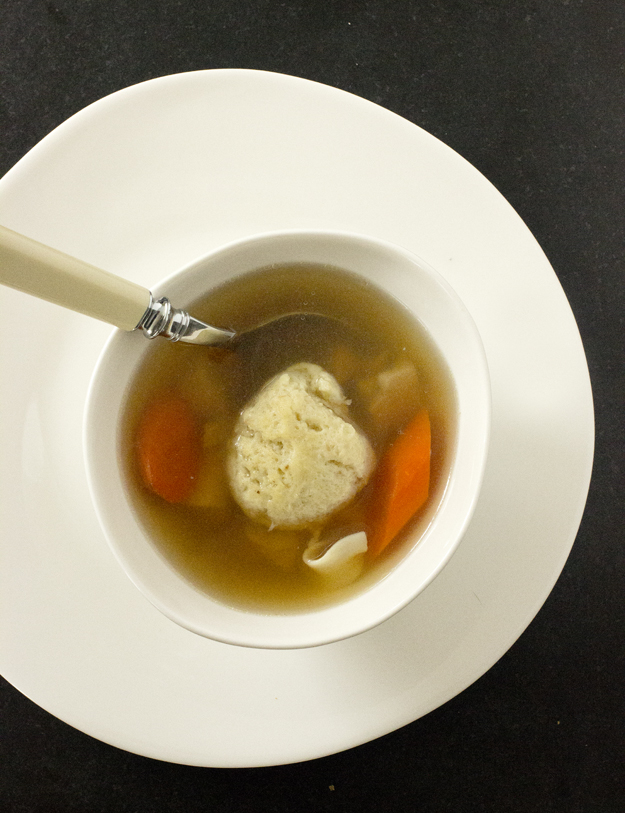
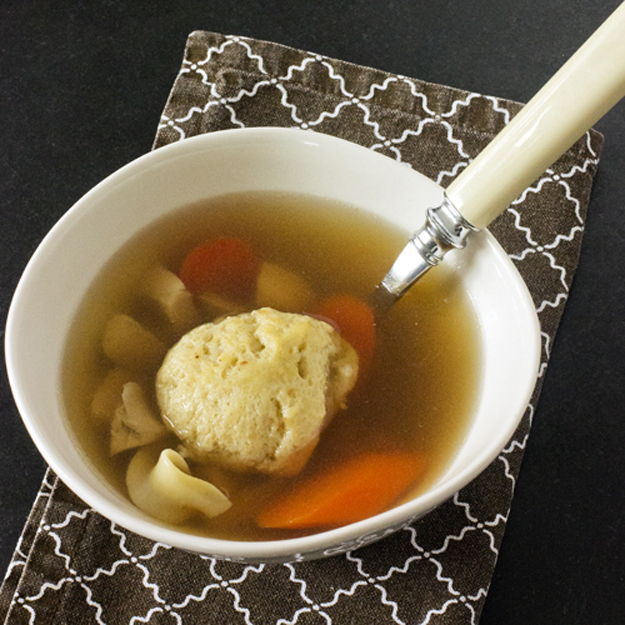
I also embraced the bonus snow storm, by hunkering down in my kitchen and making a big pot of Roasted Chicken Soup with Perfect Matzoh Balls, just in time for Passover.
There are only two things you need to know to make good chicken soup. The first is that you must use homemade chicken stock, not water, as the liquid. The second is that you must allow enough time to chill the soup, after cooking, so that all the fat can be removed. If you follow these two rules, you will have wonderful chicken soup.
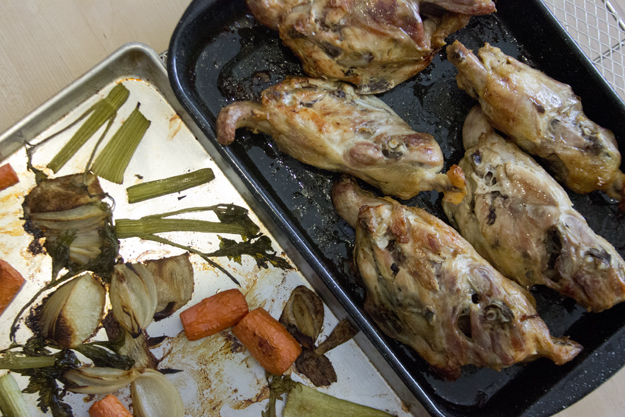
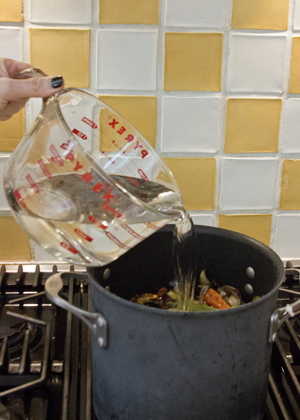
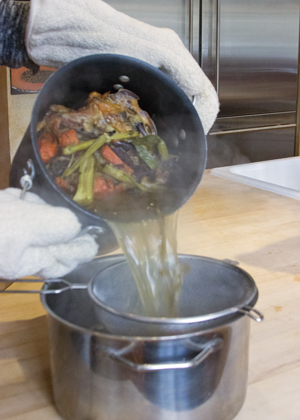
Chicken stock is a mystery to many people. Exactly what is it and how is it made? Stock is simply chicken bones, simmered, in water, with aromatic vegetables (typically, carrots, onion and celery) until the bones have given every ounce of their flavour to the liquid. This usually takes about 2-3 hours. Then you take this flavourful liquid, add some fresh bones and vegetables and simmer for a further 2 hours to get chicken soup.
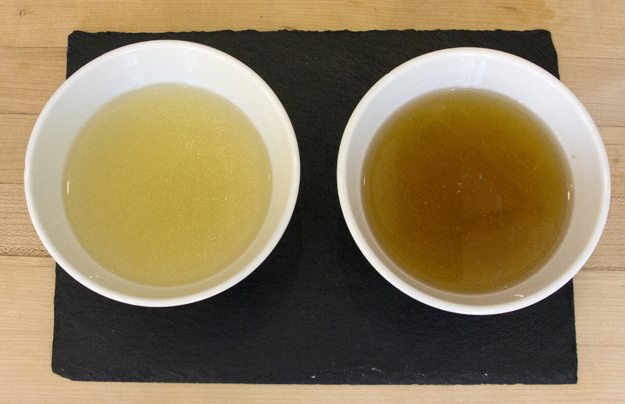
I have recently discovered roasted chicken stock. Before throwing the chicken bones and vegetables into the pot with some water, you roast them in a hot oven for about 45 minutes until they are deeply browned.Then you simmer these browned bones and vegetables with water for about 2 hours.This gives you a stock with much greater depth of flavour. It is rich, dark and delicious and makes a killer chicken soup. Here is a photo comparing unroasted stock and roasted stock.
Now, onto the matzoh balls. Here are my golden rules for making perfect fluffy matzoh balls. I have tried many different recipes and techniques over the years and the best recipe comes from the Manichewitz box, but with a few adaptations.
The recipe on the box instructs you to chill the batter for 30 minutes. Ignore the box, and chill it overnight. If you leave the mixture overnight, the matzoh meal absorbs more moisture, holds together better and cooks more evenly.
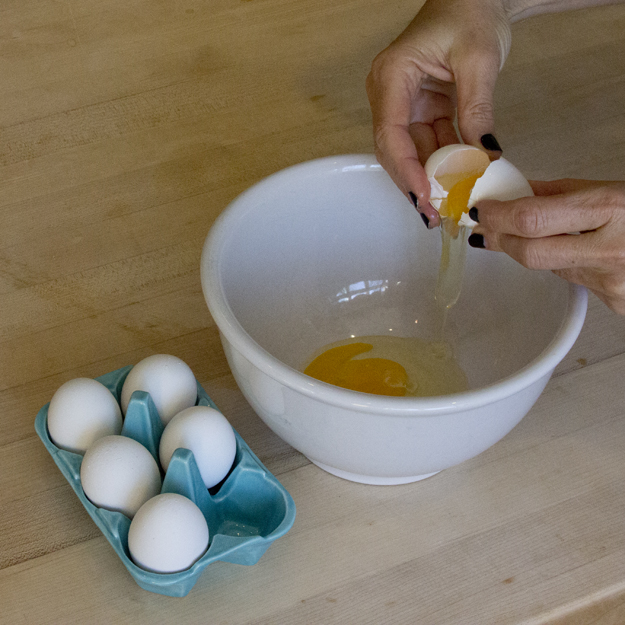
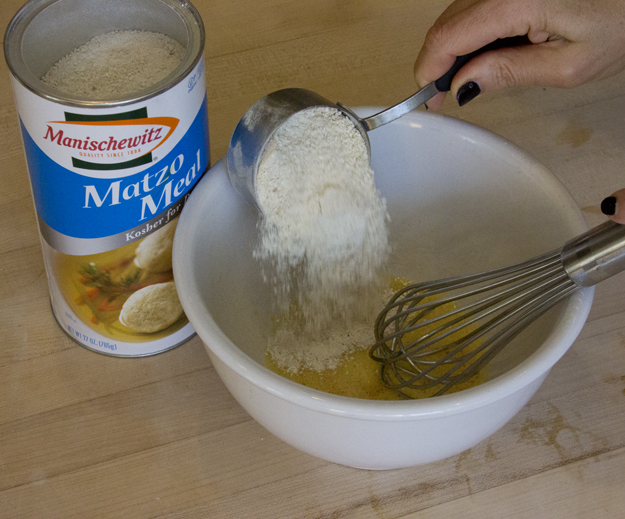
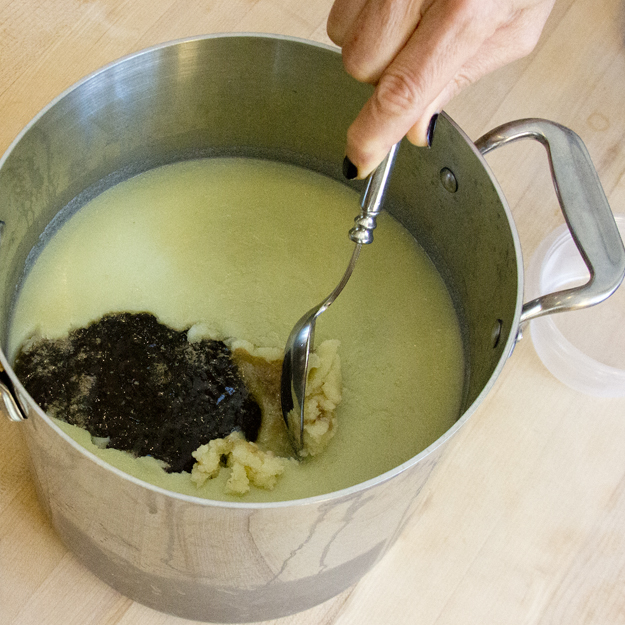
Eggs, matzoh meal, chicken fat, salt, a bit of water or chicken stock are combined to make the matzoh ball batter.
After you make your chicken soup and chill it, there will be a layer of fat sitting on top of the soup. Do not throw it away! Scrape off that fat layer and use some of it as the fat called for in the matzoh balls, instead of vegetable oil. I know that some of you are already having heart attacks, in advance of even eating this, but Passover comes only once a year, and you will actually only be eating one little matzoh ball, so the chicken fat will not kill you. It adds such flavour and tenderness to the matzoh balls, you will be amazed.
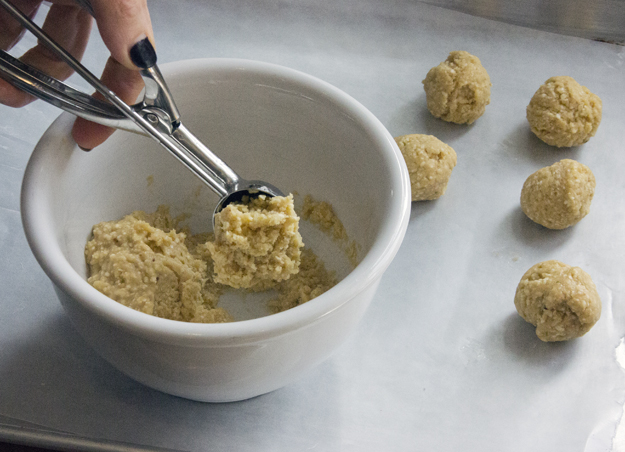
When forming the matzoh balls, wet your hands and gently toss the balls from palm to palm, to form the balls. The size you make them is up to you. I like to make them about 1 tablespoon in size. They will swell in the liquid as they cook.
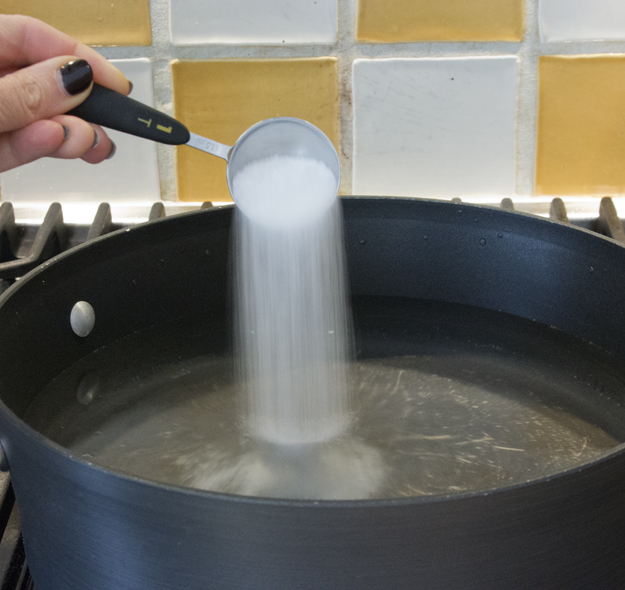
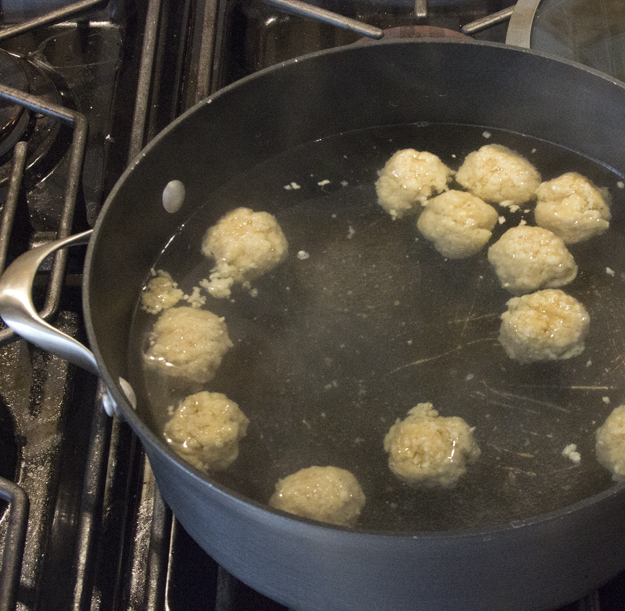
Do not cook the matzoh balls in the chicken soup! It will make your chicken soup cloudy. Cook the matzoh balls in HEAVILY SALTED water. The water should taste like the ocean. As the matzoh balls cook, they absorb the cooking water. If you start with unsalted or just lightly salted water you will have bland matzoh balls. And that would make me very sad.
Gently simmer, do not boil the matzoh balls. Cook them in a shallow wide pot, rather than a tall narrow pot, so they will have room to swell. Cover the pot so that they will cook more evenly. If your matzoh balls are large, it could take up to an hour. You will know they are done when you slice one open and they are the same colour all the way through. After cooking, remove with a slotted spoon and set in a single layer on a baking sheet. They can be wrapped and stored in the fridge for up to 3 days. Rewarm them in the chicken soup, before serving.
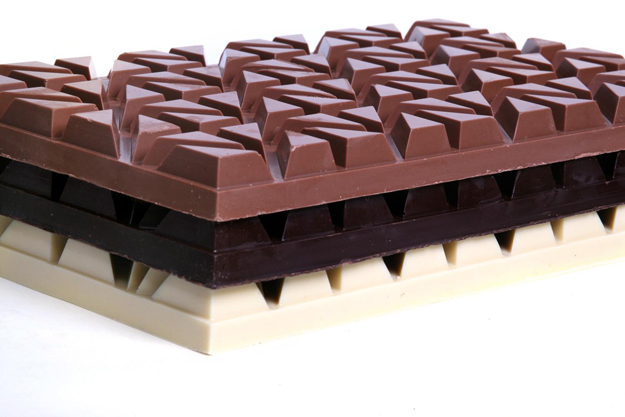
Seems that blondes really are taking over the world. First we had the introduction of Blonde Ale, then Starbucks released its Blonde Roast, and now Valrhona has introduced the world’s first blonde chocolate. Say what?? Blonde chocolate?? You thought there were just dark, milk and white?
Before we delve into the world of Blonde chocolate, I offer you a quick Chocolate 101 Primer:
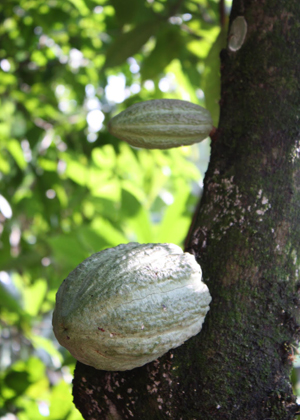
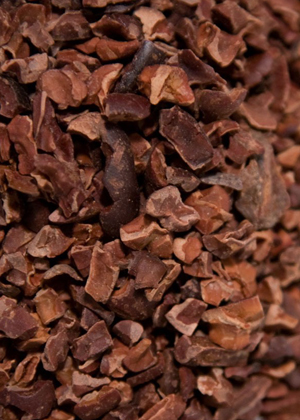
The process of making chocolate starts with the cocoa bean. The beans are fermented, dried, roasted and then shelled. These shelled beans, known as cocoa nibs, are ground and the resulting product is a thick liquid known as chocolate liquor. (It’s not actually alcohol.) Then, this chocolate liquor is pressed and from this pressing we get two products:
1. Cocoa butter, which is actually the fat from the chocolate liquor
2. Chocolate solids, which when ground results in cocoa powder.
Unsweetened chocolate is basically cocoa butter reblended with cocoa powder. Sugar is added to make semi-sweet and bittersweet dark chocolate, and milk is added to produce milk chocolate. White chocolate contains none of the chocolate liquor. It contains cocoa butter, milk, sugar and sometimes vanilla.
Yes, you chocolate purists out there, I know that technically white chocolate is not really considered chocolate since it does not contain any pulp from the cocoa solids extracted from the cocoa bean.
To be labeled white chocolate, there must be a minimum of 20% cocoa butter, 15% milk powder and a maximum of 55% sugar. Note that real white chocolate is not pure white in colour, it is actually an ivory colour. If you see snow white chocolate, it is likely that it contains vegetable oil, rather than cocoa butter and trust me, the taste difference is significant!
OK, now onto the discovery that rocked my world, Blonde Chocolate! (Just a little aside here, when I announced this startling discovery to my husband and two sons they all started snoring! Ungrateful sods, no blonde chocolate treats for them!)
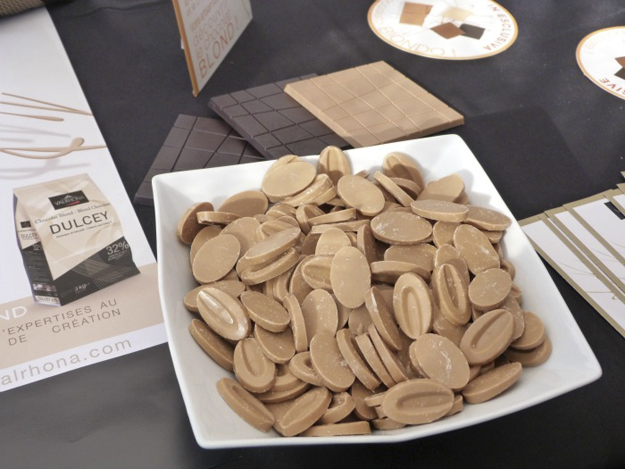
As with several other culinary innovations, this one was also an act of pure serendipity! About 8 years ago, Frédéric Bau, Executive Chef and director of Valrhona’s Ecole du Chocolat, was doing a demonstration for pastry chefs from around the globe. He had some white chocolate melting in a bain-marie. He used a small amount of that white chocolate for his demonstration and the remainder was left sitting there, continuing to slowly heat, completely forgotten about.
Around 10 hours later, he returned to discover that the white chocolate had caramelized into a stunning buckwheat honey blonde colour. It had the aroma of toasted shortbread, and when he stuck his finger in there for a taste, he was shocked to discover an intense biscuity, caramel flavour. It was smooth, buttery and there was a hint of salt on the finish. Frédéric was convinced that he was clearly onto something big here. It took almost 8 years to be able to reproduce this happy accident on a large scale and sell it commercially.
But in October of 2012 Dulcey 32%, the world’s first blonde chocolate was born. Clearly I must have been living under a rock, as I had no idea about this launch. I only became aware of it last week when I got an email from The Vanilla Food Company, featuring some new products to their lineup. My mind was spinning with the possibilities and I immediately ordered a 2 kilogram bag.
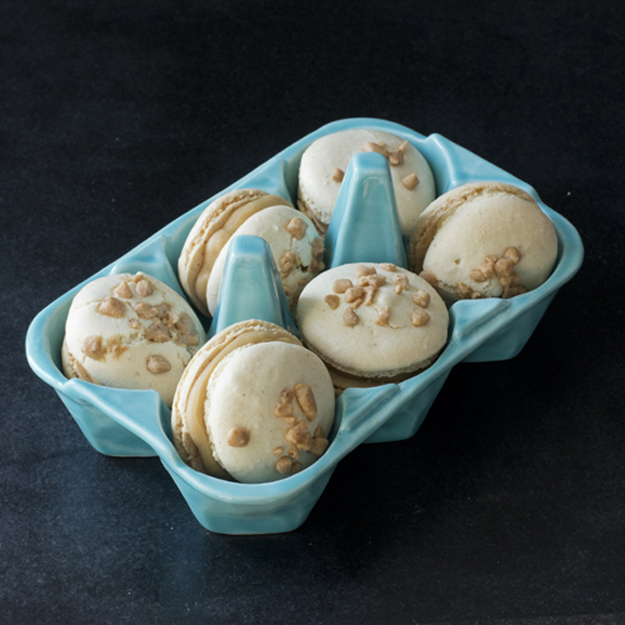
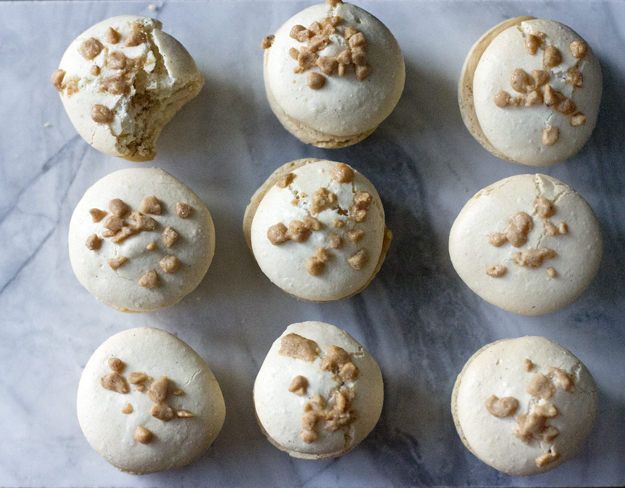
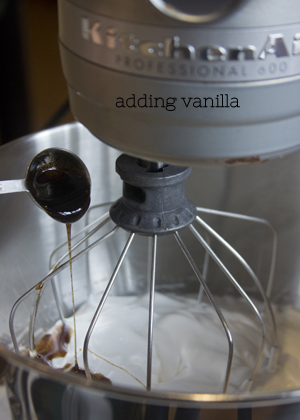
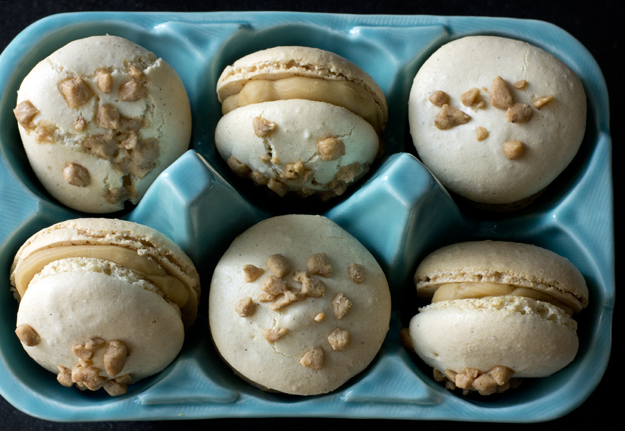
Since Passover is coming up soon (March 25), I decided to make some macarons and fill them with a Blonde Chocolate ganache. I think Frédéric would approve. These are classic French macarons, with only one “o”, not to be confused with American macaroons, (with two “oo”‘s), which are made with coconut.
Macaons are the perfect Passover dessert, since they contain no flour. There is a plethora of information and recipes out there in the Blogosphere. I have tried numerous recipes and techniques. Last year I discovered Stella Parks’ (aka Bravetart) macaron primer. I had always thought that macarons were the prima donnas of the pastry world, very temperamental and required a delicate touch. Not so says Stella. If you are a macaron geek like me, then these posts by Stella are required reading:
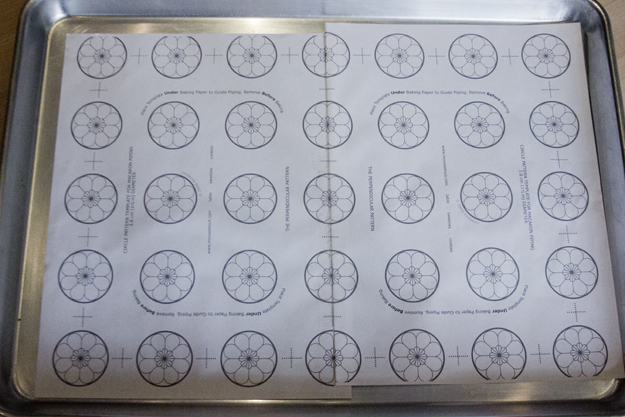
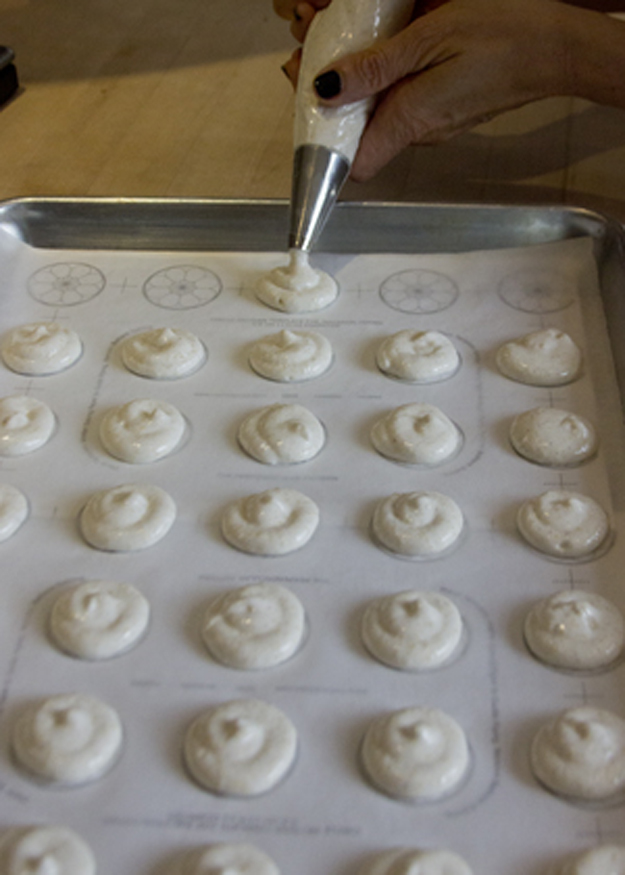
To make your life easy, print out this template for piping your macarons. Depending on the size of your baking sheets, you could print two and tape them together. Place template on baking sheet, cover with parchment and set aside.
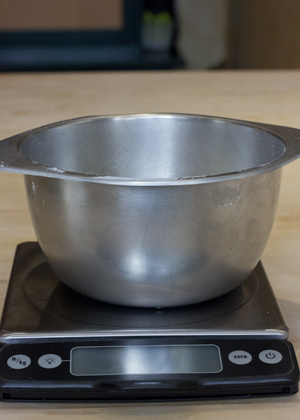
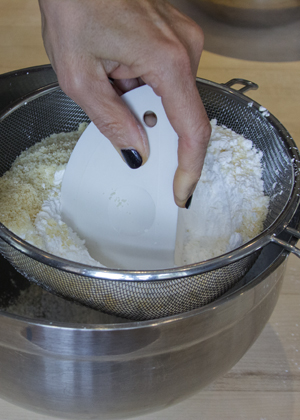
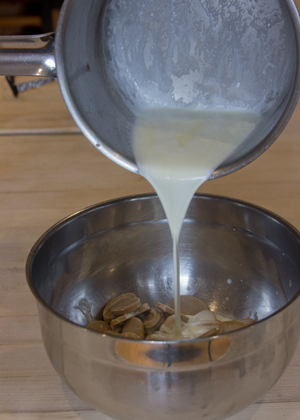
A kitchen scale and stand mixer are recommended for success with macarons. Classic macarons begin with almond flour, sometimes called almond meal. You can buy ground almonds at most grocery store or bulk food stores. The ground almonds are combined with powdered sugar and then pressed through a sieve.
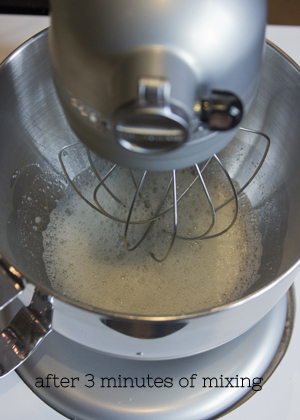
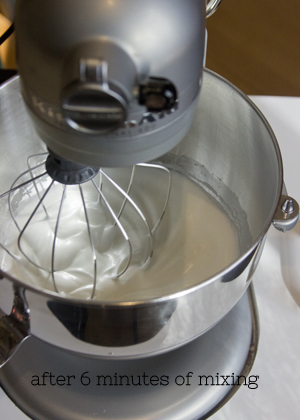
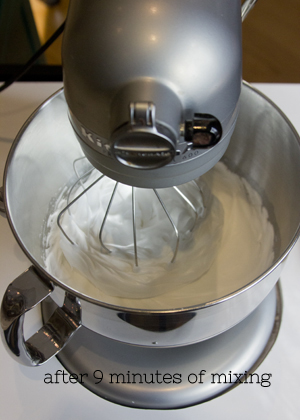
Egg whites, sugar and salt are whipped to stiff peaks. Stella gives quite explicit instructions, including number of minutes and speeds, which I have detailed in my attached recipe.
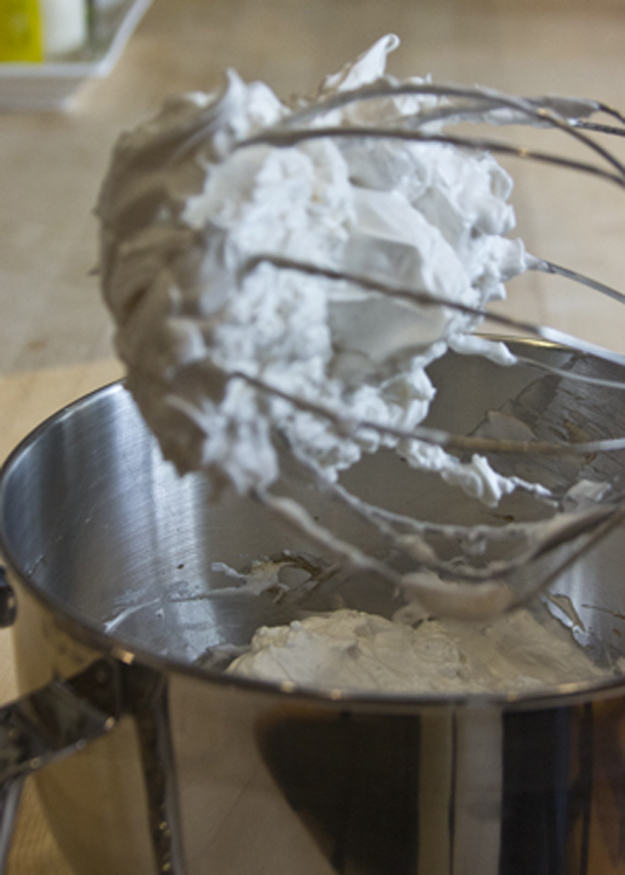
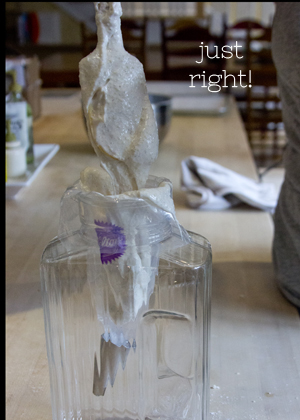
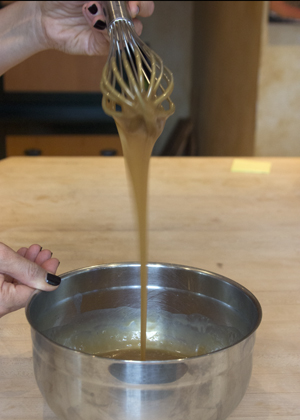
The meringue is whipped enough when there is a big clump of meringue in the center of your whisk, like this:
Next the ground almond/powdered sugar mixture is dumped on top of the meringue and a rubber spatula is used to combine everything. A combination of a folding stroke and a pressing motion, against the sides of the bowl to help deflate the meringue, are used. Remember, we are making macarons here, not meringues. You want to knock the air out of the egg whites.
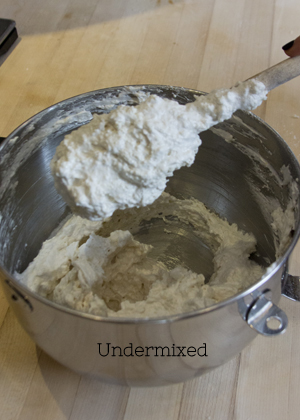
The batter, also known as the macaronage, is sufficiently mixed and perfect for piping when you spoon some batter on top of the bowl and it mounds up on itself, but after about 20 seconds, it melts back down on itself. Your macaronage is under-mixed and too stiff if you spoon some out and drop it back into the mix and it just sits there, never incorporating. Your macaronage is over-mixed if it has the consistency of pancake batter. Do not let it get to this stage!
Filling the piping bag is easy if you place it inside a tall glass or pitcher, and cuff the top down. Only fill the bag half full. Otherwise, it will ooze out from the top and you will have a sticky mess, and probably curse me!
Pipe just inside the circles, as the mixture will spread.
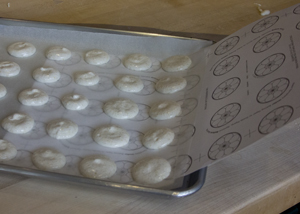
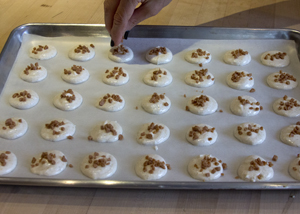
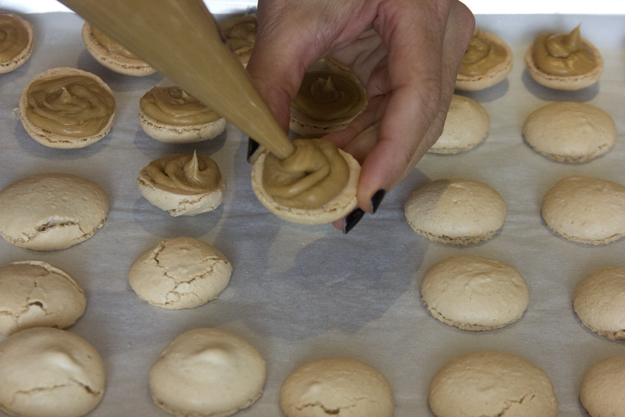
Remember to remove template before baking. Top half the macarons with a few Skor bits. These will be the top half of your macaron sandwich cookies.
While macarons are baking and cooling, prepare ganache filling. Bring cream and butter to a boil. Pour over chopped blonde chocolate. (You could also use white, milk or dark chocolate) Let sit for 3 minutes then whisk until smooth.
Let cool to room temperature, until quite thick and then pipe onto half the macarons. Top with Skor lids.
Macarons will keep in the fridge for a week or in the freezer for up to a month. Let come to room temperature before serving.

 My baby recently turned 20! Kind of scary and yet also awesome at the same time to realize that I am no longer the parent of teenage children. I have made the exact same Chocolate Cake for him for the past 19 years. To say that he is a child that does not handle change well is putting it mildly. For the first 3 years of his life he cried every year on his birthday when we sang happy birthday to him. The more he cried, the louder his older brother and sister would sing. Whether it was to drown out his crying or antagonize him even further, I am not quite sure, but I have my suspicions!
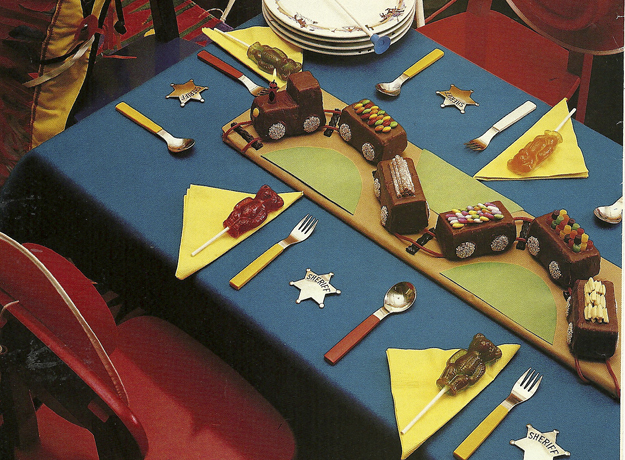
 Those suggestions were met with a stony stare and then he informed me that he would like his regular chocolate cake with chocolate icing please. Hey, at least he said please! So as the saying goes, “If it ain’t broke, don’t fix it.” So, I continued to make his favourite cake every year. However, as a food blogger, I have found this to be quite frustrating. I needed new material to blog about!
 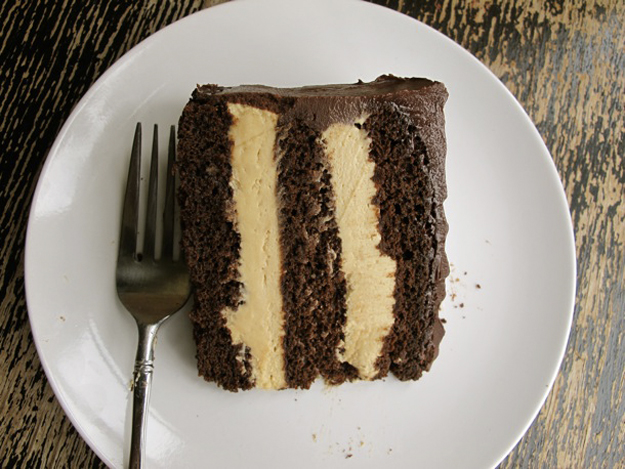 I adapted the original recipe in several ways. The first thing I did was double the cake recipe. This chocolate cake recipe uses both bittersweet chocolate and unsweetened cocoa powder. Buttermilk and coffee round out the flavours to produce a fantastic moist, rich and fudgy cake. I wanted more cake in relation to the peanut butter mousse filling.
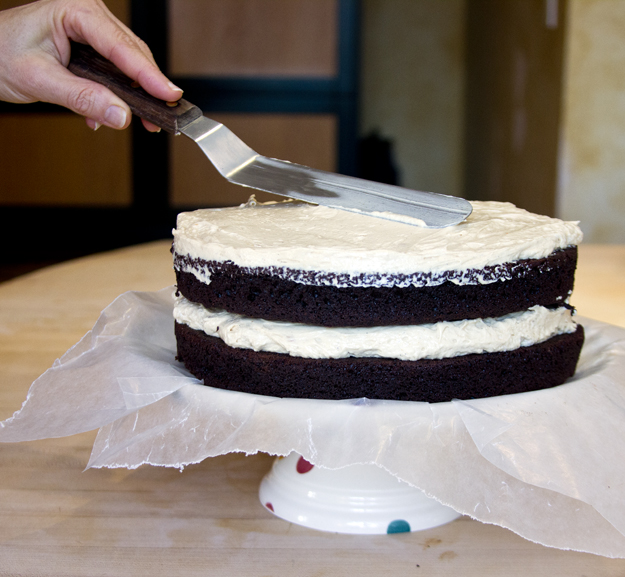
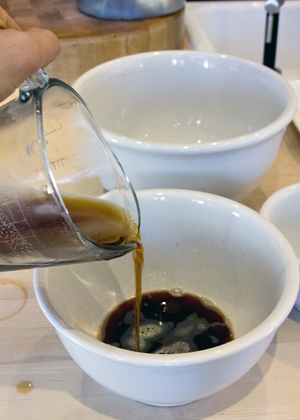
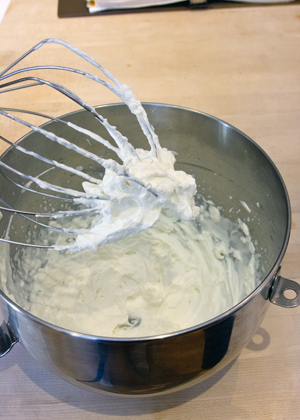
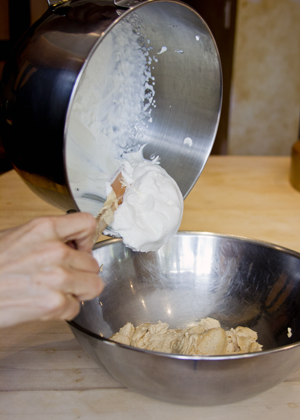
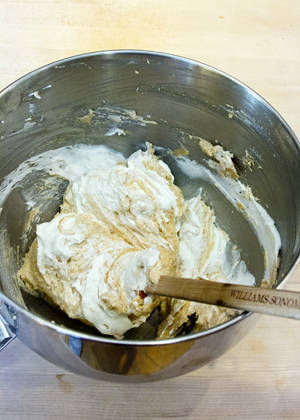
 The peanut butter mousse filling gets a bit of tang from cream cheese and then the whole thing is lightened with some whipped cream.
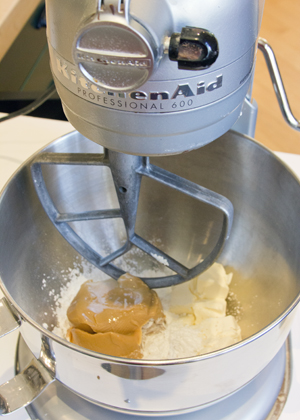
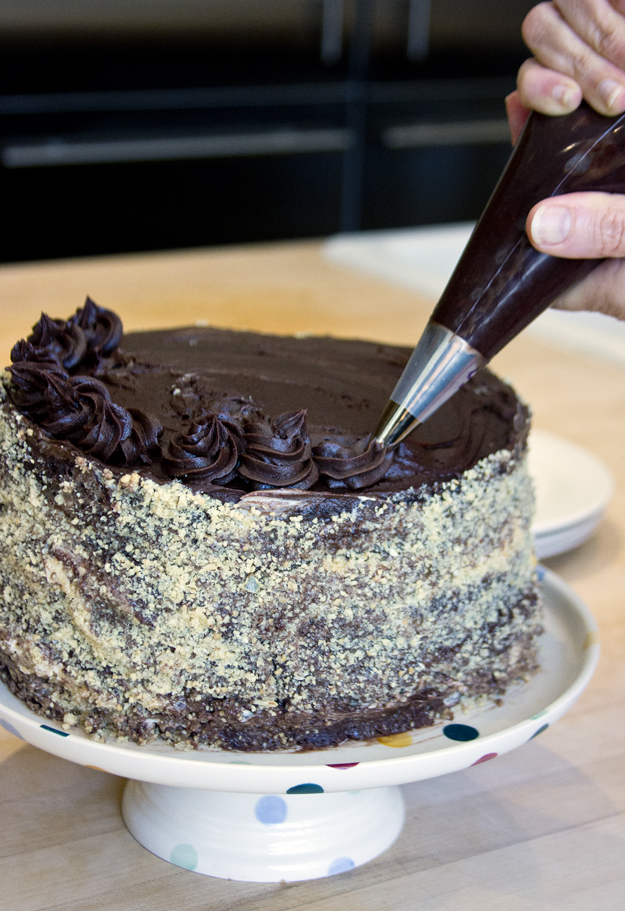
 The original recipe called for a ganache frosting, but I swapped in my favourite Chocolate Coffee Buttercream instead. The slight bitterness of the coffee was a great counterpoint for the sweet cake.
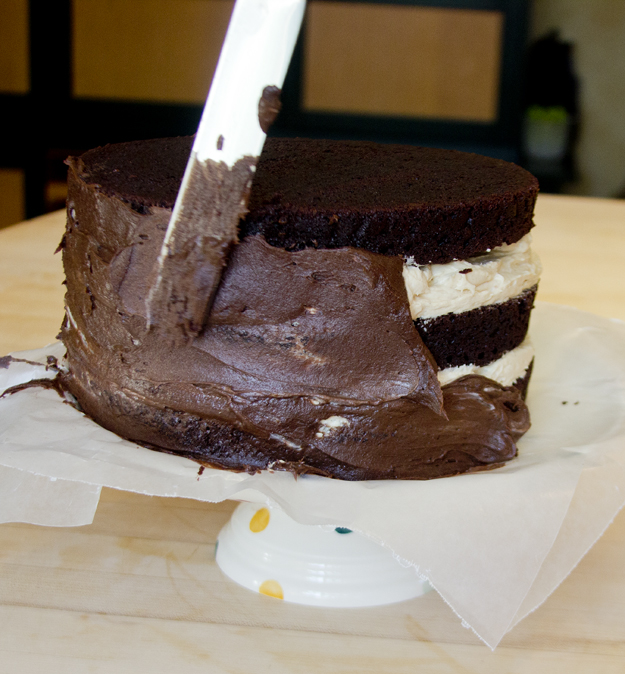 The final change I made was adding a dusting of peanut praline to the outside of the cake. I liked the textural crunch it added to the final bite. Without the praline I found it was just too many smooth textures in your mouth from the mousse and the buttercream.
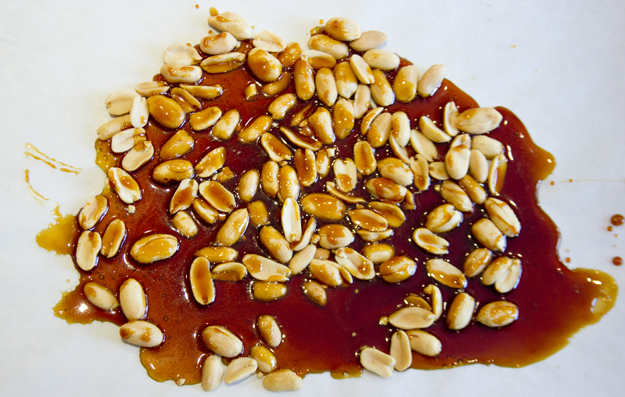


