I consider Honey Cake to be the Jewish equivalent to Fruit Cake. It’s always served at Rosh Hashanah (the Jewish New Year) celebrations but no one really likes it.
Honey figures prominently in Rosh Hashanah menus as it symbolizes our desire for a sweet new year. The choice of honey was brilliantly explained on the website torah.org with this insight: “A bee can inflict pain by its sting, yet it also produces delicious honey. Life has this same duality of potential. We pray that our choices will result in a sweet year.”
But nowhere is it written that honey must be baked into a cake. This year, Salted Honey Gingerbread ice Cream Sandwiches are on the menu. I’m a rebel.
Watch how they come together.
The cookie stamps I used are from Nordic Ware. Rolling the cookie dough in granulated sugar prevents the cookie from sticking to the cookie mold. You could certainly just bake the cookies without the bee themed stamps, but I couldn’t resist.
I tested out this recipe this summer and I wrapped each ice cream sandwich individually in plastic wrap and stored them in the freezer. We quickly discovered that the frozen cookies become rock hard making the sandwiches really difficult to eat. So in the recipe, I suggest you cut out the ice cream circles and store them a baking sheet wrapped in plastic wrap in the freezer. Assemble the sandwiches, with the room temperature, soft and chewy cookies, just before you want to eat them.
The addition of the salt to the honey ice cream keeps it from being cloyingly sweet. The spicy chewy ginger cookies are a perfect match for the sweet honey ice cream. Wishing you all a sweet and healthy new year.
While the siren call of apples and pumpkins is getting harder to resist, I’m holding out because my local market is still selling local peaches. This weekend has been just beautiful with temperatures reaching 28°C (that would be 82°F for all my American friends).
A classic Caprese contains tomatoes, fresh mozzarella and basil. This is my twist on it replacing the tomatoes with fresh peaches. I piled it all onto a Ciabatta loaf and put it in the panini press. I always forget about my panini press. It lives in a cupboard above the fridge, that I can only access with a little stepladder. But really, is there anything more glorious than a pressed sandwich. That crunch on the crust gives way to creamy melty cheese, sweet peaches and tangy basil. The basil we planted at the cottage is still plentiful and verdant.
Watch this video to see how it all comes together.
The smear of pesto really amps up the basil flavour profile. You wouldn’t normally think of pairing peaches and basil, but they are such complementary friends. If you don’t have a panini press, just put the sandwich in a frying pan, cover it with a small plate and weight the whole thing down with a heavy can (like a 28 ounce tin of tomatoes). Or you can cover a brick in foil and use that as a weight right on the sandwich.
I used a ciabatta loaf, but focaccia would also be a great choice. Don’t rush into autumn. Enjoy these last few days of summer.
The war on summer needs to stop. I’m looking at you pumpkin spice lovers. Stop flooding my Instagram feed with #PSL. You know, fall does not officially start until September 22. I don’t understand why some people feel the need to rush headlong into fall.
Early September is the time to be gorging on tomatoes and corn.
I refuse to be rushed into the new season. I’m one of those people that continue going sockless well into November. I have been known to slip into my winter boots, barefoot. To be fair, they are fur lined (well fake fur). To be honest, I have trouble with transitions. I always have. So I am here today to prolong your summer as long as possible with a glorious tomato galette. A galette, for the uninitiated, is French for lazy-ass tart 😉. It is essentially a free-form pie. No tart or pie pan needed.
The problem with many pie or tart doughs is toughness. When flour and water are mixed together, water molecules hydrate the gluten-forming proteins in the flour and too much gluten formation can lead to a tough crust. But, when we add fat into the mix, the flour protein molecules become coated with that fat. They provide a barrier that keeps the water molecules away from the protein molecules. Sort of like when you apply frizz-fighting cream into your hair. It coats the hair strands and when dried, protects your hair from moisture in the air.
My galette dough boasts two types of fat, butter and sour cream, leading to a very tender and flaky AF crust. The dough for this galette is so simple to make. It comes together in the food processor in about less than 30 seconds. It is extremely versatile and can be used for both sweet and savoury galettes. The dough freezes beautifully. I usually make extra, roll it out and tuck it into the freezer for when I need a galette fix fast.
The dough is spread with a bit of Dijon mustard for tang and then covered with nutty Gruyere and sliced tomatoes. I found some gorgeous heirloom tomatoes at the supermarket, but any local tomato will be delicious. Finish with drizzle of honey, a sprinkle of thyme and a generous shower of salt. Add fresh basil after baking. Galettes need to a hot oven to brown up that bottom crust. It’s perfect hot, warm or even at room temperature.
It’s no secret to regular readers of this blog that I adore rhubarb. That being said, I was shocked to discover there are 18 rhubarb recipes in the archives of my blog! I love the tartness that rhubarb brings to desserts. It’s a great way to achieve flavour balance in desserts, keeping the sweetness at bay.
Local rhubarb does not really arrive in Ottawa until early July and right now I am awash in a sea of rhubarb. Because I no longer have a garden (I’m in a condo now), my son planted a rhubarb patch in his backyard for me for Mother’s Day a few years ago. Rhubarb is a prolific perennial. It’s the gift that keeps on giving.
This ice cream is a vanilla base with roasted strawberry-rhubarb compote mixed in. Roasting is an excellent way to boost the flavour profile of fruit. Mix 1.5 cups of halved strawberries, 1 cup sliced rhubarb and 2 tablespoons sugar together on a sheet pan, and roast it in a 350°F oven for about 15 minutes, until the fruit is tender. Mash the fruit with a potato masher until it becomes a chunky sauce. Chill the sauce while you make the ice cream.
If you find yourself with a plethora of rhubarb, slice it and freeze it. Then all winter long you can roast it with frozen strawberries and spoon it over your morning yogurt. It makes winter more bearable.
I used the basic vanilla ice cream recipe from my Cuisinart Ice Cream recipe book. It’s an excellent base for all kinds of flavour mix-ins. The strawberry rhubarb mixture gets swirled in once the ice cream is churned but still soft.
Feel free to serve the ice cream in cones or if you want to make a special sundae dessert, serve it in pretty glasses with this Salted Pistachio Crumble on top. I’m all about texture. Save some of the strawberry rhubarb juice to drizzle on the sundaes.
Fairly close to the top of my “To Do” list was an item I have been putting off for quite a while (aside from rescheduling my dental cleaning). I have been wanting to master the skills necessary for baking a beautiful pavlova.
A pavlova is a meringue based dessert named after famed Russian ballerina Anna Pavlova. She toured Australia and New Zealand in 1926. The creation of this dessert sparked the famous “Pav War.” New Zealand claims that the chef of a Wellington hotel at the time created the dessert in her honour, apparently inspired by her bell shaped tutu. Australians, on the other hand, claim that the pavlova was invented at a hotel in Perth, and named after the ballerina because the meringue was “as light as Pavlova.”
The meringue base is typically topped with whipped cream and then some type of fruit. Baking the meringue is a bit tricky and requires paying attention to the small details. I baked quite a few last month and here is what I learned.
Make sure the bowl of your stand mixer is absolutely clean and free of any grease. Fat is the enemy of meringue.
Cold eggs are easier to separate than room temperature eggs as the yolks are firmer when cold and less likely to break. Let cold egg whites sit for at least 30 minutes before beating. Room temperature egg whites will produce greater volume.
Use superfine sugar to make the meringue. It dissolves much faster than regular sugar and will give you a smoother meringue. Any undissolved sugar leads to a gritty and/or weeping meringue. I learned that the hard way! If you can’t find any at the supermarket, just place regular granulated sugar in the food processor and process it for about 45 seconds.
Know your peaks. When it comes to gauging doneness of beaten egg whites, you need to understand the stages of doneness. Soft peaks will flop over. Medium peaks will stand up but not completely straight. Stiff peaks stand straight upright.
Beat the meringue on low and steady speed. (speed 2 or 4 on my KitchenAid mixer) A slower speed results in a more stable meringue. Once all the sugar is added you can increase the speed to high.
Be patient when adding the sugar to the egg whites. Slowly spoon in the sugar while whisking the egg whites. It should take about 5 minutes to add the sugar. Adding the sugar slowly allows it to dissolve. Adding it too quickly will deflate all the air bubbles you are working so hard to achieve.
I find meringue to be very sweet, so I decided to add a tart rhubarb curd to the filling to counterbalance all the sugar. I also paired tart rhubarb with fresh raspberries for an added hit of tartness. The rhubarb is roasted in the oven. The curd and the roasted rhubarb can be made a day in advance. Assemble pavlova the day you plan to serve it.
Here’s a video showing how the assembly comes together. Your meringue will likely crack in the oven. As Zoe says, “that’s the nature of the beast.” Cracks notwithstanding, it will still taste delicious. You will need to carefully remove the top layer of baked meringue to allow you to fill the pavlova with curd, fruit and whipped cream. The outer shell is firm, but inside you will discover a softer marshmallowy layer.
I have an early summer twist on a traditional pesto for you today. Instead of basil, peas and arugula take the starring role. Frozen peas are perfect for this recipe. I find that unless you have access to fresh peas immediately after they have been harvested, they always taste starchy to me. Frozen peas are packaged immediately after harvesting and that fresh verdant pop is preserved.
Peas are quite sweet, so the addition of arugula, which is peppery and slightly bitter, is a really nice contrast. Pine nuts are traditional in pesto, but I love the richness and colour you get from pistachios.
The pesto comes together while the pasta is cooking. I love spaghetti for this pesto, but a short tubular shape would also be great, like penne or rigatoni. An extra sprinkling of cheese is not optional, in my opinion, but I’ll leave that up to you. For the photos , I garnished mine with some green pea and purple radish shoots that I found at Produce Depot (Ottawa) this week. I also reserved some of the blanched frozen peas and chopped pistachios to sprinkle on top. I like garnishes that tell a story of what the dish contains.
I did not grow up with the tradition of buttermilk biscuits. We were more of a party sandwiches and whipped Jello mold kind of a family. (My mom was fancy like that!)
I have been to Nashville and eaten some incredible buttermilk biscuits and wanted to learn to recreate them at home. In my quest to learn, I spent last week baking buttermilk biscuits every day. My husband was thrilled and I think I have succeeded. Just look at these babies. Lofty, light, fluffy and flaky AF. We froze the extra biscuits and discovered they are quite delicious toasted.
I learned a few things along the way and I’d love to share those lessons with you.
The type of flour you use makes a difference. All-purpose flour has a higher protein content than cake and pastry flour. More protein means more gluten, which gives the dough enough structure/body to create flaky layers and a nice crusty exterior. But using all-purpose flour exclusively led to a biscuit that was a bit tough. Cake and pastry flour, with its lower protein content, does not develop gluten as well as all-purpose flour. This results in light fluffy biscuits but those made exclusively with this flour did not rise as high or achieve the flaky layers I desired. The ideal was a 55%/45% (by weight) mix of all-purpose and cake and pastry flour.
Use both baking soda and baking powder. Baking soda has an alkaline base, which means it is not acidic. It needs acid to activate it and create carbon dioxide, which provides the leavening. Buttermilk plays the role of acid in these biscuits. It also adds a nice tangy flavour. Too much baking soda would completely neutralize that tangy flavour and leave behind unactivated baking soda which tastes metallic. Baking powder is made up of baking soda plus a dry acid. That additional acid will help give the biscuits their characteristic tang, plus provide extra leavening insurance.
The butter must be very cold. If you tend to have hot hands, I would suggest investing in a pastry blender. They are inexpensive and do a great job of working the butter into the flour. Make sure that you don’t totally work the butter into the flour. leave a few pea sized bits of butter. Butter is 20% water, so when those little knobs of butter hit the hot oven, they will melt and release steam, which creates pockets of air for maximum lift.
Don’t over knead the dough: You are not looking for a ball of dough that is as smooth as a baby’s bottom. After adding the buttermilk, the dough will look like a shaggy mess. That is correct. Just knead the dough 6-7 times until there is no dry flour visible. You will still see little knobs of butter in the dough.
Building layers is the key to flaky biscuits. Shape the dough into a rectangle, roughly 11×7 inches. I used a rolling pin to start and then used my bench scraper to help me straighten the edges. A ruler would also be an excellent tool for this. Next, fold the dough into thirds, as if you were folding a sheet of paper into thirds to fit into an envelope. Repeat this flattening and folding twice more and you have built in your layers.
Don’t twist the biscuit cutter. Press the cutter down into the dough and then lift it straight back up again. If you twist it, you seal off the edges of the dough, prohibiting the biscuits from rising evenly.
Snuggle. Place biscuits close together on baking sheet, almost touching. When they are in close proximity they provide support to each other and can grow up nice and tall.
Chill. Place unbaked biscuits in fridge for a 15 minute rest before baking. This gives the gluten time to relax, resulting in more tender biscuits and the butter can harden. If the butter is too soft, the biscuits will spread and slump more readily.
Here’s a video to show you how it all comes together.
Don’t skip making the whipped brown honey butter. I have included a recipe for how to make it. Once you brown the butter, chill in the fridge to solidify. Then whip it with a hand mixer and add a bit of honey and salt to taste. Leftover butter freezes perfectly. I also made some strawberry butter by whipping 125 grams unsalted butter (not browned butter) with 3 Tablespoons freeze dried strawberry powder, 2 teaspoons of honey and a pinch of salt.)
Dorie Greenspan had the very clever idea to caramelize Rice Krispies in her book Chez Moi. She used them to make Crispy Topped Brown Sugar Bars. I wasn’t sure what I wanted to use them for, I just became obsessed with caramelizing Rice Krispies. Unfortunately I didn’t have any Rice Krispies in my pantry, but I found a box of Special K cereal, so I figured, close enough.
Caramelizing the Special K was simple. Boil sugar and water until it is a light amber colour. Mix in the cereal, stir to coat and continue cooking until the Special K becomes dark golden brown. Transfer to a baking sheet to cool.
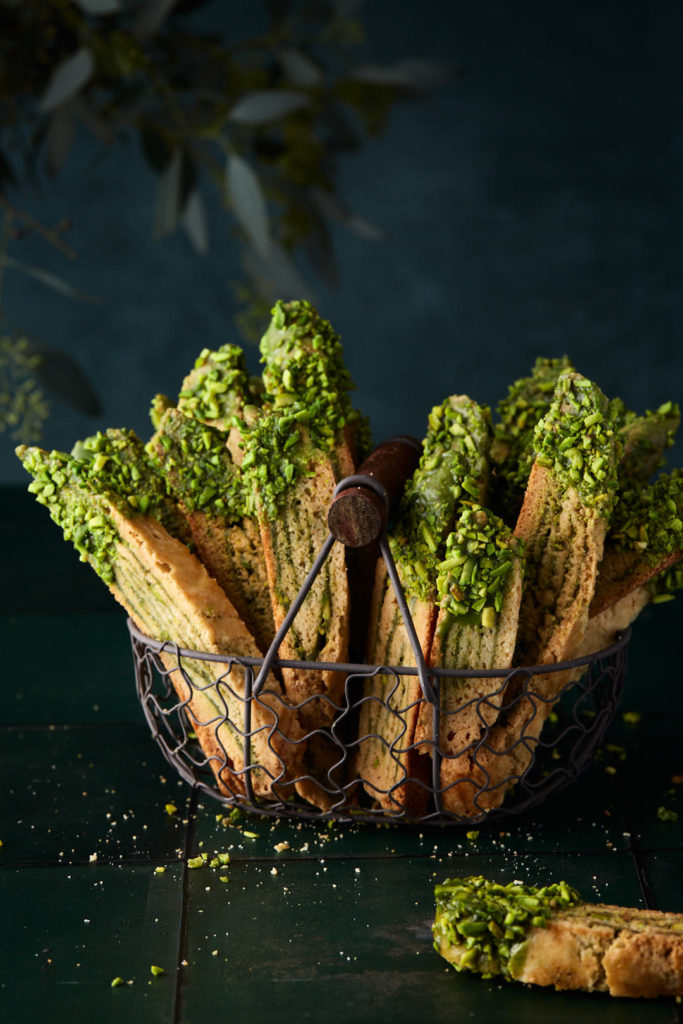
As I snacked on the Special K (very addictive), I remembered an old recipe from my childhood that incorporated Special K cereal. It inspired me to create these Cinnamon Almond Caramelized Crunch Biscotti.
Biscotti, literally translated from Latin means “twice baked.” The dough is first formed into a log and baked until just starting to firm up. Once the dough cools, it is sliced, on a slight diagonal and baked for a second time, until crisp. Traditional Italian biscotti dough is made without butter, but I add butter to my dough. The biscotti are crunchy but not hard and dense.
Here’s a pro tip that will change your biscotti making game. Most recipes instruct you to turn the biscotti halfway through the baking process so that they bake evenly and get crisp on both sides. To skip flipping the biscotti, position a wire cooling rack on your baking sheet. Then arrange the slices on top of the cooling rack. This way, the heat of the oven can circulate around the biscotti and there is no need to flip the slices. Give the biscotti a generous sifting of cinnamon sugar before they go back into the oven for their second bake.
The biscotti will keep well in an airtight container for a few weeks, or for them into the freezer for longer storage.
If you grew up in the 1970’s you might recall the iconic Nabisco Icebox Cake. Two simple ingredients and no baking required. Chocolate wafer cookies are layered with whipped cream and then set into the fridge for some culinary alchemy. The cookies absorb the moisture from the cream and become soft and cake-like. The texture always reminded me of the Good Humour Ice cream Sandwich -squidgy, in a good way.
My mom was fancy, so she always sprinkled the top with some chocolate shavings.
This version is Julie van Rosendaal’s clever take on the original icebox cake. As soon as I saw her recipe in the Globe and Mail last month, I became obsessed with trying it. I have tweaked her version very slightly by adding some strawberries to the rhubarb compote. Watch how it all comes together.
Biscoff cookies originated in Belgium in 1932 and have become Europe’s favourite cookie. They are similar to gingersnaps but have a much crunchier texture, which I discovered comes from Belgian brown sugar , which is quite different from North American brown sugar. If you’re curious about the difference, you can read all about it here.
The first time I had a Biscoff cookie was in 1991. I had just moved to Ottawa and my Belgian neighbour, Brigitte, invited me over for coffee and a playdate with our kids. She served Speculoos cookies with the coffee. I thought she said “speculum” and was slightly perplexed. I discovered that the brand name was Biscoff (a hybrid of biscuit-coffee) , but the generic name of the cookie is Speculoos. A visit to the gynaecologist never fails to make me think of these cookies. Whatever you call them, they are delicious.
I bought my Biscoff cookies on Amazon. If you live near a Trader Joe’s, they make a version of these cookies as well.
This cake is a great make ahead dessert. Prepare it just to the stage before you slather the top with whipped cream. Cover well and pop it in the freezer for up to a month. Just before serving, unmold from the loaf pan and cover with freshly whipped cream. A great trick I learned from Anna Olson, is to add skim milk powder to your cream before whipping (1 tablespoon per cup of cream). The skim milk powder stabilizes the cream and your beautifully piped or swirled design will hold its shape for hours.
For the design I piped, I used a Wilton #127 piping tip. You could just spread the cream on and use a spoon to swirl it decoratively.
When sliced, the cake is such a pretty surprise. The tartness of the rhubarb provides a lovely fresh contrast to the sweet cookies and cream.
If you search the archives of this blog, you will discover that there are no recipes for stuffed pasta of any sort. I have always assumed that they are too much work to make. As I typed that last sentence, I realized how bizzare that sounds, coming from someone who often posts cakes that take all day to create.
I was inspired to give stuffed shells a whirl after watching Jeff Mauro make these Spinach and Mushroom Stuffed Shells on The Kitchen a few weeks ago. The base of most stuffed shell recipes consists of ricotta, mozzarella, and an egg. You can choose your own flavour adventure. I decided on kale and plant-based spicy sausage. Jeff made a delicious looking vodka-tomato-cream sauce to lay his shells on, but I took the easy route and pulled out a jar of Rao’s Marinara Sauce (Not sponsored, just love it! Great price at Costco this week, by the way.)
Remember to cook the shells for a minute or two less than the package directions, as they will continue cooking in the oven with the sauce. You can put the filling into a disposable piping bag if you like, but honestly, it didn’t take that long to actually fill them with a spoon.
Sprinkle a bit of extra cheese on top of the shells before baking.
The recipe for this serves 4-6. if you are just cooking for two, make the full recipe but divide it into 2 smaller casserole dishes. Bake one for dinner that night and freeze the second for another time. You can bake it frozen without thawing. Freezer meal make me happy.