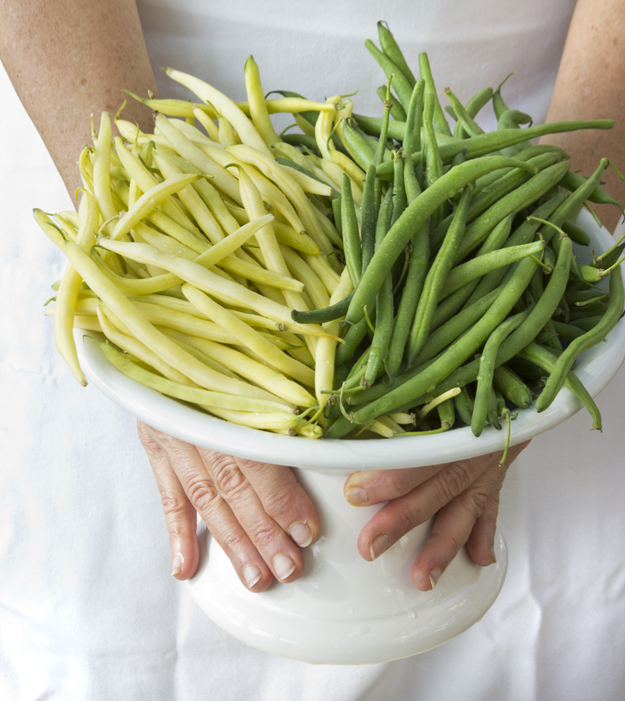
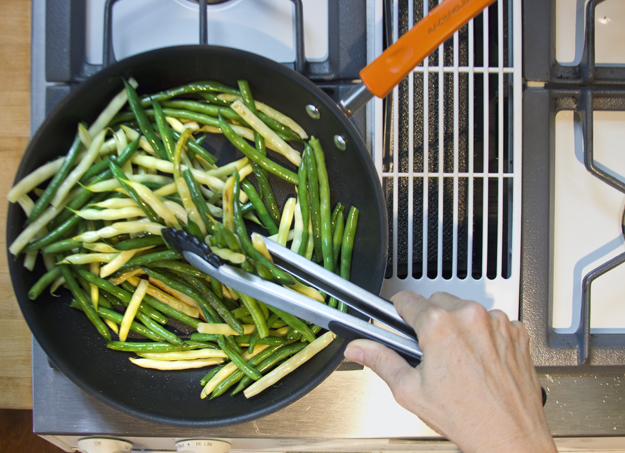
When the baskets at the market are spilling over with green and yellow beans I get very excited. That satisfying sharp snapping sound they make when you break off the ends tells me that these beans are fresh from the field.
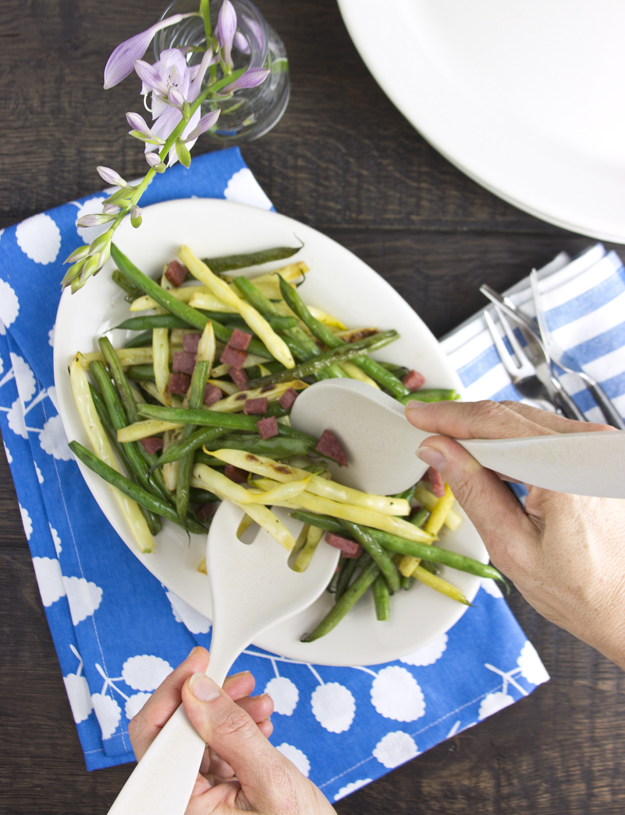
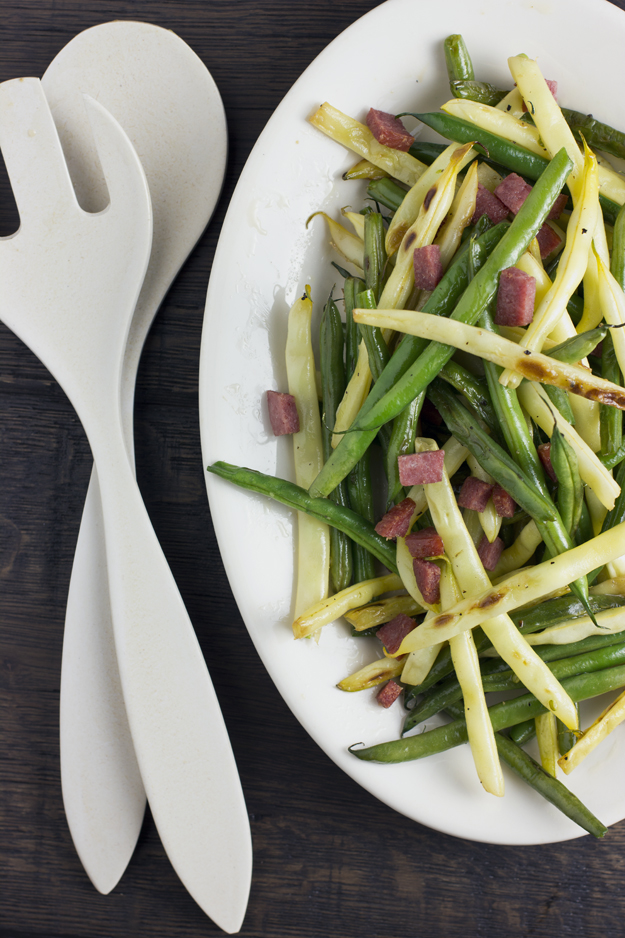
Traditionally in North America, veggies have been portrayed as a minor character on the plate, letting meat take center stage. However, chefs around the world are beginning to inspire us to flip that view around. Let vegetables shine on the plate , but use meat sparingly, to add some acidity, richness and fat. This recipe was created by Chef Josh Keeler from Two Boroughs Larder in Charleston, SC.As I perused Chef Josh’s recipe, I did a double take reading the instructions. Put the salami in the blender. Really??? Remember that episode of The Chew when host Carla Hall wonders “Can you blend it?” and then proceeds to puree leftover chicken pot pie? Well, blended salami vinaigrette is way better than that. Surprisingly delicious. It adds richness and an unctuous quality to the beans. The pureed dressing is a rather vibrant orange colour, thanks to the paprika, but don’t let it scare you. Press on!
I decided to add a touch more salami , crisping up little cubes to use as a sort of meat crouton.The first time I made this we added chick peas to the dish to up the protein content. As my sister Bonnie says, “Chick peas make everything better.” For this photo shoot, I left them out.
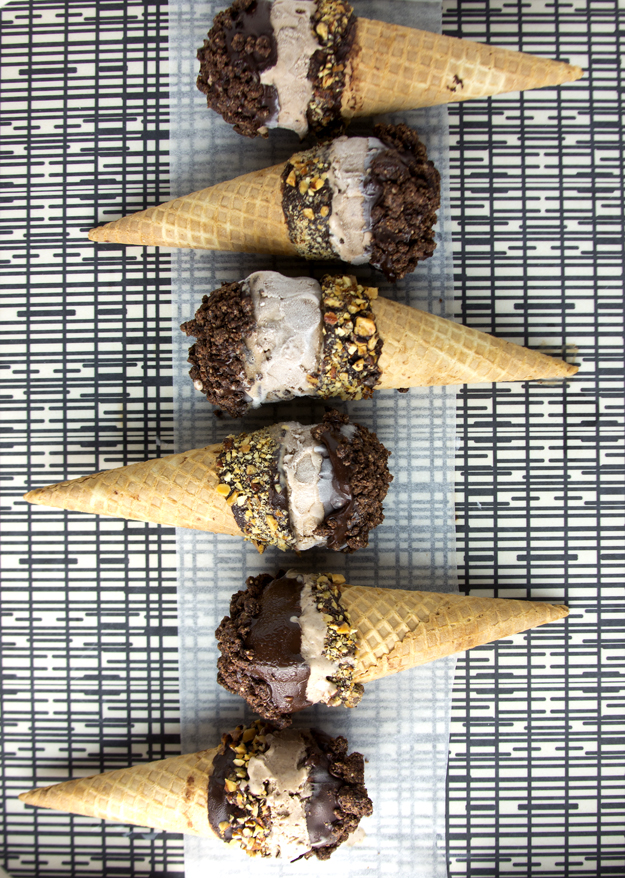
When I came across a recipe for Malted Chocolate Ice Cream in Bon Appetit Magazine, I instantly knew that I must create it for my charming friend Marla. Her guilty secret is a wild passion for Malteasers (chocolate covered malt balls). While her husband Ed and I prefer to poison ourselves with Twizzlers, Marla has always preferred Malteasers.
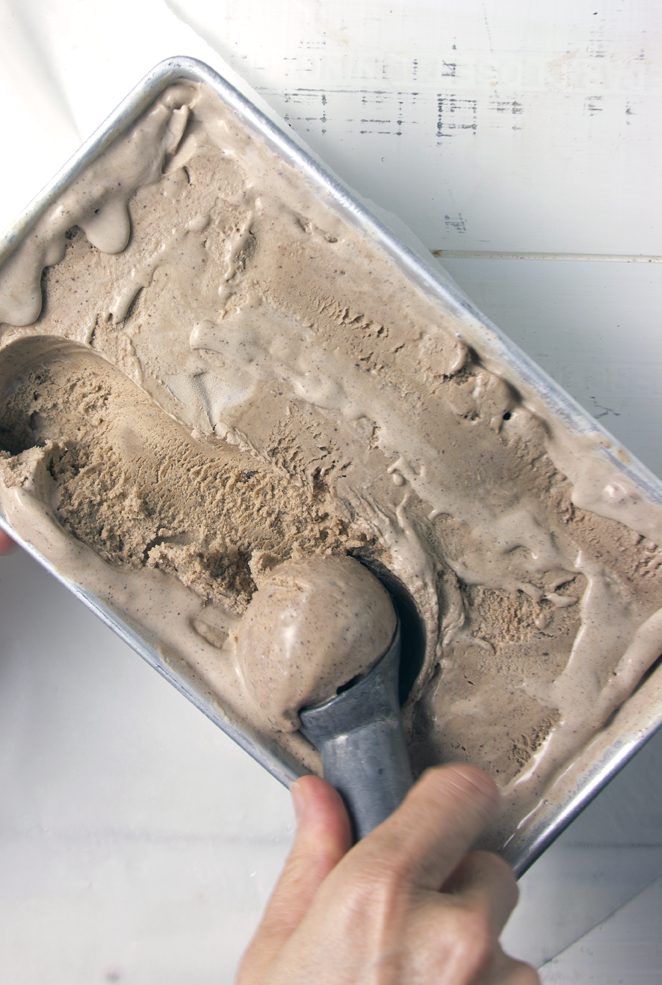
I made the ice cream and transferred it to the freezer. While cleaning up I licked the bowl to taste. I was instantly transported back to my childhood. Totally reminiscent of the chocolate Drumsticks of my youth. Usually the corner store only stocked Vanilla Drumsticks, but once in a while they carried the cones filled with a light chocolate ice cream. This malted milk ice cream reminded me exactly of those. I knew I had to recreate them!
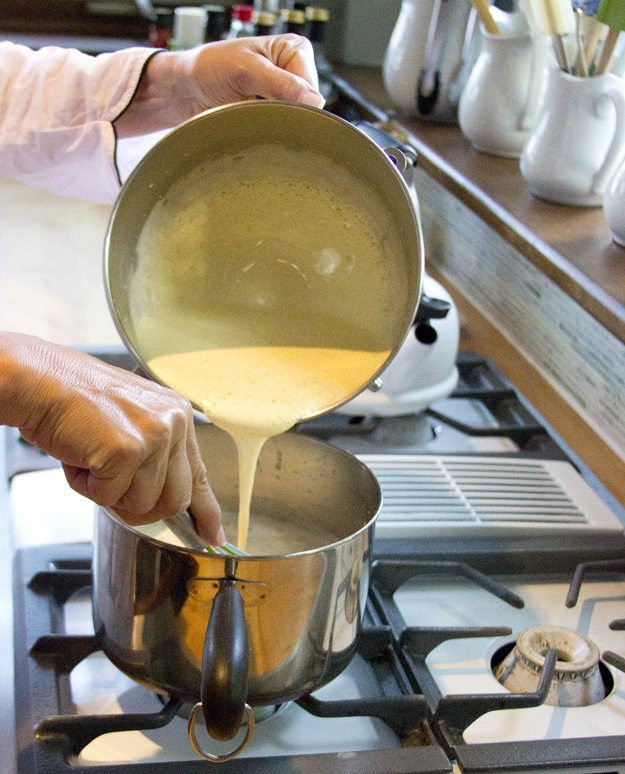
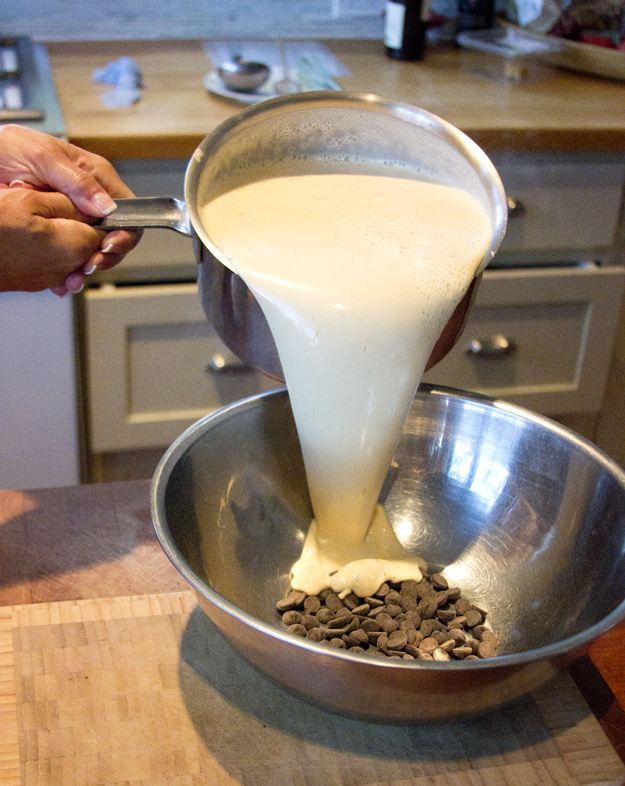
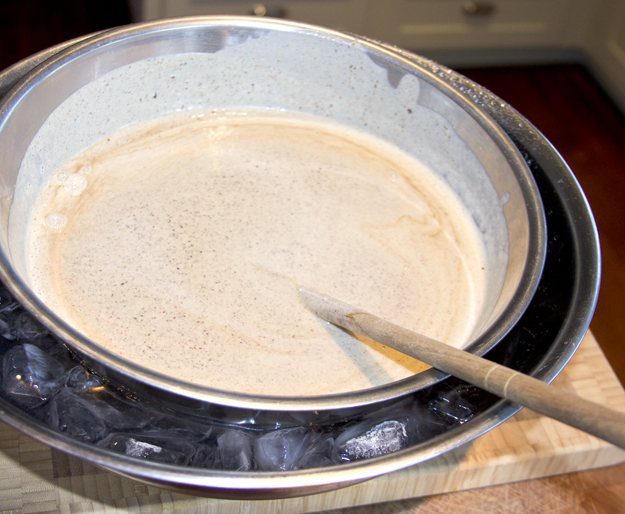
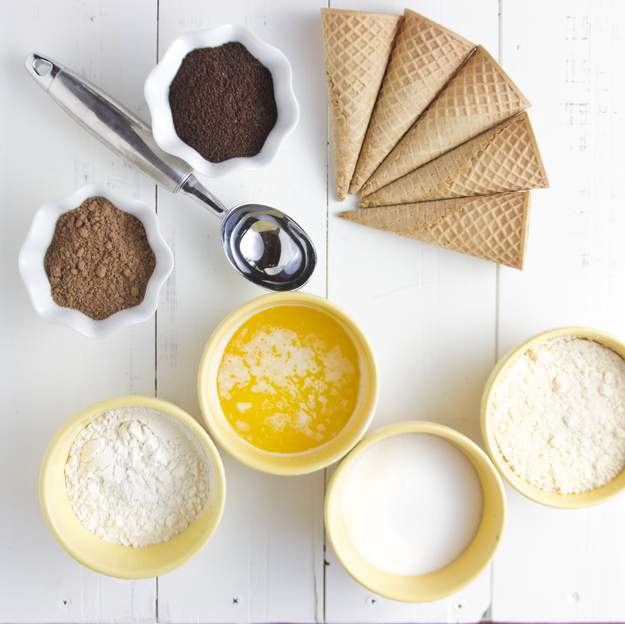
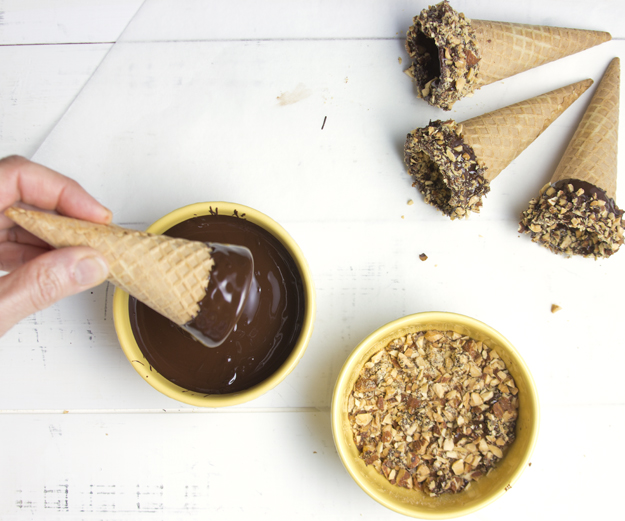
The base for this ice cream requires a dozen egg yolks! Luckily, Marla made us an incredible Lady Baltimore cake that used a ton of egg whites, so the yolks were just sitting in the fridge the next day. It was meant to be!The hot custard melts the chocolate. Before the liquid can go into the ice cream machine it needs to chill for a while in an ice water bath. While the ice cream was freezing, I tackled the cocoa-coffee crumbs. Bon Appetit magazine calls them “delirium inducing” and I have to concur!Cocoa powder, ground coffee, flour, melted butter, sugar and ground almonds are combined and then spread out on a cookie sheet and baked in the oven until dry and crispy.
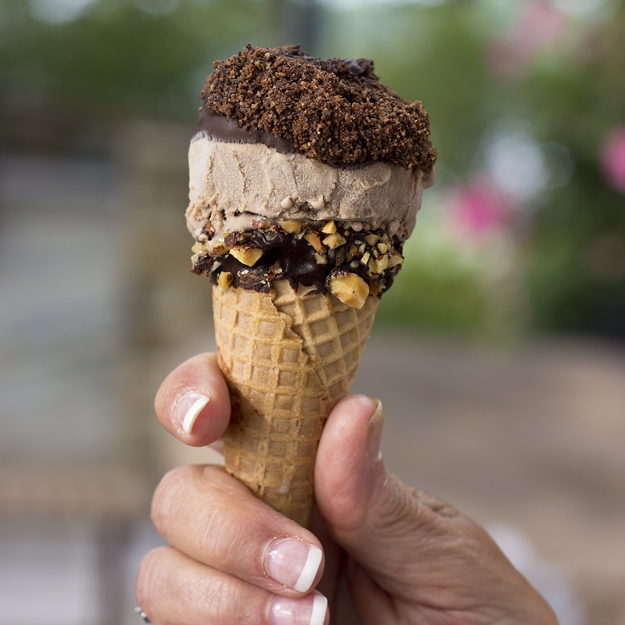
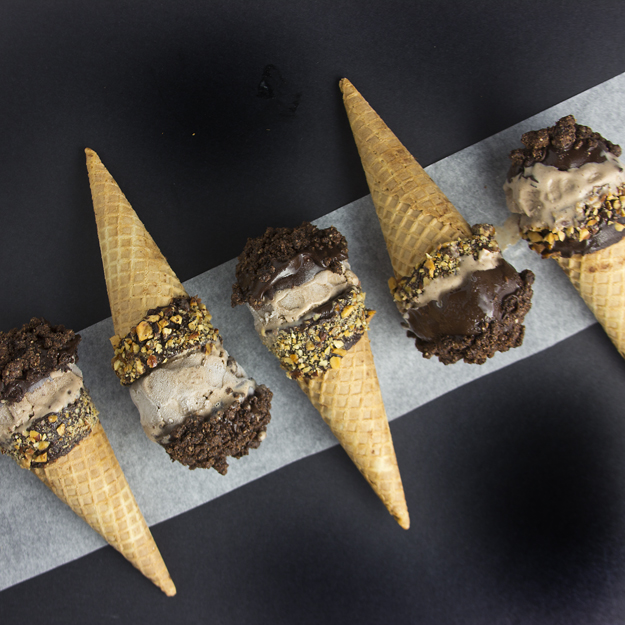
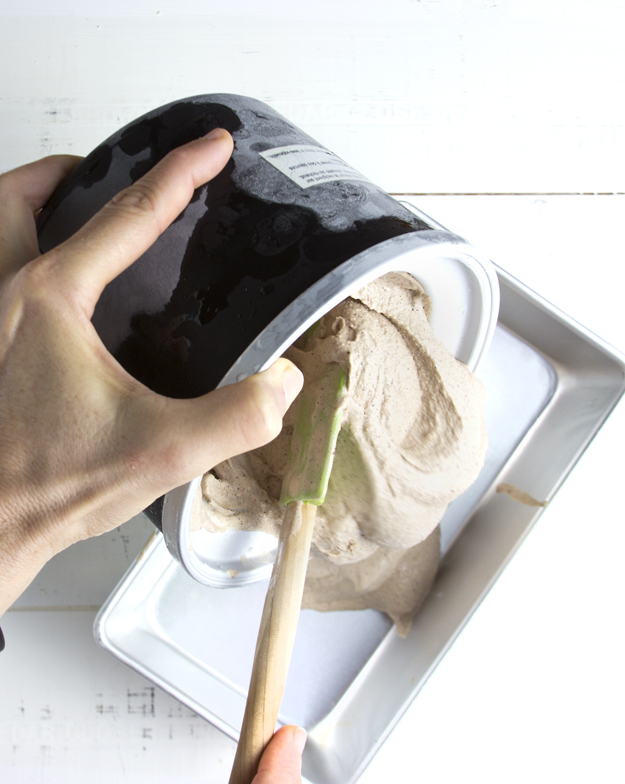
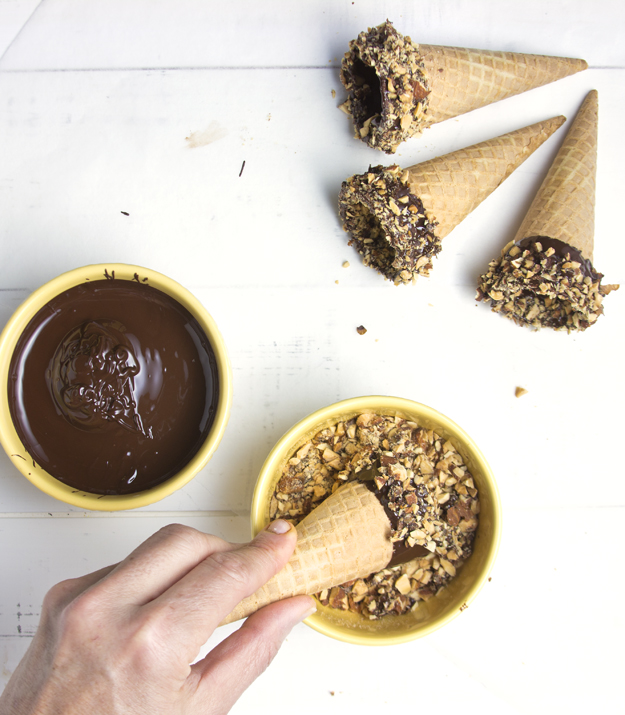
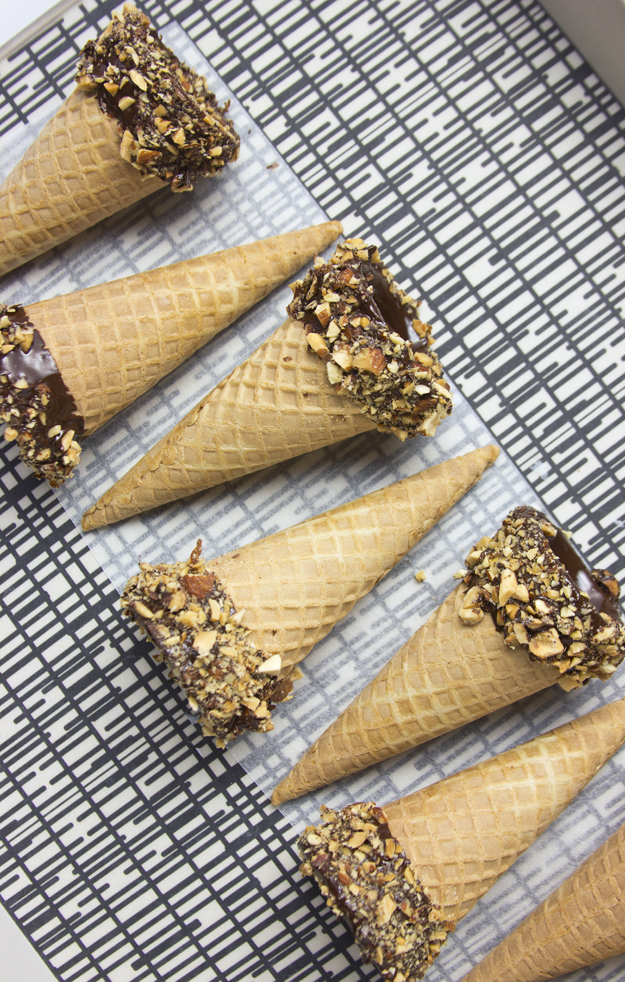
A dip in melted chocolate and then a roll in salted roasted almonds, because that’s how we roll around here. Extra deliciousness. Sweet and salty is just an awesome combo.Malted Chocolate Ice cream is scooped and cones are filled. A final dip in more melted chocolate and a finishing touch of cocoa- coffee crumbs!!
We’re not big on celebrating the “Hallmark Card Holidays” in our house. Valentines Day is just an excuse for me to bake, blog about and then gorge on photo shoot leftovers of gorgeous heart shaped cookies like these, or these or especially these!! Not that I really need a holiday excuse to bake cookies.
Mother’s and Father’s Day are customarily observed with the perfunctory card and a big hug. So imagine my surprise this year when each of my 3 children, totally independant of each other, presented me with gifts. Two days before, my youngest son gave me a delicate sterling silver chain bracelet. On Mother’s Day my oldest son handed me an impeccably wrapped and ribboned box that contained an elegant hand blown glass pitcher with a flavour infuser in the center. And then, 6 weeks after Mother’s Day, my middle child, (my daughter), left a fitbit on my desk.
My first thought was that my husband told the kids he was leaving me for a younger faster version and hadn’t gotten around to telling me yet. Then it occurred to me that perhaps I was dying and no one had the guts to break the news to me. But no, the husband vowed he was in it for the long haul and I felt perfectly healthy. Turns out, they just wanted to show me how much they love and appreciate me. Awww. Sweet!!
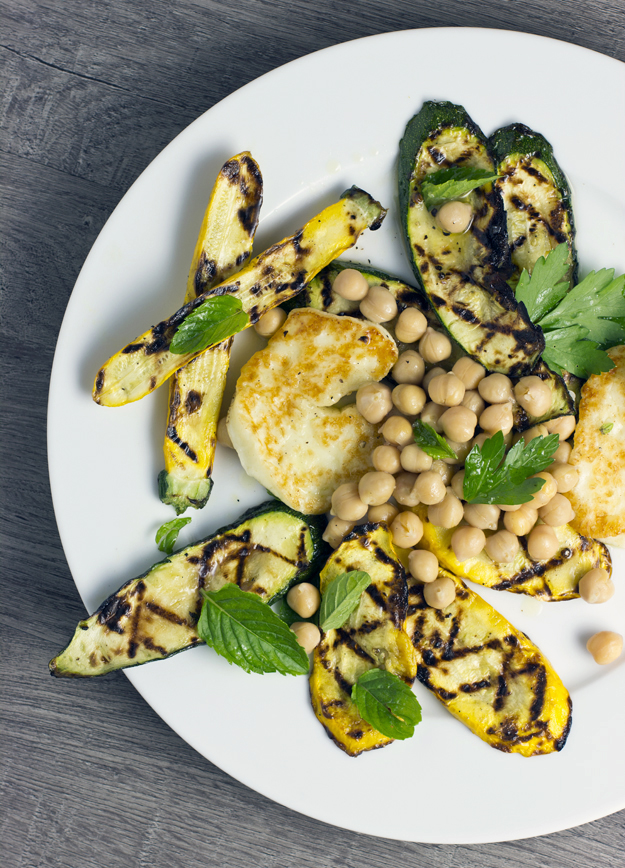
Guzzling mint-strawberry-cucumber flavoured water and wearing the fitbit make me believe I am healthier already. I decided to go with the flow and assembled this healthy, insanely delicious salad I discovered in the June 2014 issue of Chatelaine magazine.
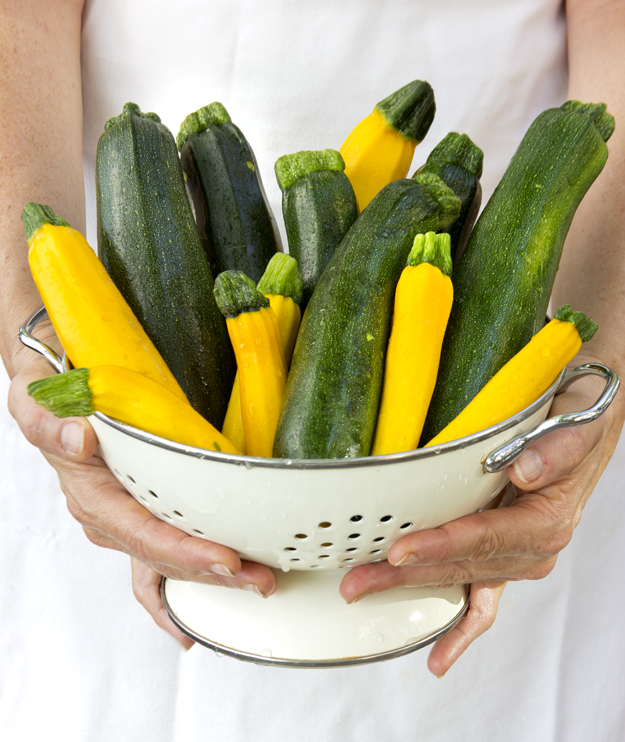
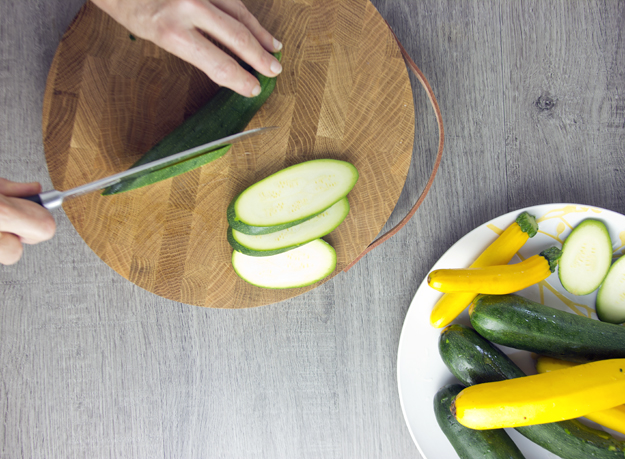
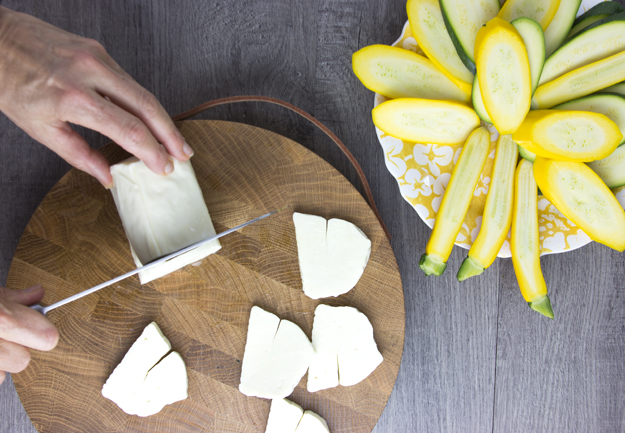
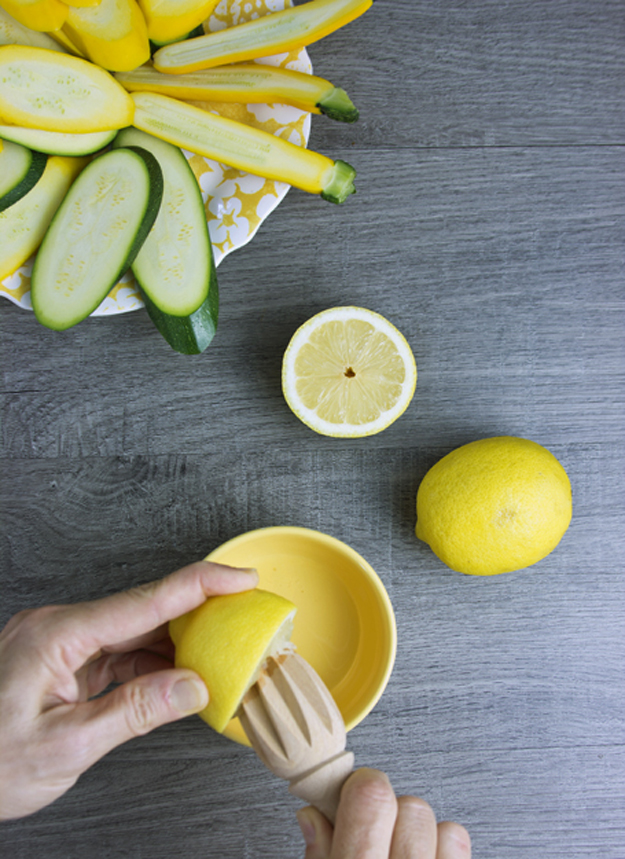
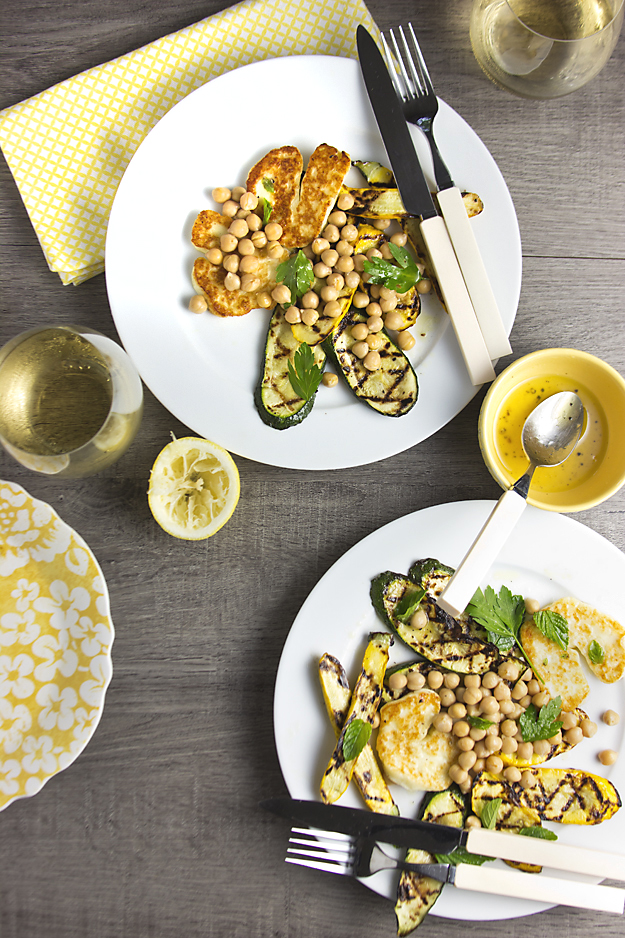
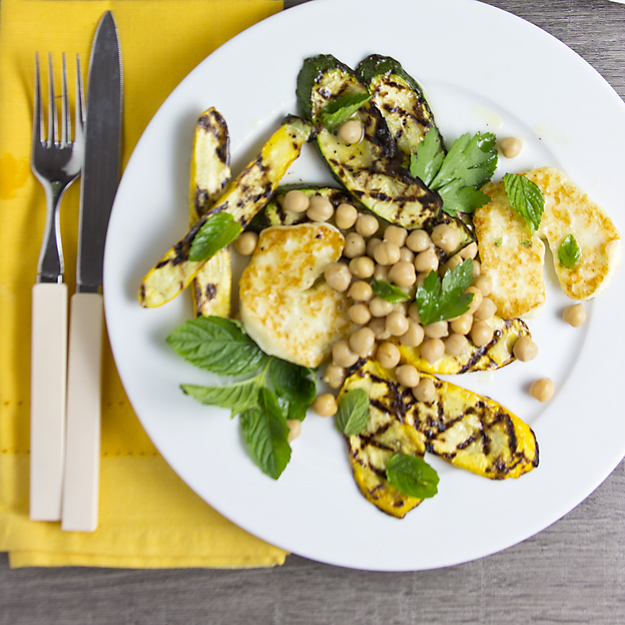
Already armed with some gorgeous local zucchini, I was prepared. I sliced the fatter zucchini on the diagonal into 1/2 inch thick planks. The little ones I just sliced in half, lengthwise. A package of Halloumi cheese gets sliced into 1/2 inch planks as well. I whisked together a dressing with white wine vinegar, lemon juice, olive oil, salt and pepper.Everything gets treated to a generous glug of good olive oil, some Kosher salt and pepper (no salt for the cheese!, it’s salty enough already.) The zucchini get grilled until deeply golden brown. I pan fried the halloumi since it can stick to the grill. A can of chickpeas and some fresh mint and parsley and lunch is ready. I think that eating raw zucchini is about as pleasant and flavourful as chewing a sponge. But bathe it in olive oil, salt and pepper and let it get grill kissed and something magical happens to the taste and texture. It becomes silky in texture and almost meaty in substance. And if you have never had fried halloumi cheese before, well, let’s just say you are in for a real treat. It is salty, slightly rubbery and squidgey. While that may not sound like the most appetizing description, trust me, it is delicious. It sort of squeaks between your teeth when you chew it and it is very addictive.
Happy Blogiversary to me. This is my 300th post! When I look back at my first post, It seems hard for me to believe I have been at this for over 6 years. This journey has been one of self discovery as well as one heck of a huge learning curve. With each post I learn something new and develop skills I never knew I had the capacity for. The most joyous thing about blogging is the readers. Connecting with strangers out there in the blogosphere is really incredible. (Also, it’s a great way to hear from your family!) Thanks so much you guys, for continuing to subscribe, read and leave me comments! Bloggers live for the comments. It means we are not just spewing off to an empty vacuum. Someone is out there listening.
For my 300th post I though I would talk about inspiration. People always ask me how do I think of subjects to blog about. Where does my inspiration come from?
Life’s little challenges along the way can often provide inspiration as well. My son’s gluten intolerance spawned this post, and empty nest syndrome inspired this one. Once in a while sheer greed gives rise to a post, such as this one about a Chip Stand Crawl. Often the spark is my excitement to share an awesome new recipe I’ve discovered and can’t believe I have ever lived without before, like Double Coconut Granola. And then, once in a blue moon, lightning strikes, literally!
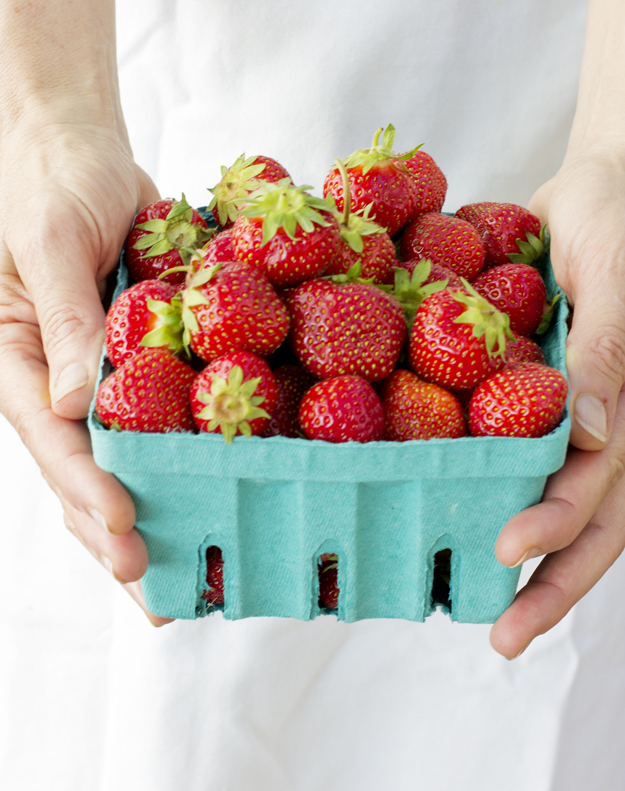
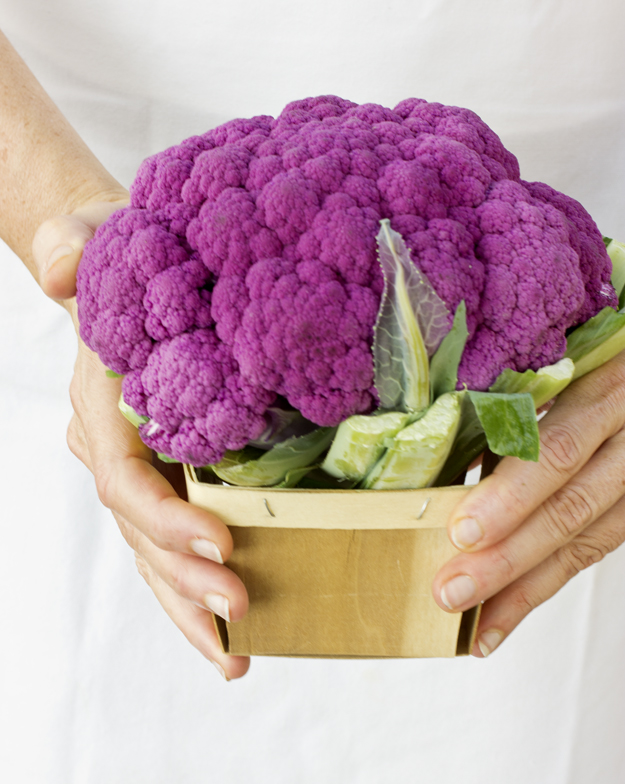
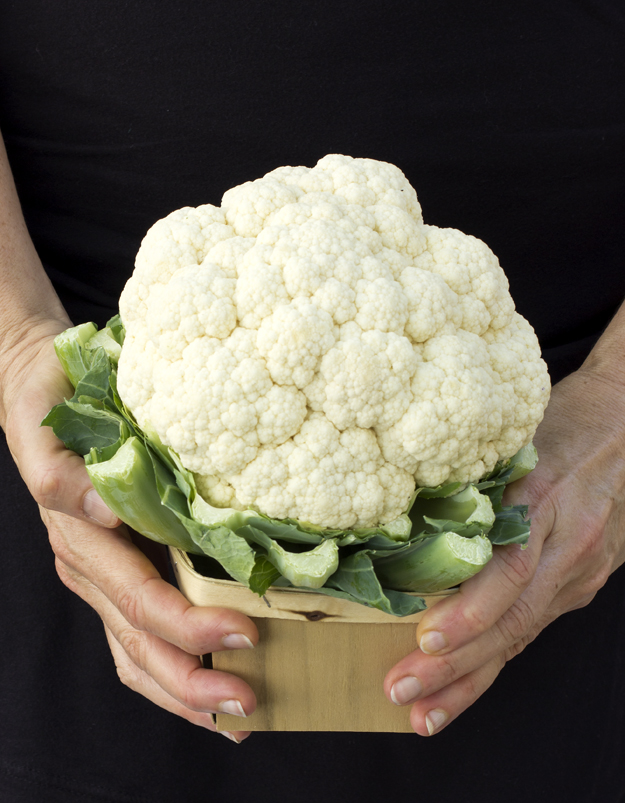
A visit to Parkdale Market yesterday left me feeling very inspired. Stay tuned for posts about all these gorgeous vegetables.
Happy Canada Day! For 148 years old, the old broad’s in pretty good shape. As I survey the state of the world around me, I feel supremely grateful to be living in this beautiful country.
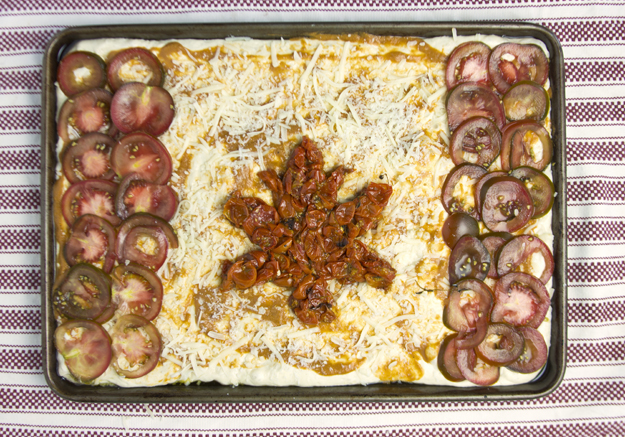
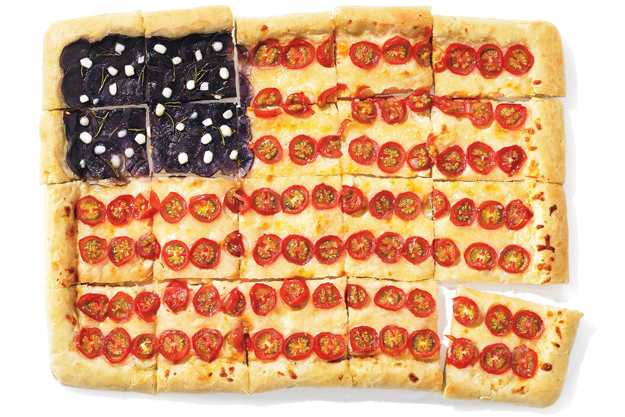
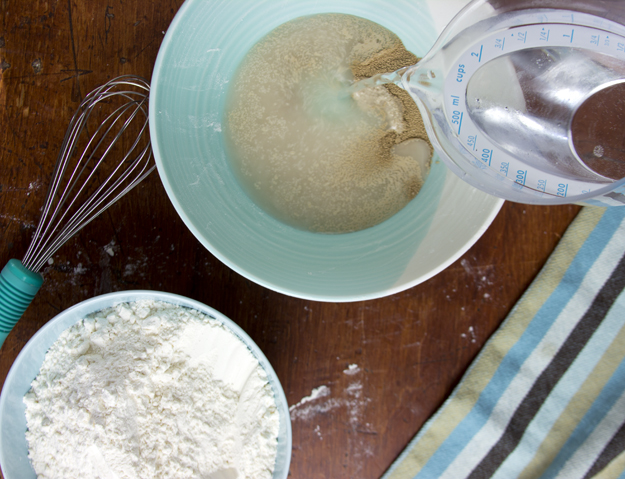
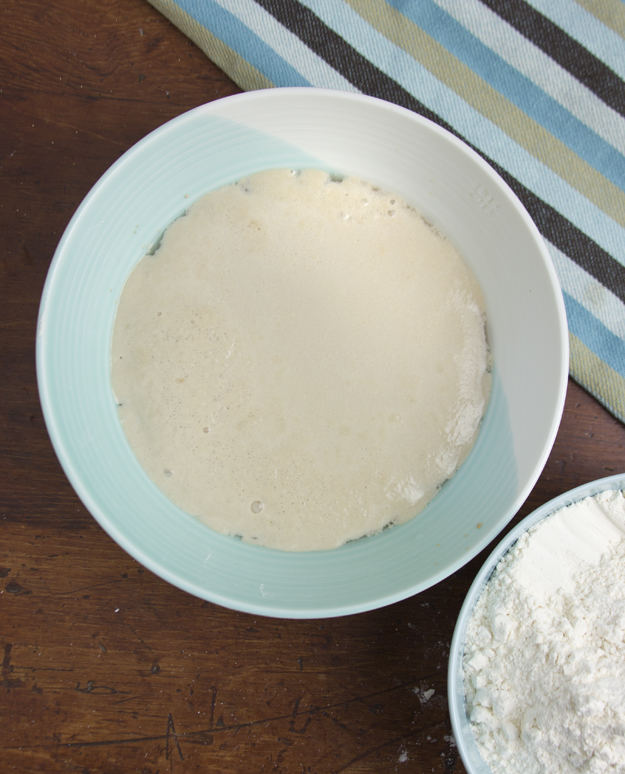
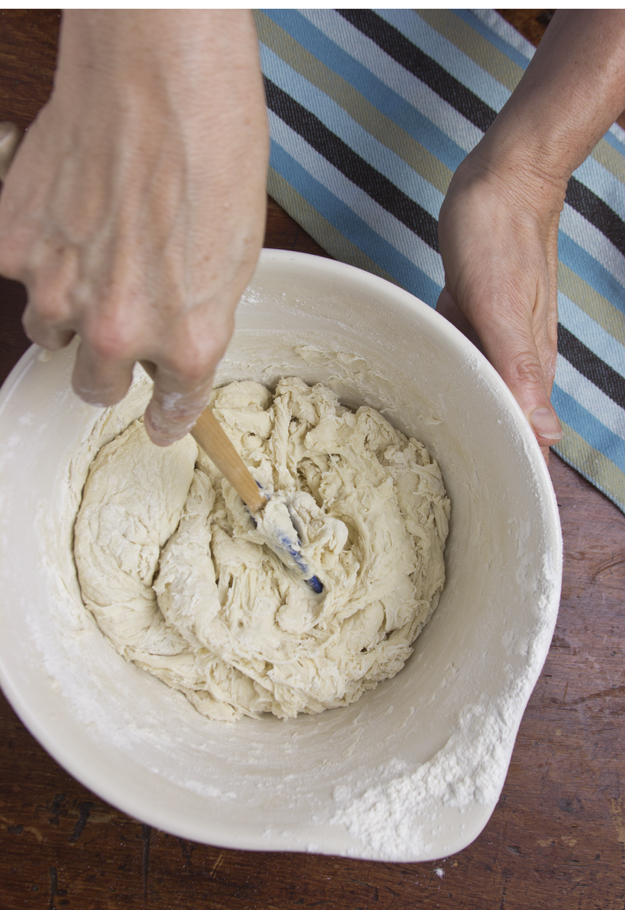
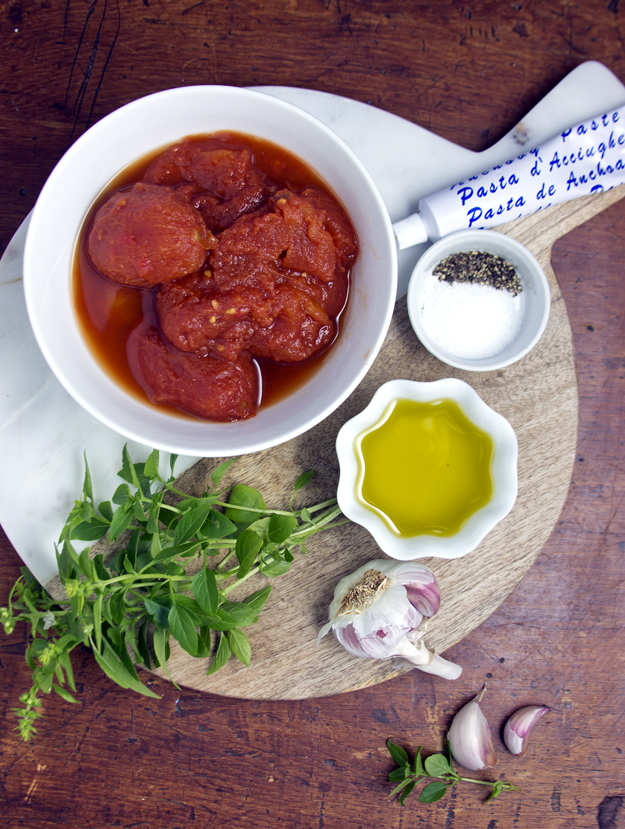
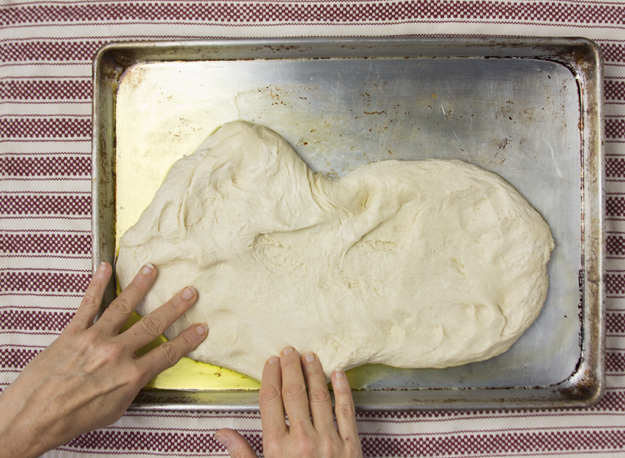
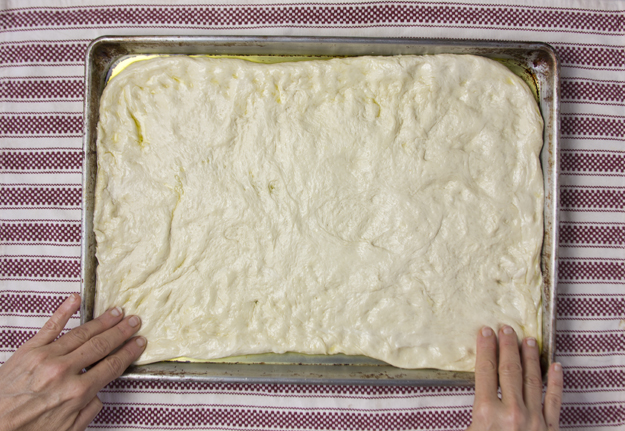
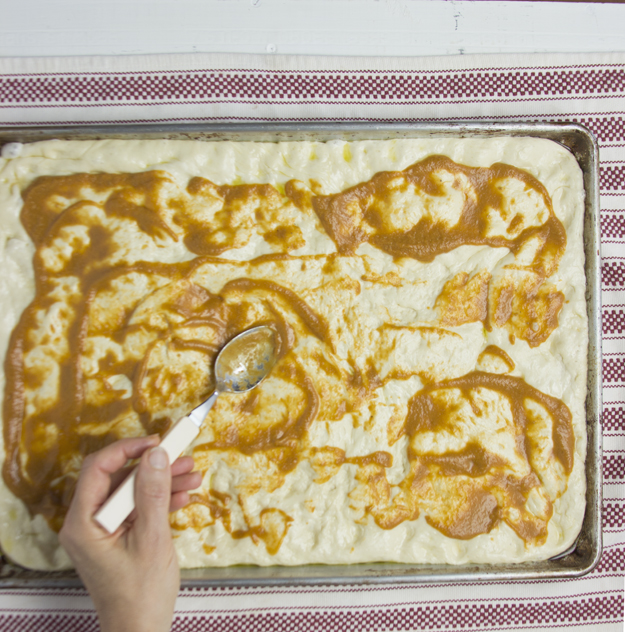
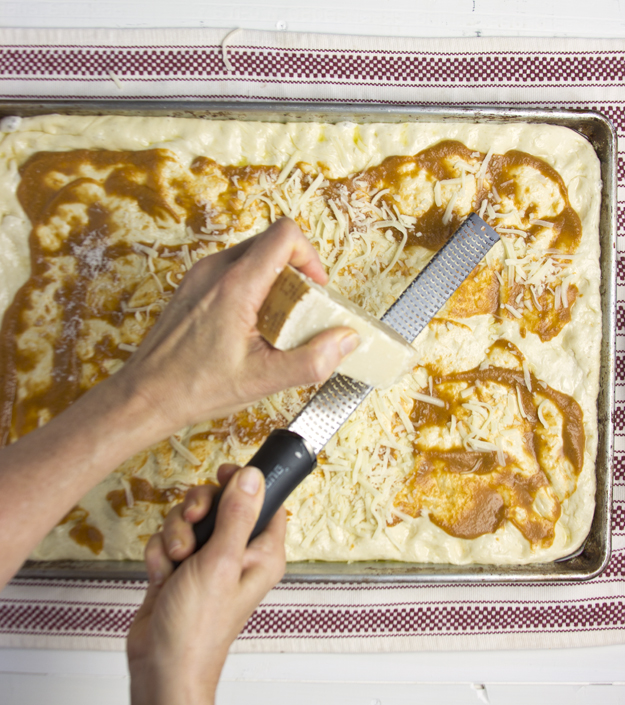
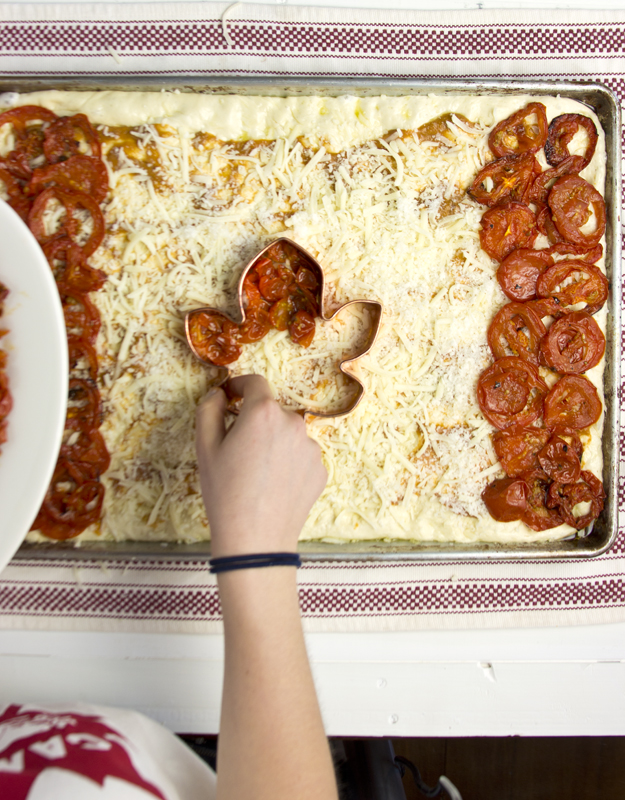
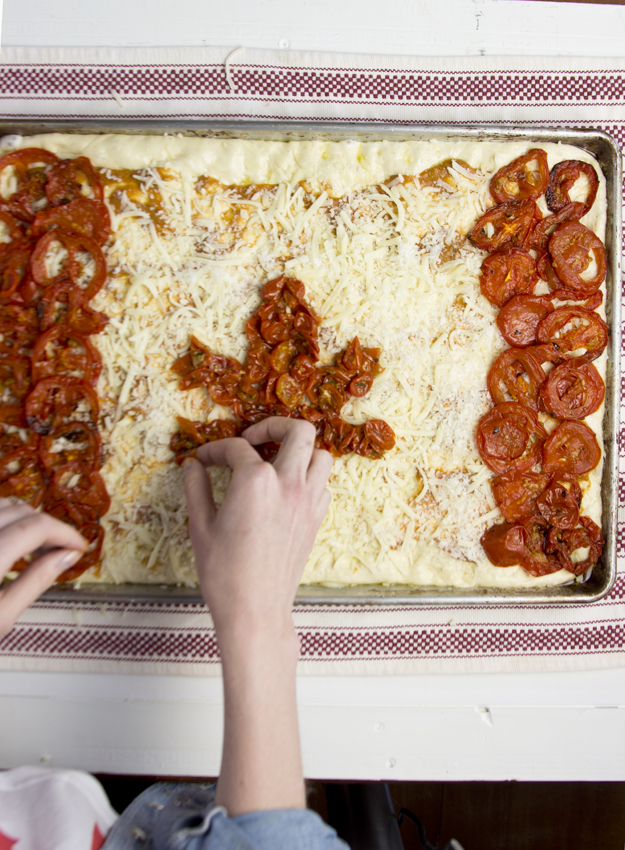
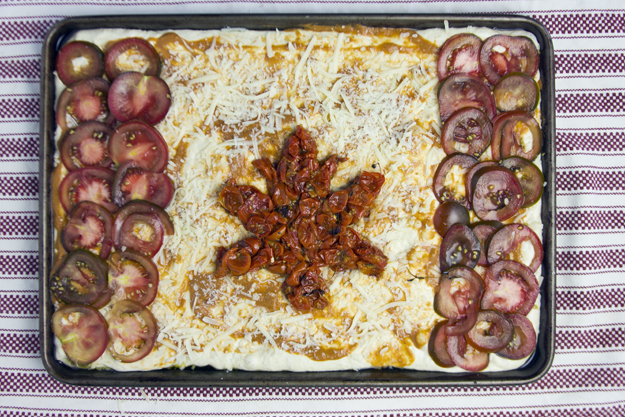
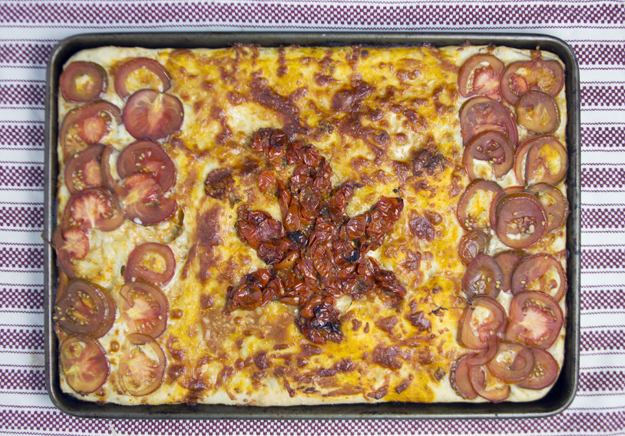
Many Canadian families commemorated the day with a 2-4 of Labatts, a Timmie’s double double or perhaps one of these awesome treats. Here at our cottage we celebrated with a pizza decorated like the Canadian flag, because that’s just how we roll. My daughter sent me this photo of an American Flag pizza and said we should make a Canadian version. I’m always up for a culinary challenge. The dough should be made at least a day or two in advance. The slow rise in the fridge allows the flavours to develop and the end result is a crust with a nutty flavour and a satisfying chewy texture. Within 10 minutes, the warm water has activated the yeast and it’s all bubbly.The sauce for this pizza couldn’t be simpler. Just blend everything together . No cooking required. Anchovy paste is the secret ingredient that gives incredible depth of flavour, but not a fishy taste.The dough gets stretched flat in a well oiled 13 x 18 inch sheet pan. If the dough refuses to stretch, and keeps springing back, wait about 10 minutes and try again. It’s like a toddler having a temper tantrum. Just walk away and come back after it’s had a chance to relax.Sauce goes next. Then a layer of shredded mozzarella and a grating of Parmesan.We used a maple leaf cookie cutter to help us form the roasted grape tomatoes into a leaf shape. Two rows of thinly sliced raw plum tomatoes made a pretty red border.Happy Cannabis Day. Sort of looks more like a cannabis leaf than a maple leaf!
One of my very first restaurant jobs was working on an outdoor charcoal BBQ, as patio grill chef. I learned how to build two-zone fires (hot side and cool side of the grill), how to tell the doneness of the meat by poking it, (not so easy!) and what cuts of beef were best for grilling. Since it was my job to schlep the 50 pound sacs of hardwood charcoal down from the patio’s rooftop, my arms were beautifully toned that summer. The only downside was the black soot that stubbornly remained under my nails, even after scrubbing with bleach and a nail brush. The kitchen staff nicknamed me Cinderella. The smell of musquite in my hair became my signature scent and excited my husband. It was a fun summer!
It was around this time that my husband revealed something to me that made me rexamine our relationship. He told me that when he was in University, he and his friend Joel would get together in his dorm room on Friday night and cook dinner. The night before he’d marinate rib steaks in red wine. Then Friday night, he dumped the steaks and wine it into an electric frying pan, added some dried spices and a tin of sliced mushrooms. He covered the frying pan and basically braised the rib steaks! They thought they were quite the gourmet men about town! Braising rib steaks is a crime. A tender, well marbled piece of beef should never be braised. Luckily I have schooled him in meat cookery and he is now quite skilled in grilling.
I thought I would share with you some of the wisdom I picked up from my Cinderella summer. Here are the Eight Steps to Grilling the Perfect Rib Steak (my personal favourite).
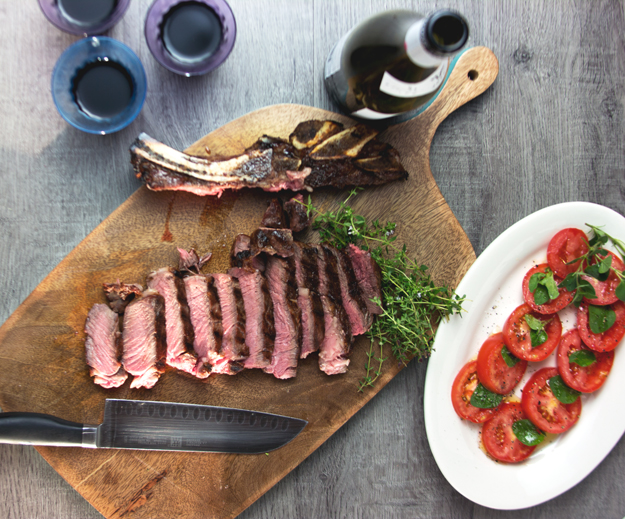
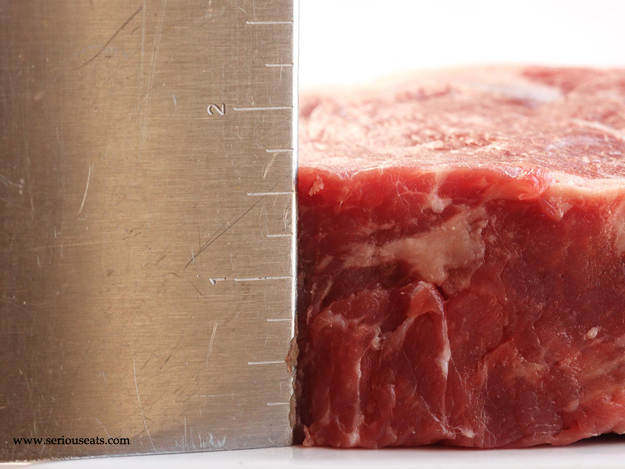
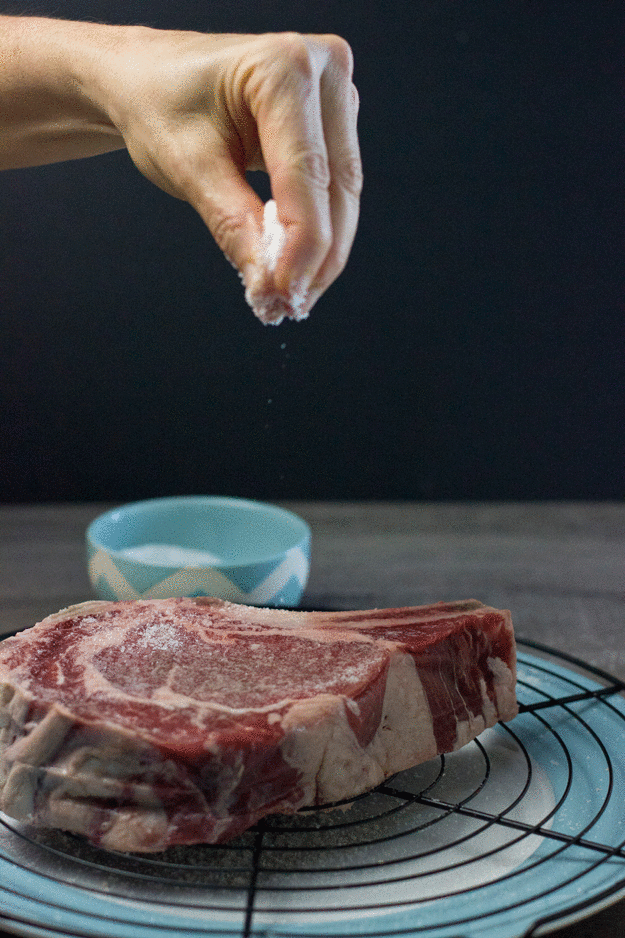
1. Make friends with your butcher. Don’t buy those skinny steaks lined up in the display case. Ask the butcher, very nicely, to please cut you some well marbled steaks between 1 1/2 and 2 inches thick. Yes, that is a big hunk of meat, over a pound, but one of these behemoths will feed 2-3 people,. The only issue might be the fight over who gets to gnaw on the bone. Most butchers won’t mind doing this for you. Some of my favourite people are butchers (Hi Joel and Gabe!)2. Salt early and heavily with Kosher salt. It used to be thought that you should never salt meat ahead of time because it was thought that would cause the juices to leak out and make the meat dry. Turns out that isn’t true. When you first salt the steak, the salt dissolves and sits in a little puddle on top of the meat, but within about an hour, the salt begins to break down the meat’s muscle fibres and the juices will be reabsorbed, along with the salt. The salt contributes to a juicer steak since it helps the cells hold on to water. By salting ahead of time you get meat that is seasoned all the way through and very tender and moist when cooked. The steak does not taste salty, it tastes properly seasoned.3. A Chilling Nap: Once salted, the steak should be set on a wire rack over a baking sheet and refrigerated for at least 4 hours and up to 2-3 days. (I usually do it for overnight). The wire rack allows the air to circulate around the meat and lets the surface get nice and dry. A dry steak will brown much better than a wet one.
And while we’re here, let’s address the “Let meat rest on the counter for 30 minutes, so it can come to room temperature before grilling” myth. Yes, I said myth. First of all, this is a honking’ big piece of meat. After 30 minutes, it may have warmed up by maybe 3°. What really helps with even browning is having a dry piece of meat. And salting it and letting it sit on a wire rack in the fridge overnight is going to do that work for you. So go ahead and cook fridge cold meat. Tell them I said it’s ok.
4. Make it hot! I am only going to address gas grills here. The debate about gas vs. charcoal continues to rage on with the same ferocity as Montreal vs. New York style of bagels. I have cooked on charcoal and I will admit that, if you know what you are doing, you will end up with a stellar steak. There are plenty of tutorials online for how to grill with charcoal, but, “been there, done that”. These days I am all about the ease of a gas grill.
Turn both burners on the gas grill to high. Close lid and give it 15 minutes to it get rip roaringly hot. After 15 minutes, turn the other burner to low.
5. Start High and Finish Low. Start the steaks on the hot side of the grill and cook each side for about 3 minutes, until it is well charred. Then, move it over to the cool side of the grill, close the lid and let it go for another 5 minutes, before checking the temperature.
There is a school of thought out there that advocates for the reverse sear, starting low and finishing high. Meathead Goldwyn of amazing ribs.com has me almost convinced to give it a try.
When you start with high heat, you load up the exterior, and by the time you are done you have a thick band of overcooked meat. If you reverse the order, start the food in the indirect zone at a lower temp, warm everything until it is close to uniform on the inside, and then hit it with Warp 10, you get both a better interior and exterior. That’s reverse sear, and this is another technique you should master. It is the best approach for many foods.
I will report back to you as soon as I try it.
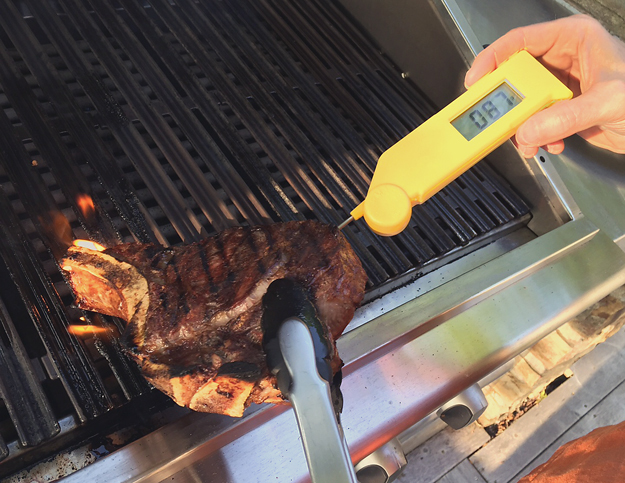
6. Don’t Poke! If you take anything away from this post today, let it be this. Buy yourself an instant read thermometer. This is a great one, and I see that they have just come out with a little sister. Poking the meat to see if it is done is a fool’s game. A thermometer takes all the guesswork out if it, and makes you look like a rock star.
Blue (very, very rare) or, as we call it around here, “Steak for Ed” 105°F
Rare 115°F
Medium Rare 120-130°F
Medium 140°F
Stick the thermometer in the steak from the side into the center, not from the top.7. Let it rest. Put the steak on a plate and cover with foil to let it rest for 5-10 minutes. According to Nathan Myhrvold, James Beard Award winning author of Modernist Cuisine, the resting time down not really allow the the juices to redistribute themselves and get sucked back from the edges to the center. What is really going on here is that as the meat cools, the juices thicken up, so that they stay in the meat, rather than flooding out into your plate.
8. Slice steak, and arm wrestle your partner for the bone.
We are living in a time of some amazing culinary experimentation. While culinary mashups are nothing new, witness the Turducken, which has it’s roots in ancient Roman times, some creations have gone a bit too far.
While I love nothing better than a bowl of Cheetos and a glass of wine for dinner, I am not keen to give Cheetos Macarons a try anytime soon. Nor will Goat Cheese and Peanut Buttercup Fries be passing these lips… not ever!
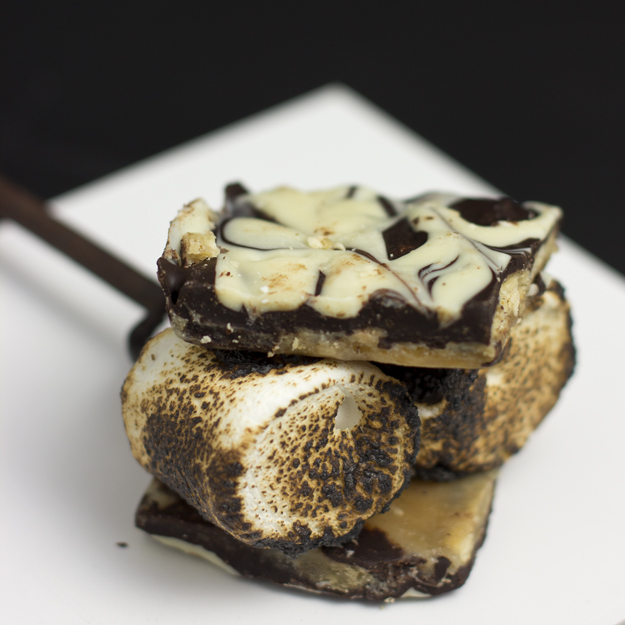
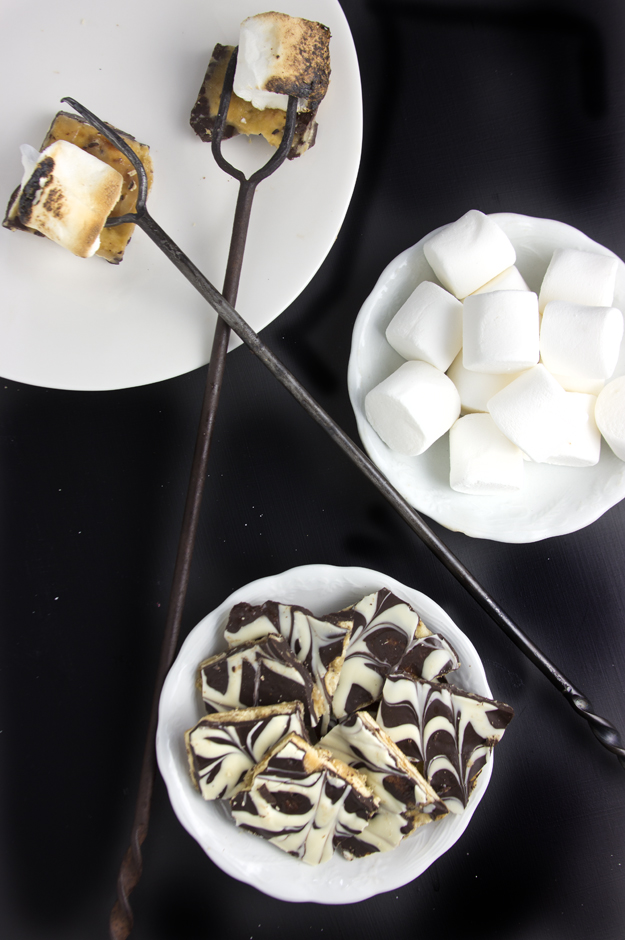
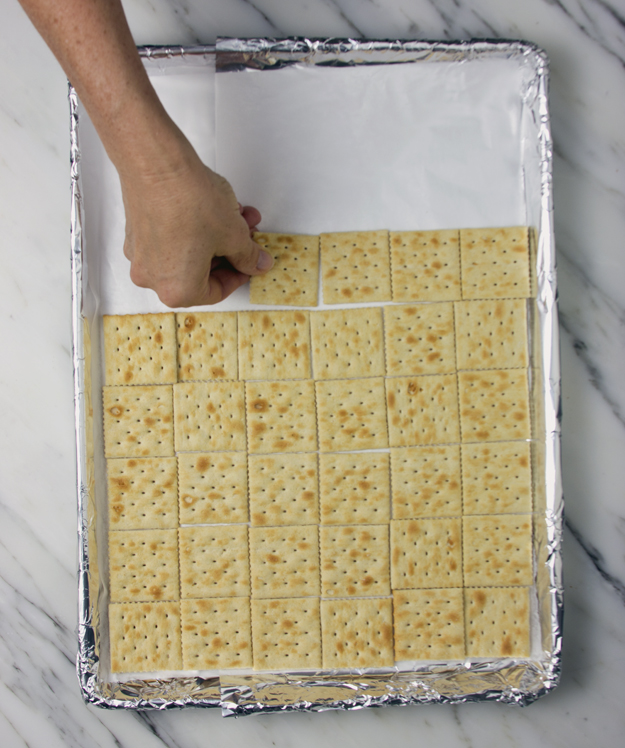
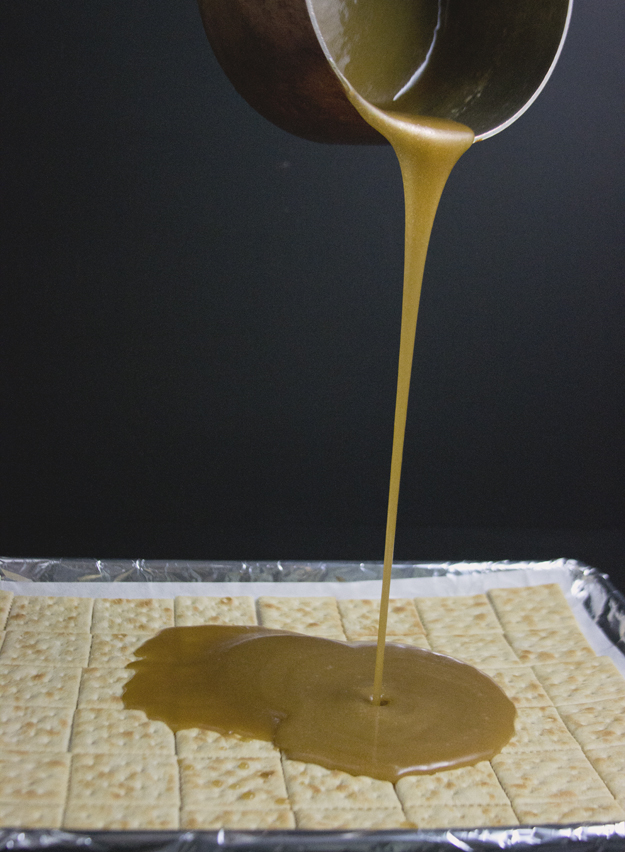
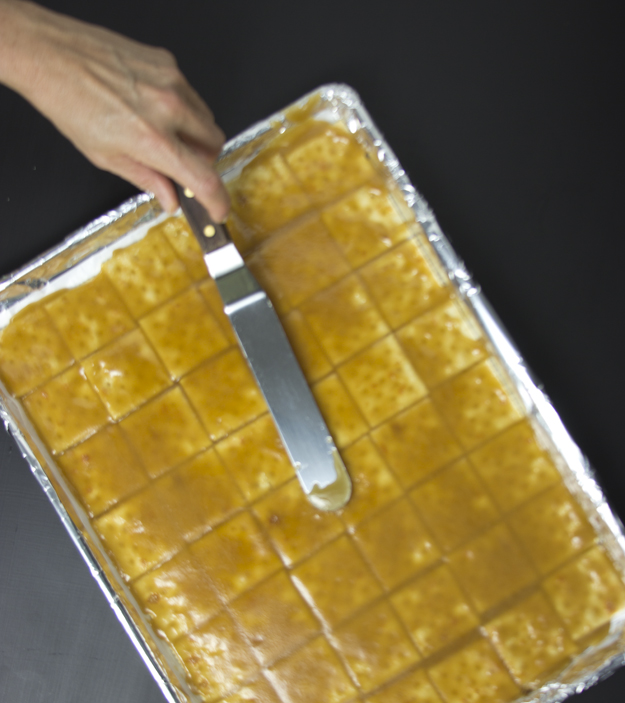
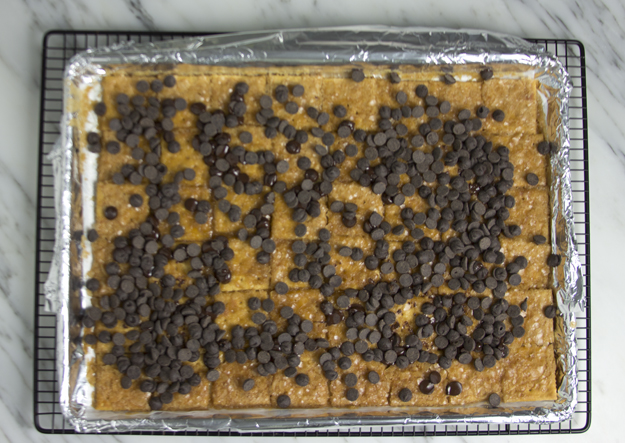
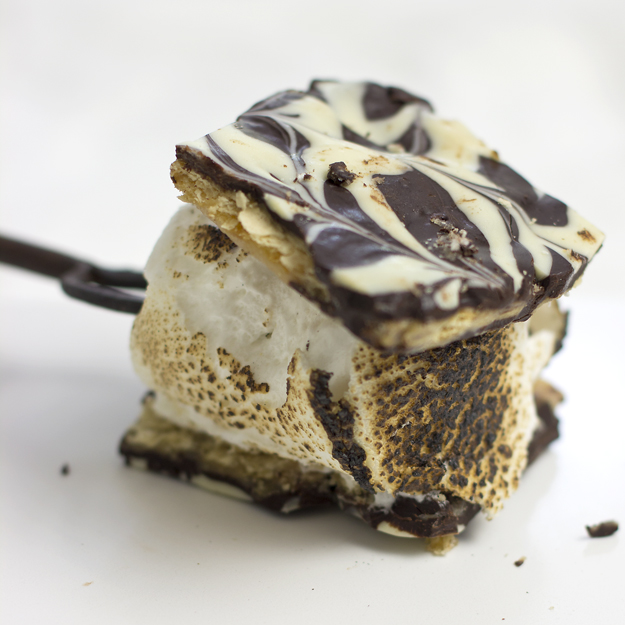
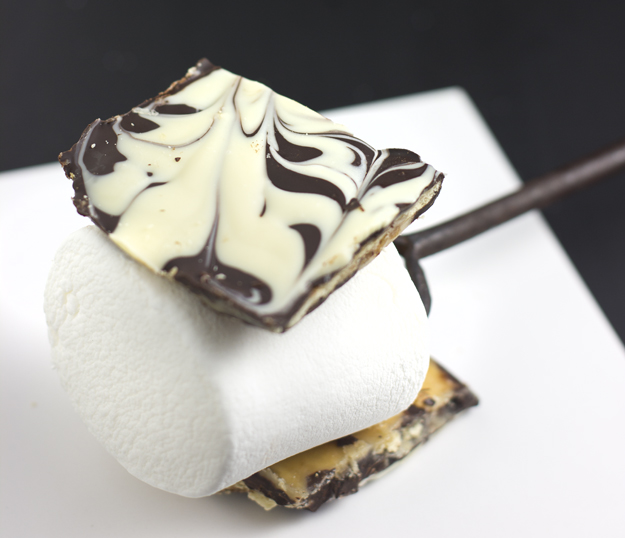
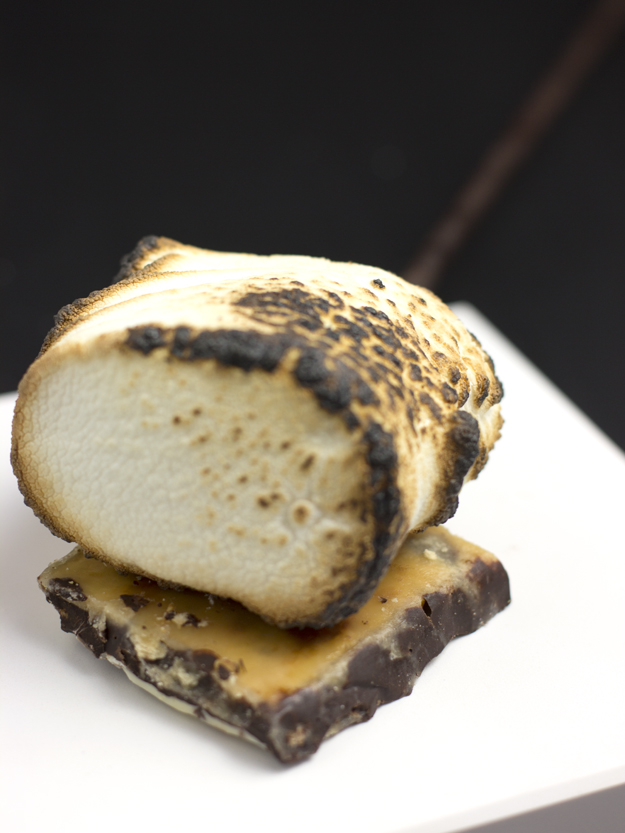
So, in the spirit of culinary creativity, I bring you The Ultimate S’more. Because it’s summer! Because it’s crazy delicious! Do I really need an excuse for taking my favourite Passover snack, Matzoh Crunch and turning it into that summertime staple, the s’more? Instead of using matzoh, I substituted Saltine crackers.I cooked butter and brown sugar until it resembled molten hot lava and poured it over a layer of saltines.I baked it until it was bubbling and then I covered it in bittersweet chocolate and marbled in some white chocolate, just because it’s so freaking beautiful.
Then I toasted some marshmallows and sandwiched them between the caramel chocolate coated crackers. If you are a purist, like my youngest son, you may prefer them raw!If you are watching your carbs, perhaps an open faced sandwich is the way to go.However you enjoy summer, including the Ultimate S’mores in your celebrations is bound to make it a lot sweeter.
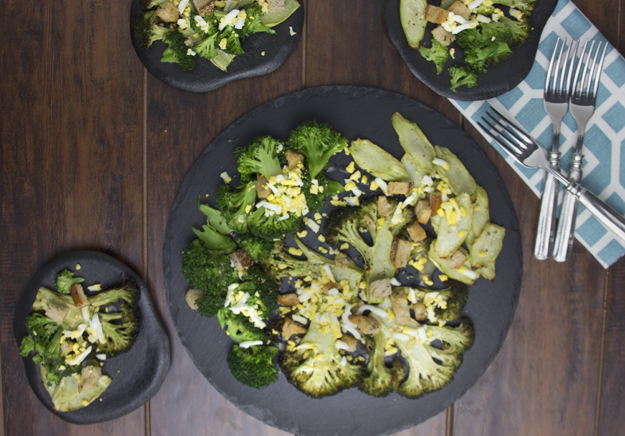
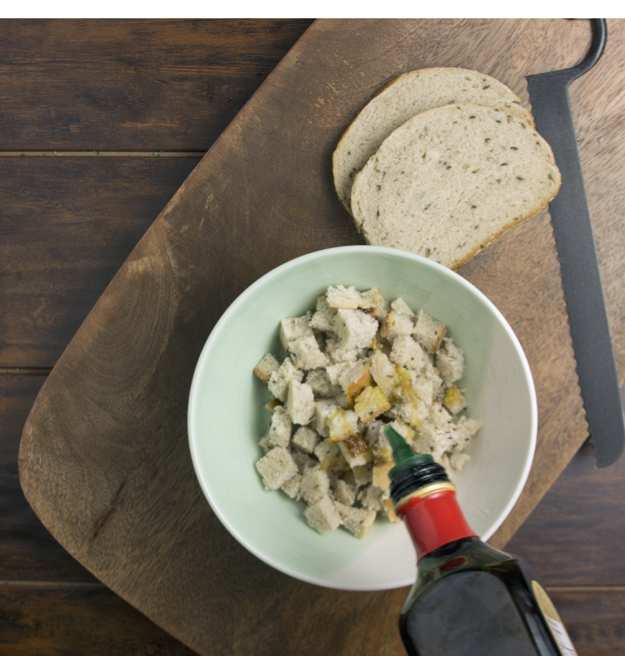
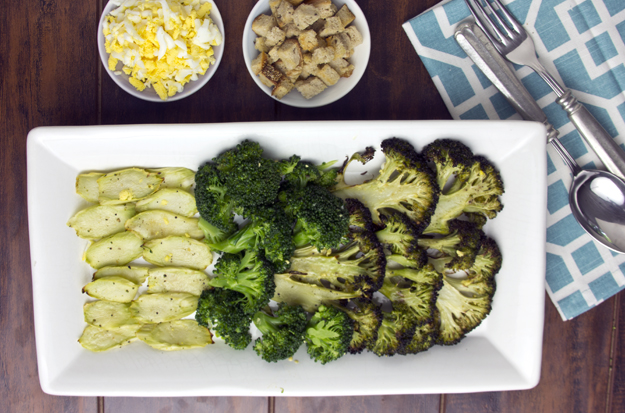
While broccoli might not be the first vegetable you think of for a summer salad, let me be the one to convince you otherwise. With the addition of a warm garlic vinaigrette and a garnish of grated hard boiled eggs and crunchy salty rye bread croutons, it’s the perfect warm weather side dish.
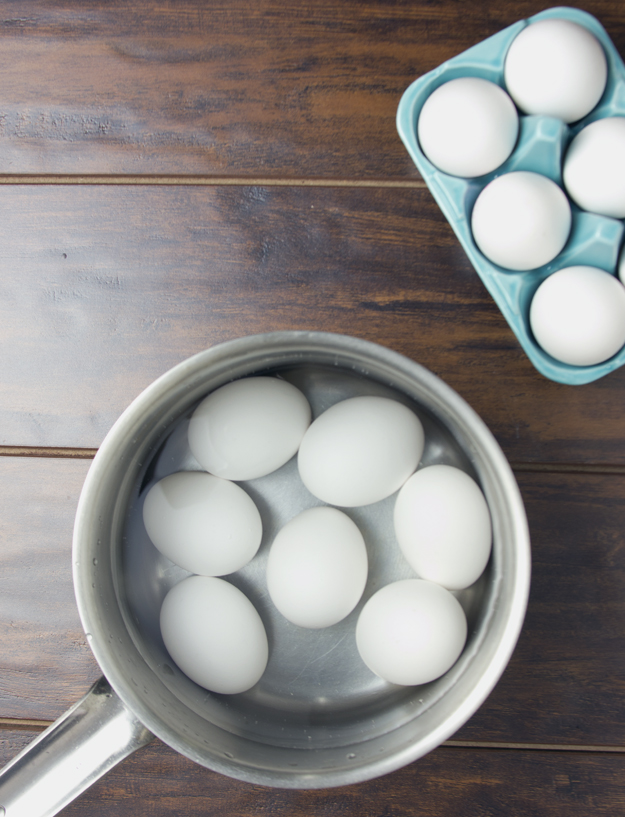
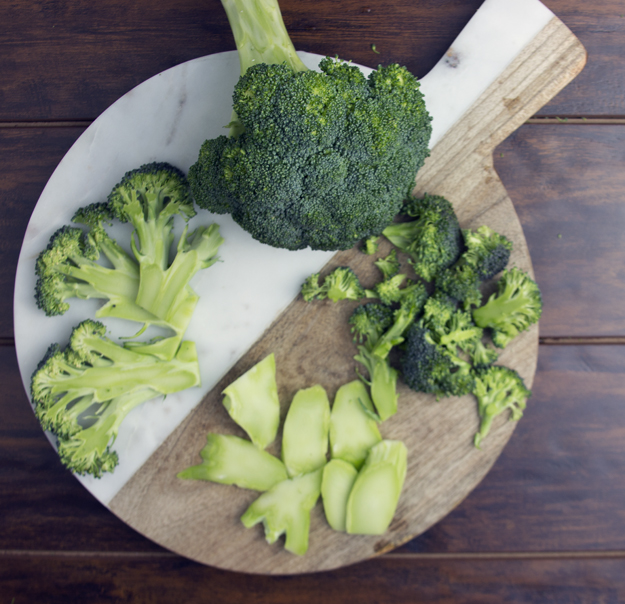
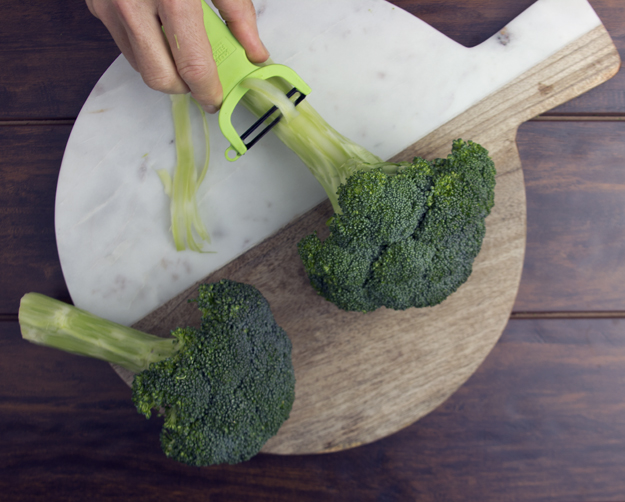
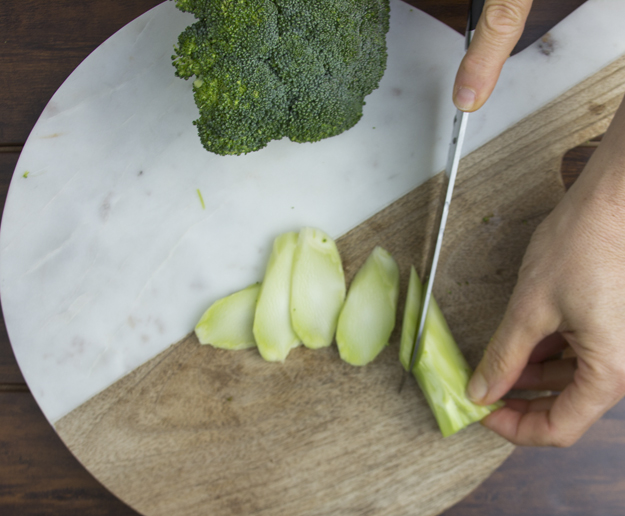
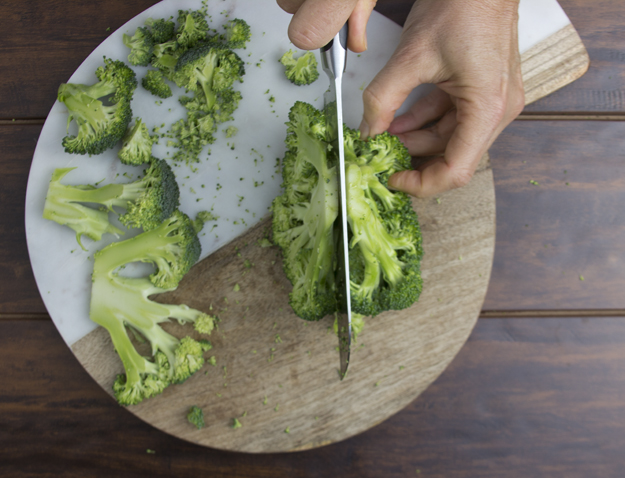
Start with hard boiling the eggs. I am a hard boiled egg pro. No green or grey rim around the yolk ever! It was my responsibility to hard boil a gross (don’t see that word used very much anymore! ) of eggs every morning at my very first restaurant job. Here’s how to make perfect ones every time. Place eggs in a pot. Cover with cold water. Bring to a boil. Put lid on pot and remove pot from the heat. Let sit, covered for 12 minutes. Drain, rinse eggs under cold water and peel as needed. Next, dissect the broccoli. Peel the stems and cut into diagonal coins. Cut the head of the broccoli into thick 1/2 inch planks. These broccoli planks remind me of the storybook character Flat Stanley. If you have never heard of him, check out this link. I have always wanted to possess this super power of making myself totally flat so that I could slide under locked doors and snoop where I shouldn’t! What super hero power do you wish you had?As you slice the planks, little bits of florets will fall off. Set them aside for boiling or steaming. They are too tiny and tender for roasting.
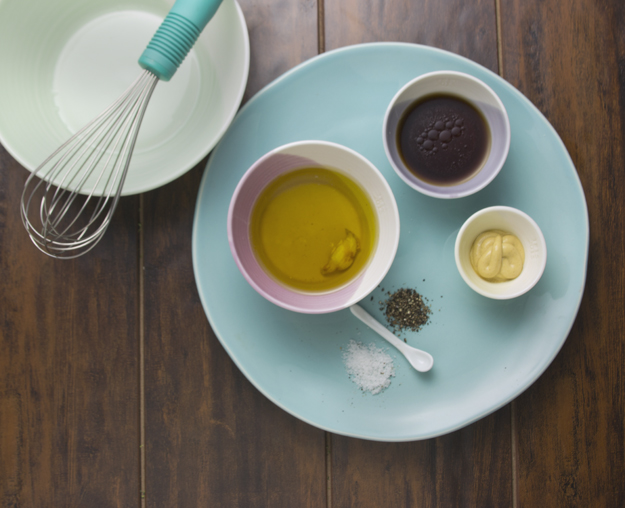
A few glugs of extra virgin olive oil, a liberal sprinkling of kosher salt and freshly ground black pepper, and the sliced stems and flat planks ready for roasting.Toast some rye bread croutons while the broccoli is roasting. Whisk together a warm garlic-mustard vinaigrette.Arrange the roasted and steamed broccoli on a platter. Drizzle with the tangy dressing and garnish with the egg and croutons. Each bite is a perfect combination of textures and flavours. The roasted broccoli brings a charred, smoky bite. The verdant steamed broccoli adds a bit of freshness. Hard boiled eggs add creaminess and the rye croutons add salt and crunch, always welcome at any party. The tangy Dijon garlic vinaigrette wakes up your taste buds.
My husband arrived home from work last week with a gift for me. From the sound of my squeal when I opened the package, you would have thought the box held a large square cut diamond ring. Nope. Just a jar of maple salt.
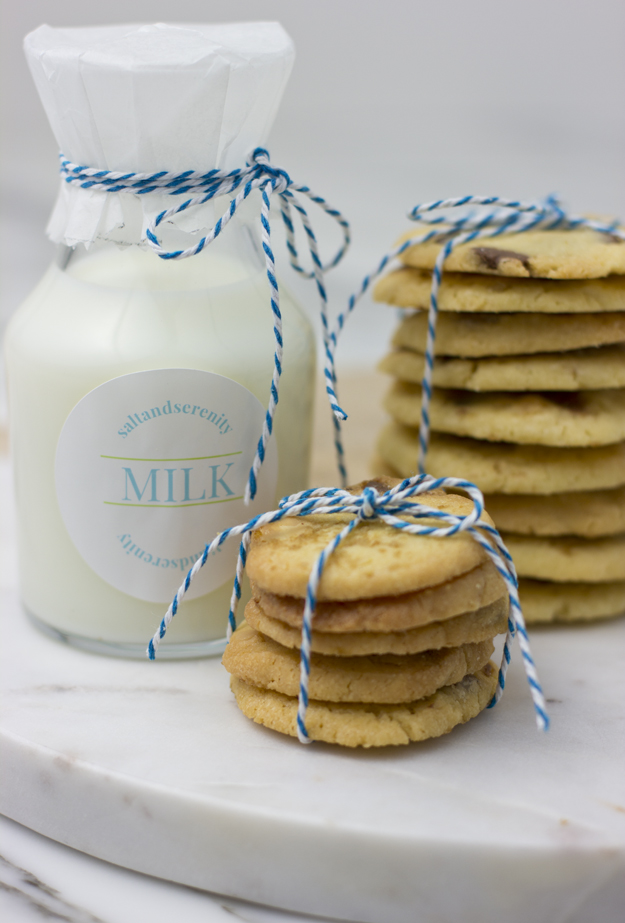
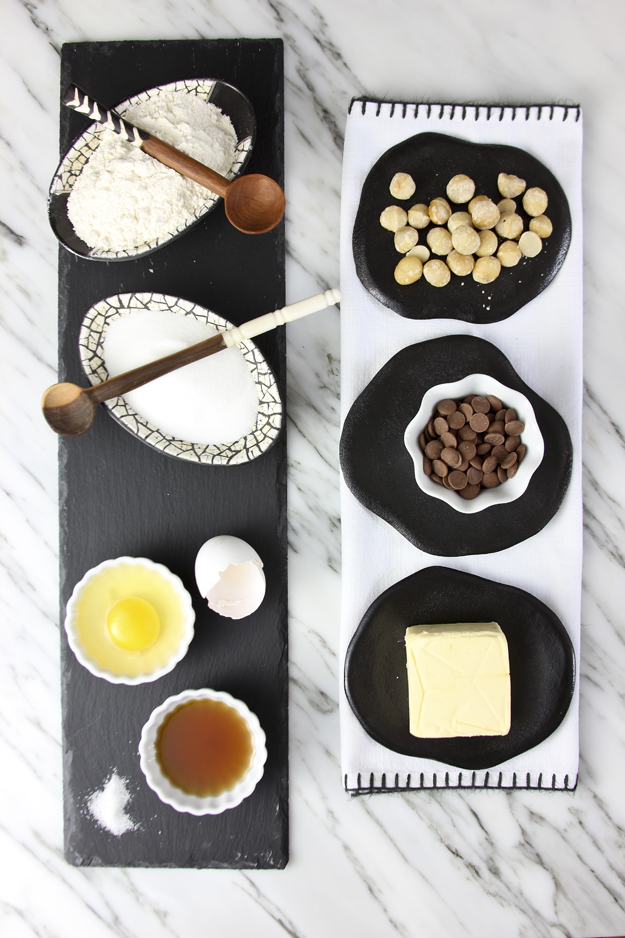
Yes, I said maple salt!! Who knew? My mind was reeling with the possibilities. Maple glazed chicken thighs finished with a sprinkle of maple salt, salmon with a maple soy glaze and strewn with a light dusting of maple salt, maple salted pecans? I settled on maple macadamia milk chocolate cookies, finished with a fine mist of maple salt. Maple syrup would be the natural addition to give these cookies a serious maple bent, but too much syrup would make the dough too soft and liquidy. The solution was to add maple extract to the dough. I added almost 1 1/2 teaspoons and it was perfect.
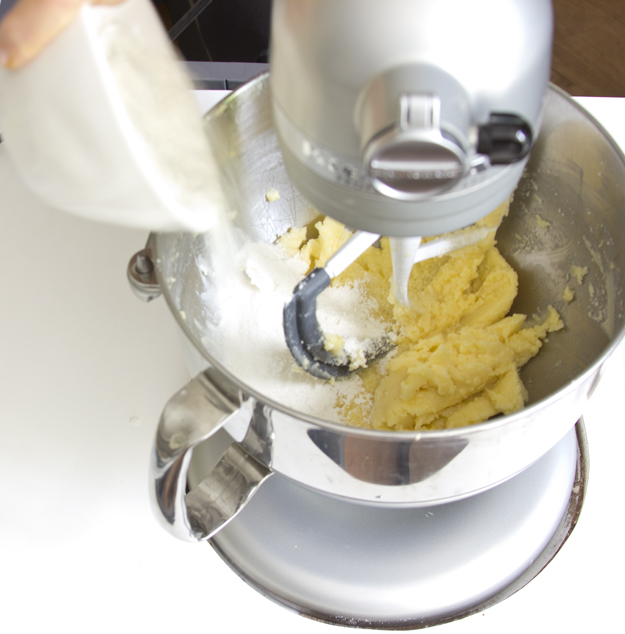
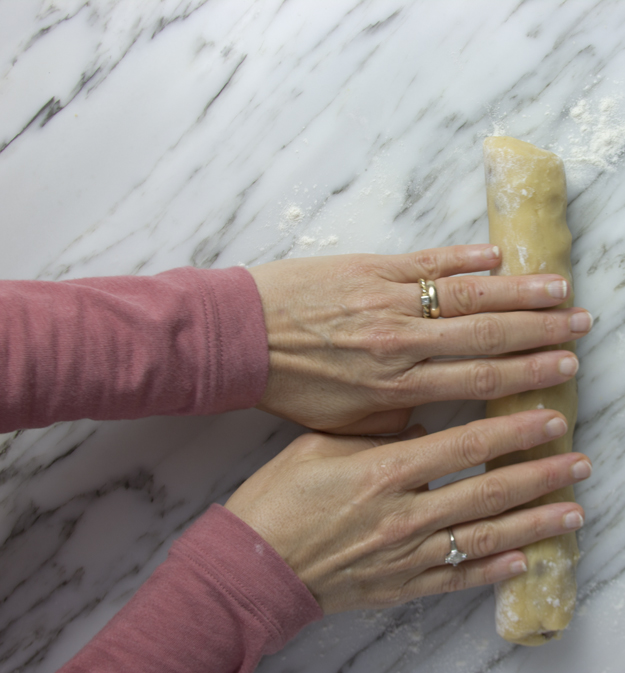
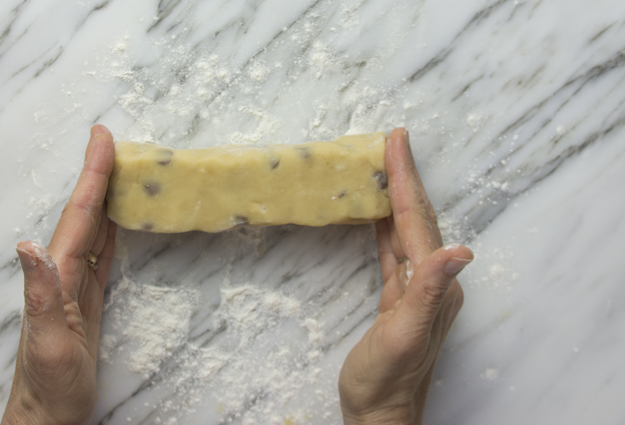
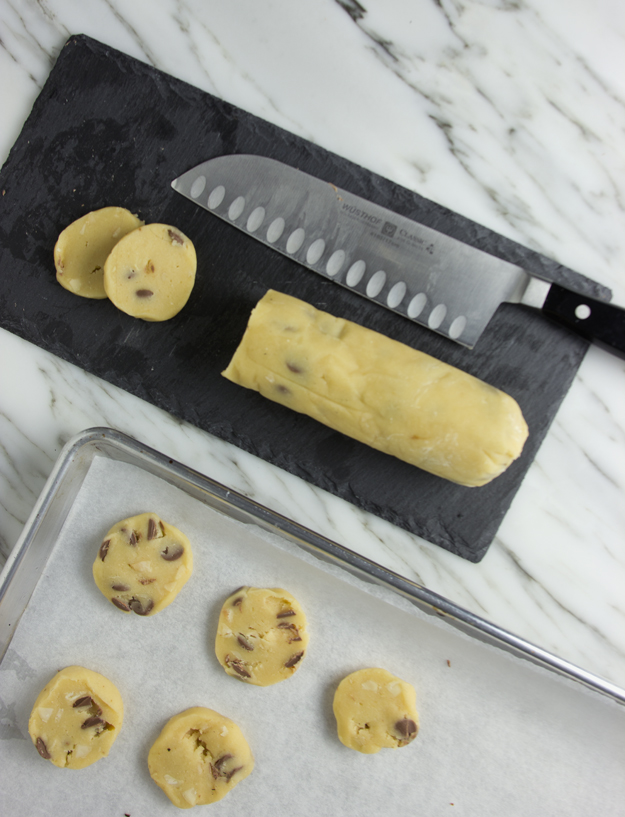
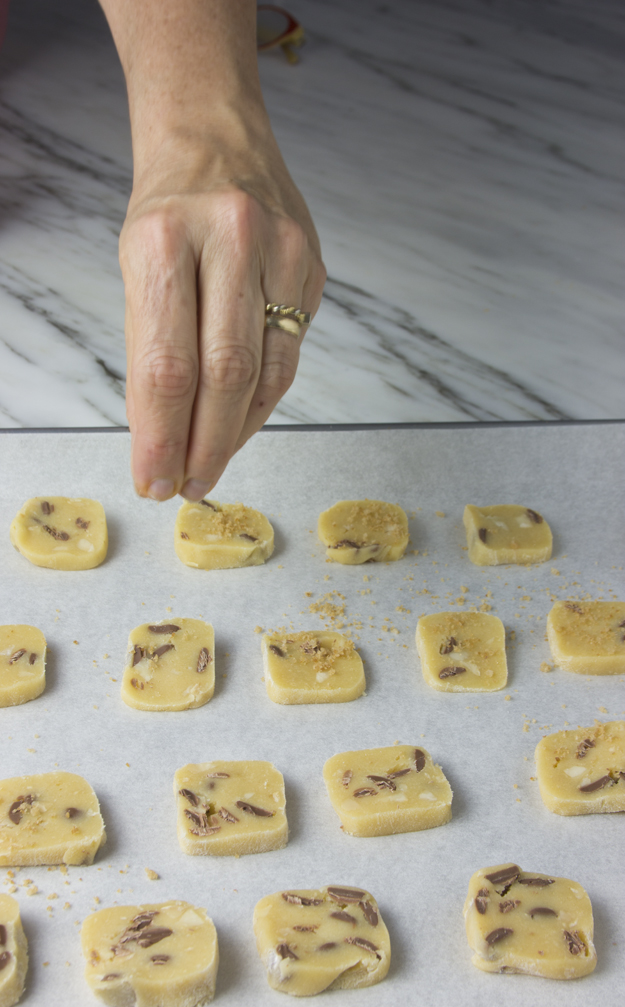
This recipe was adapted from the Lindt chocolate web site. The dough came together quite quickly in my stand mixer.I formed one round log and one square log (check out this video if you need help forming a square log). If you are impatient like me, freeze for 2 hours. If not, chill dough in fridge for 6 hours or even overnight. Slice, top with maple salt or just regular fleur de sel, and bake.Be patient and let them cool completely before tasting. They spread quite a bit in the oven. They are quite thin and you will be utterly surprised that such a thin and delicate cookie can pack such a wallop of deep maple flavour. Buttery and crispy, these cookies are really unique. The tiny crystals of maple salt crunch delicately between your teeth and keep you craving more. You can find maple salt online at Saltworks (in the USA), or at Maison Côté in Canada.
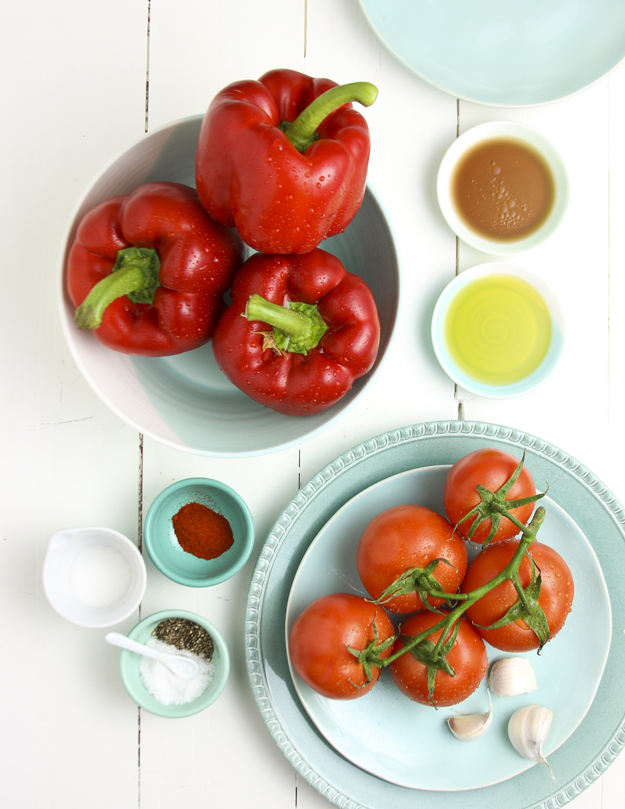
It probably wouldn’t shock you to learn that I am a very organized person. Each spring, I dump out the stale spices in my alphabetized drawer and buy fresh ones. The only one I never have to toss is the smoked paprika. I go through that stuff on a stunningly regular basis. It make everything taste better. It typically sneaks it’s way onto roasted vegetables, like cauliflower, sweet potatoes, squash and carrots. I recently made a smoked paprika and garlic vinaigrette that took roasted broccoli to another dimension.
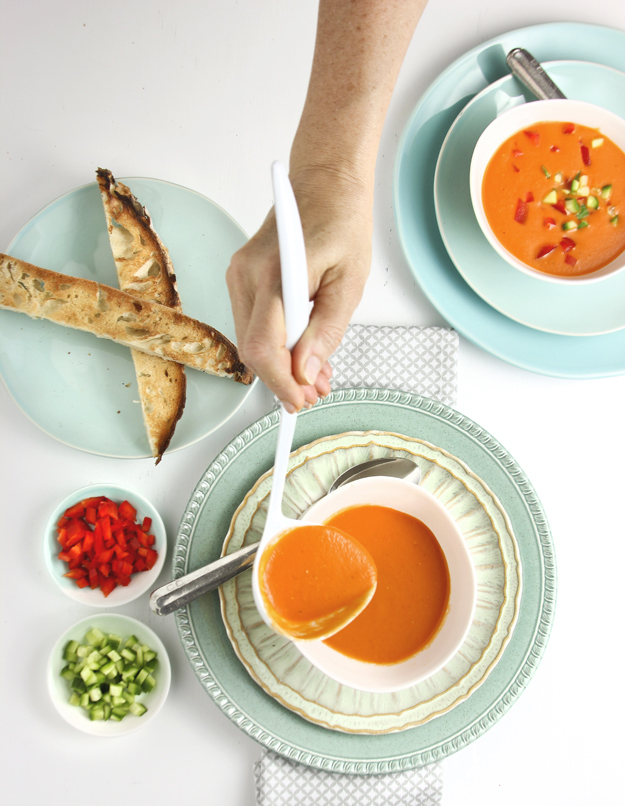
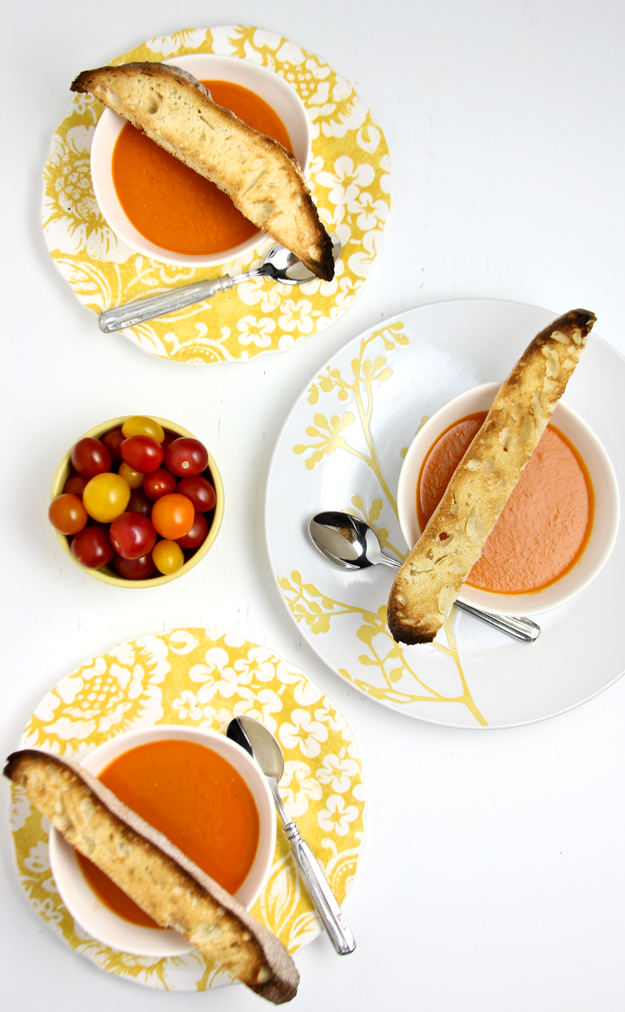
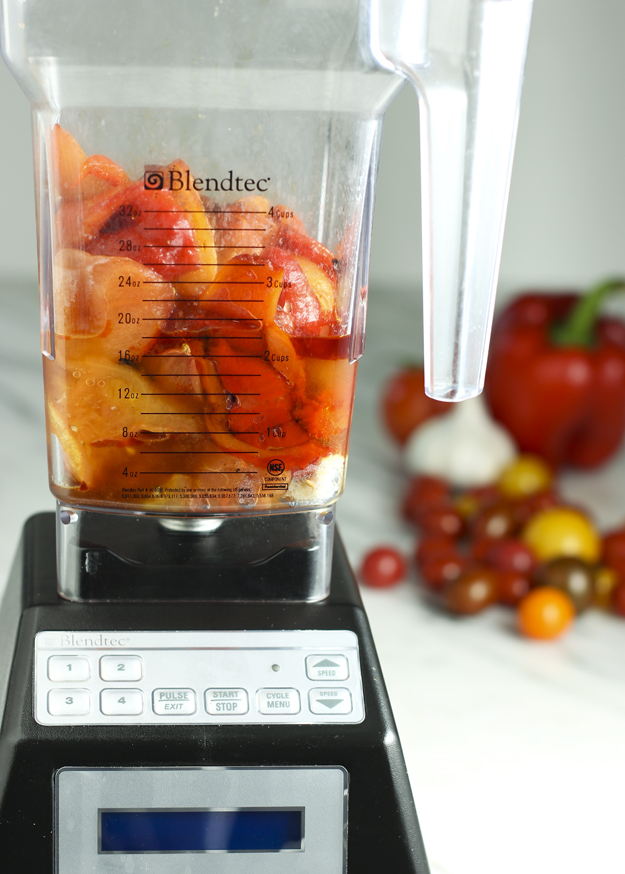
Smoked paprika has that transcendent ability to take a dish to a very delicious new height.This soup was adapted from a roasted vegetable gazpacho that I stumbled upon while browsing through Donna Hay’s Modern Classics: Book 1. I have most of her books and regularly use them for styling and photography inspiration. Her collaboration with photographer Con Poulos has created multitudes of awe inspiring images.
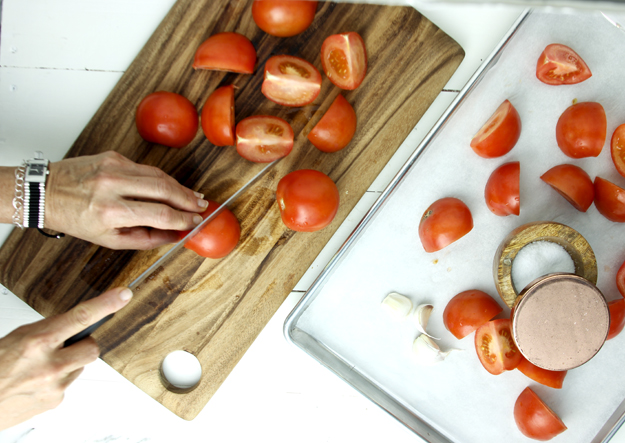
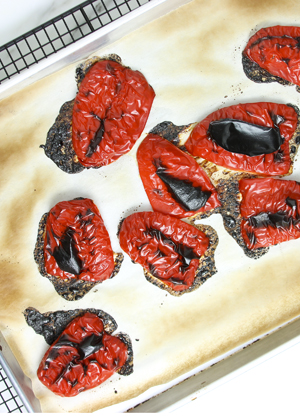
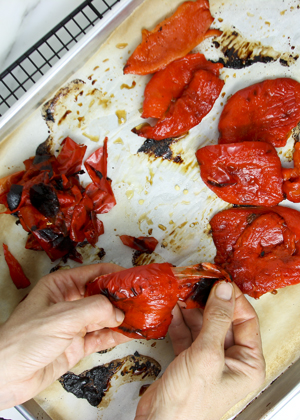
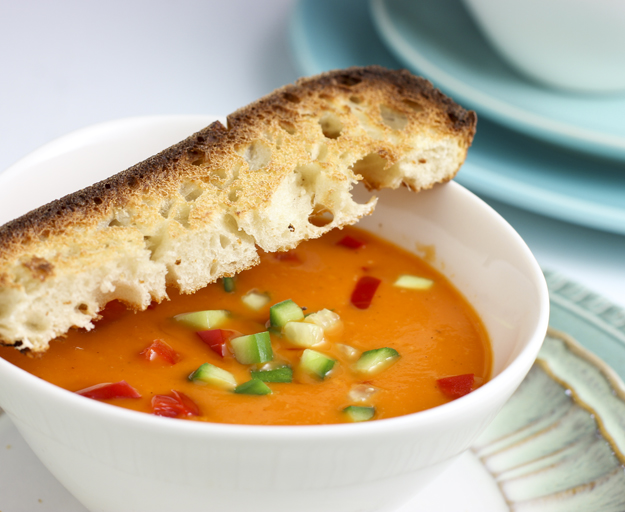
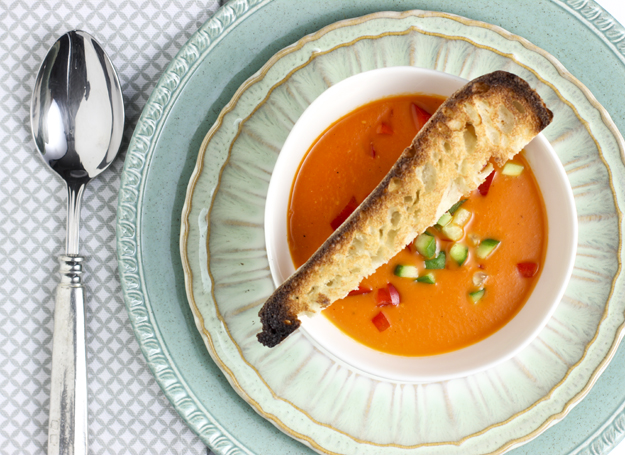
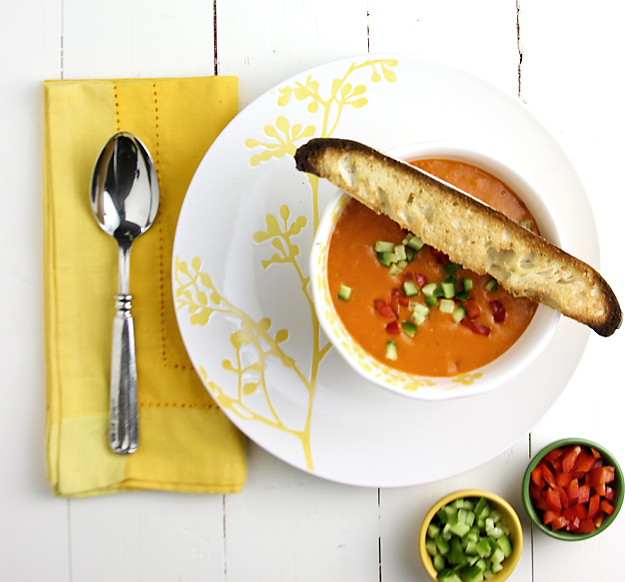
Donna’s soup was heavy on the roasted red peppers and light on the roasted tomatoes. I flipped this because I love tomatoes way more than peppers. When I saw the addition of smoked paprika, I knew I had to try it.After blending I took a taste and decided that the heat and smoky flavour needed to be boosted. A teaspoon of my favourite chipotle tabasco made all the difference! Additional smokiness without painful heat.I diced up some red peppers and cucumbers to garnish the soup and served it with some grilled sourdough for dipping. After chilling in the fridge overnight the soup was even richer and deeper in flavour the next day.

 I like to think of green beans as the little black dress (LBD) of the vegetable world. Just as versatile as a LBD, green beans can get get dressed in so many different ways. Accessorized with dill, celery and an apple cider vinaigrette, green beans are casual and ready for a backyard BBQ. Adorn them up with blood oranges, hazelnuts and a sherry vinaigrette, and they are perfect for a formal dinner (pearls optional). Tart them up with spicy chiles, almonds and a soy- honey dressing and they are all set for a hot date.
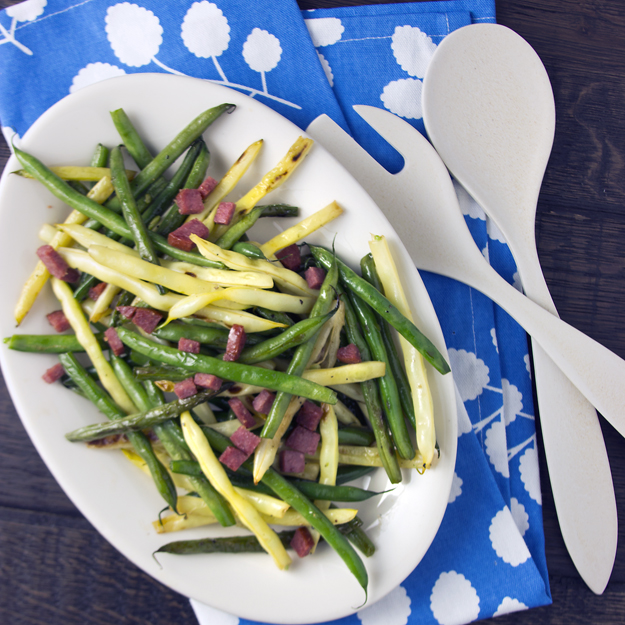 As I perused Chef Josh’s recipe, I did a double take reading the instructions. Put the salami in the blender. Really??? Remember that episode of The Chew when host Carla Hall wonders “Can you blend it?” and then proceeds to puree leftover chicken pot pie? Well, blended salami vinaigrette is way better than that. Surprisingly delicious. It adds richness and an unctuous quality to the beans.
 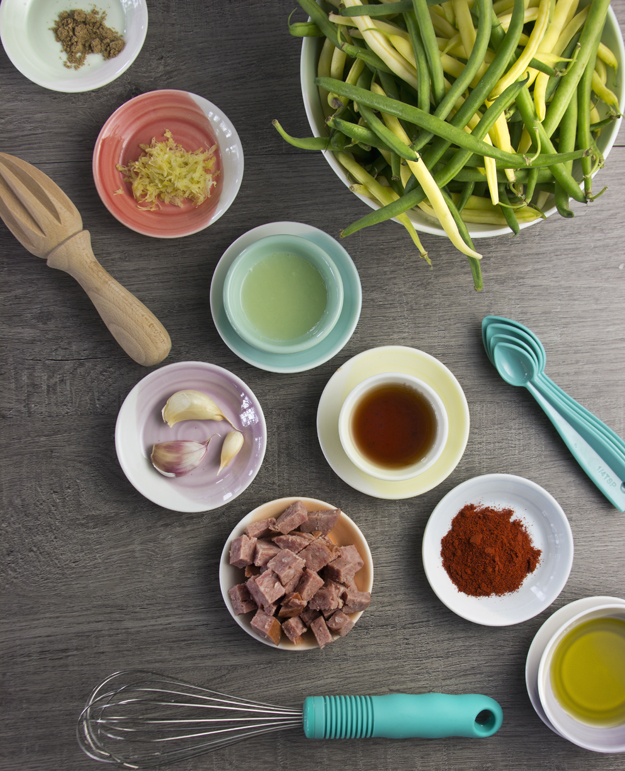 The pureed dressing is a rather vibrant orange colour, thanks to the paprika, but don’t let it scare you. Press on!
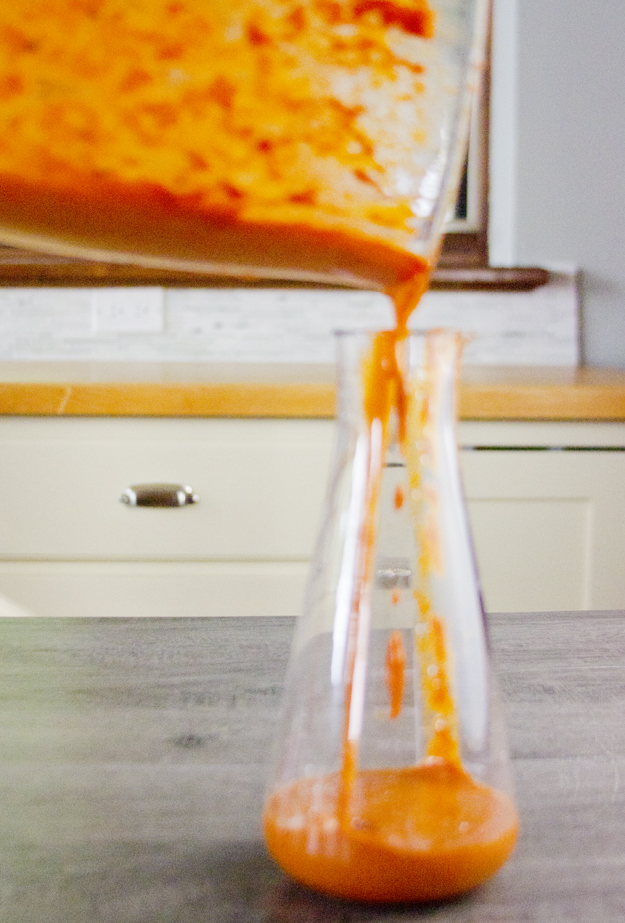
 I decided to add a touch more salami , crisping up little cubes to use as a sort of meat crouton.
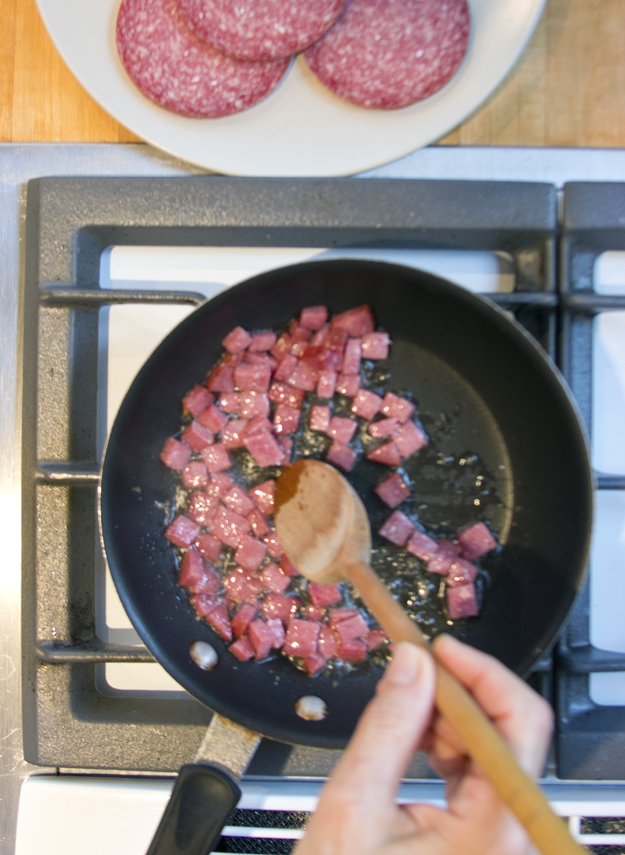 The first time I made this we added chick peas to the dish to up the protein content. As my sister Bonnie says, “Chick peas make everything better.” For this photo shoot, I left them out.